Sponsors


Building a home page with Angular 2
Static HTML home pages are so boring, but what happens when you add the power of Angular 2?
Whenever a web developer desires to build a web application or a website for the client, they need to create the prototype of the home page in the head, because this is the page that one sees when they visit the website through the domain name.
Home pages are the backbones of the websites, no matter what kind of website you are trying to build, so for example, if you are developing a blog, then your homepage will contain new articles/blogs in the homepage that updates dynamically. If you are a service vendor or someone who is selling a product, you will mention the features or benefits of the products on the home page. Thus one could assume that the chances of the audience spending a lot of time on your website depends on the quality of your home page.
In my previous article, I have talked about the AngularJS 1 and Angular 2 (through examples). I am sure you are now able to see the benefits of new AngularJS 2, but simple contact forms (and grids) are not enough for a good working website, after all, in order for your audience to enjoy the website, they need something to glance over. Even though there are many video tutorials on the AngularJS website, it may be difficult to follow them, as many programmers prefer the clear written instructions.
Thus, in this article, I am going to show you how to build a home page with AngluarJS 2. I won't be covering AngularJS 1, because I believe most have already moved to the new versions. Let's get started!
Building a home page with AngularJS 2
We will use the previous template that you can download from here (https://github.com/buckyroberts/angular-2-template). Before we start, you need to understand the structure of the website. We are going to build a website that sells hosting and domains at various prices with different packages. If you visit the famous hosting/domain websites like GoDaddy, Namecheap, HostGator, etc., then you will realize that all follow the similar structure; they all have the menu bar in the header, then the main content page that contains the information on the different packages, followed by the footer that has the sitemap of the website.
The structure approximately looks like the following:
<----------------------------------Header-------------------------->

<----------------------------------Navigation---------------------->

<----------------------------------Content------------------------->

<----------------------------------Footer-------------------------->
We will design a title bar in the Header, menu bar in the Navigation, package details in the Content and finally the site information and contact details in the Footer.
Following should be the structure of the previous template project that we used in the previous article: (move the "login-template.html" from the root folder to "app/ts" and change it to "contact-form.html")
angular-template
-> app

 -> -> ts

 -> -> -> app.component.ts

 -> -> -> main.ts

 -> -> -> contact-form.html

 -> ->

 -> index.html

 -> package.json

 -> README.md

 -> tsconfig.json

 -> typings.json
We know that Components are the backbone of the AngularJS2. Components are designed in ".ts" files, however, its HTML implementation is defined in its HTML counterpart. So we will create a new HTML file "app.component.html" for our "app.component.ts". Paste the following code:
app.component.html
<body>

<div id="fixedheader"><menu-page></menu-page></div>

<packages></packages>

<div id="fixedfooter"><contact-form></contact-form></div>

<div id="extratext">

<p style="text-align:left;">

©MyFavoriteHosting.com

<span style="float:right;">2014-2016</span>

</p>

</div>

</body>
This is the layout of our website, but this is just a HTML file, which we will refer in "app.component.ts". The code is pretty much self-explanatory. Now create a file called "menu-bar.component.html" and paste the following code:
menu-bar.component.html
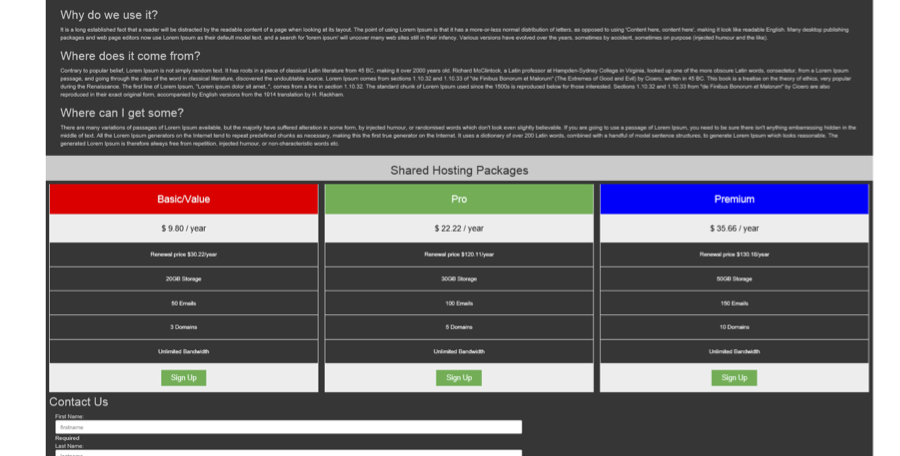
<div id="titlebar"> <h2 align="center">Welcome to our site!</h2> </div>

<ul class="topnav">

  <li><a class="active" href="#home">Home</a></li>

  <li><a href="#blog" (click)="clickBlog()">Blog</a></li>

  <li><a href="#packages">Packages</a></li>

  <li><a href="#contact">Contact</a></li>

  <li class="right"><a href="#about" (click)="clickAbout()">About</a></li>

</ul>

<div style="padding:0 16px;">

<h2>What is Lorem Ipsum?</h2>

Lorem Ipsum is simply dummy text of the printing and typesetting industry. Lorem Ipsum has been the industry's standard dummy text ever since the 1500s.....

<h2>Why do we use it?</h2>

It is a long established fact that a reader will be distracted by the readable content of a page when looking at its layout.....

<h2>Where does it come from?</h2>

Contrary to popular belief, Lorem Ipsum is not simply random text....

<h2>Where can I get some?</h2>

There are many variations of passages of Lorem Ipsum available, but the majority have suffered alteration in some form.....


</div>
In this file, I have built the menu bar through the HTML lists. You can see that I am using "Lorem Ipsum" text currently which is nothing but a standard text code that is normally used for testing how a text is shown on the media. You can use your personal text/writing if you want. Now create a file "menu-bar.component.ts" and paste the following code:
menu-bar.component.ts
import {Component} from 'angular2/core';

@Component({

                  selector: 'menu-page',
                  templateUrl: 'app/ts/menu-bar.component.html',
                  styles: [`
                  body {margin: 0;}
                  #titlebar {
                                    background-color: white;
                                    color: black;
                                    width: 100%;
                                    height: 100%;
                  }

                  ul.topnav {
                                    list-style-type: none;
                                    margin: 0;
                                    padding: 0;
                                    overflow: hidden;
                                    background-color: #333;
                  }

                  ul.topnav li {float: left;}

                  ul.topnav li a {
                                    display: block;
                                    color: white;
                                    text-align: center;
                                    padding: 14px 16px;
                                    text-decoration: none;
                  }

                  ul.topnav li a:hover:not(.active) {background-color: #111;}
                  ul.topnav li a.active {background-color: #4CAF50;}
                  ul.topnav li.right {float: right;}

                  @media screen and (max-width: 600px){
                                    ul.topnav li.right,
                                    ul.topnav li {float: none;}
                  }

    `]

})

export class MenuBarComponent {
                  clickBlog() {
                    alert('Blog is clicked!');
                  }
                  clickAbout() {
                    alert('About is clicked!');
                  }
}
Here, I am using "style" decorator in the @Component to add the styling. This is a nice way of separating the CSS code from the HTML code. You can also use "styleUrls" to refer to the external CSS sheet.
Apart from it, I just assign the selector to "menu-page" and template to its HTML part. This is the standard way to add the new components in AngularJS 2, which mean you usually need two files: component.ts file and its HTML counterpart. Let's do the same for our hosting plan packages. Create two files, "packages.component.html" and "packages.component.ts".
packages.component.html
<h2 align="center">Shared Hosting Packages</h2>

<div id="packages">
<div class="columns">
  <ul class="price">
    <li class="header" style="background-color:#FF0000">Basic/Value</li>
    <li class="grey">$ 9.80 / year</li>
                  <li>Renewal price $30.22/year</li>
    <li>20GB Storage</li>
    <li>50 Emails</li>
    <li>3 Domains</li>
    <li>Unlimited Bandwidth</li>
    <li class="grey"><a href="#" class="button">Sign Up</a></li>
  </ul>
</div>

<div class="columns">
  <ul class="price">
    <li class="header" style="background-color:#4CAF50">Pro</li>
    <li class="grey">$ 22.22 / year</li>
                  <li>Renewal price $120.11/year</li>
    <li>30GB Storage</li>
    <li>100 Emails</li>
    <li>5 Domains</li>
    <li>Unlimited Bandwidth</li>
    <li class="grey"><a href="#" class="button">Sign Up</a></li>
  </ul>
</div>

<div class="columns">
  <ul class="price">
    <li class="header" style="background-color:#0000FF">Premium</li>
    <li class="grey">$ 35.66 / year</li>
                  <li>Renewal price $130.18/year</li>
    <li>50GB Storage</li>
    <li>150 Emails</li>
    <li>10 Domains</li>
    <li>Unlimited Bandwidth</li>
    <li class="grey"><a href="#" class="button">Sign Up</a></li>
  </ul>
</div>
packages.component.ts
import {Component} from 'angular2/core';

@Component({
                  selector: 'packages',
                  templateUrl: 'app/ts/packages.component.html',
                  styles: [`
                  * {
                                    box-sizing: border-box;
                  }
                  .columns {
                                    float: left;
                                    width: 33.3%;
                                    padding: 8px;
                  }
                  .price {
                                    list-style-type: none;
                                    border: 1px solid #eee;
                                    margin: 0;
                                    padding: 0;
                                    -webkit-transition: 0.3s;
                                    transition: 0.3s;
                  }
                  .price:hover {
                                    box-shadow: 0 8px 12px 0 rgba(0,0,0,0.2)
                  }
                  .price .header {
                                    background-color: #111;
                                    color: white;
                                    font-size: 25px;
                  }
                  .price li {
                                    border-bottom: 1px solid #eee;
                                    padding: 20px;
                                    text-align: center;
                                    color: white;
                  }
                  .price .grey {
                                    background-color: #eee;
                                    font-size: 20px;
                                    color: black;
                  }
                  .button {
                                    background-color: #4CAF50;
                                    border: none;
                                    color: white;
                                    padding: 10px 25px;
                                    text-align: center;
                                    text-decoration: none;
                                    font-size: 18px;
                  }

                  @media only screen and (max-width: 600px) {
                                    .columns {
                                                      width: 100%;
                                    }
                  }
    `]
})

export class PackagesComponent {

}
This is the code of our package details. It should be self-explanatory. We have defined the HTML file and added the required code in it, then we defined its counterpart .ts file and applied the CSS styling. Now, let's add our contact form from the previous article (which we have changed its name from "login-template").
contact-form.component.html
<h2>Contact Us</h2>

<div id="contact">

<form [ngFormModel]="studentForm" class="form-horizontal" id='myForm' role="form">

    <div class="col-md-7">
       First Name: <input ngControl="firstname" #firstname="ngForm" [(ngModel)]="user.firstname" type="text" placeholder="firstname" class="form-control">

       <span [hidden]="firstname.valid"><b>Required</b></span>
    </div>
                  <div class="col-md-7">
       Last Name: <input ngControl="lastname" #name="ngForm" [(ngModel)]="user.lastname" type="text" placeholder="lastname" class="form-control">

       <span [hidden]="lastname.valid"><b>Required</b></span>
    </div>
    <div class="col-md-7">
       Password: <input ngControl="password" #password="ngForm" [(ngModel)]="user.password" type="text" id="password" placeholder="password" class="form-control">
       <span [hidden]="!password.control.hasError('required')"><b>Required</b></span>
       <span [hidden]="!password.control.hasError('startsWithNumber')"><b>Must start with number</b></span>
    </div>
                  <div class="col-md-7">
       Email: <input ngControl="email" #email="ngForm" [(ngModel)]="user.email" type="text" id="email" placeholder="email" class="form-control">
       <span [hidden]="!email.control.hasError('required')"><b>Required</b></span>
    </div>
</form>
</div>
<br />
Valid: {{studentForm.valid }} <br />

<br />

<button type="button" (click)="addNewGroup(user)" class="btn btn-primary btn-lg" data-dismiss="modal"> Submit</button>
contact-form.component.ts
import {Component} from 'angular2/core';
import {CORE_DIRECTIVES, NgClass, FORM_DIRECTIVES, Control, ControlGroup, FormBuilder, Validators} from 'angular2/common';
import {Config} from './config.service';
import {MenuBarComponent} from './menu-bar.component';
import {PackagesComponent} from './packages.component';

class User {
   firstname:string;
   lastname:string;
   password:string;
   email:string;
}

interface ValidationResult {
 [key:string]:boolean;
}

// Check if the passworkd starts with Number
class PasswordValidator {
 static startsWithNumber(control: Control): ValidationResult {
   if ( control.value && control.value.length > 0){
     if (isNaN(control.value[0]))
      return { 'startsWithNumber': true };
   }
   return null;
 }
}

@Component({
                  selector: 'contact-form',
                  templateUrl: 'app/ts/contact-form.component.html'
})

export class ContactFormComponent {
                  user:User;
                  studentForm: ControlGroup;
                  constructor(fb: FormBuilder){

    this.user = new User();
    this.studentForm = fb.group({
       'firstname': new Control(this.user.firstname, Validators.required),
                     'lastname': new Control(this.user.lastname, Validators.required),
       'password': new Control(this.user.password, Validators.compose([Validators.required,PasswordValidator.startsWithNumber])),
                     'email': new Control(this.user.email, Validators.required)
    });
  }

  addNewGroup(user:User) {
    if (this.studentForm.valid) {
      alert('added ' + user.firstname + user.lastname + user.password + user.email);
      this.user = new User();
    }
    else {
       alert('Invalid Form! Please fill all the areas.');
    }
  }
}
Now, let's add everything together in "app.component.html" so that it can render our page.
app.component.html
<body>
<div id="fixedheader"><menu-page></menu-page></div>
<packages></packages>
<div id="fixedfooter"><contact-form></contact-form></div>
<div id="extratext">
<p style="text-align:left;">
©MyFavoriteHosting.com
<span style="float:right;">2014-2016</span>
</p>
</div>
</body>
This is self-explanatory as well (I hope so ;-)). Now, if you do the "npm start", you will see a cool homepage of our website.
You can play with the CSS styles to get whatever look you want. The layout will automatically adjust to the screensize of the device as we are using a responsive HTML 5 feature, so whether you are looking at it on mobile or PC it doesn't matter.
As an exercise, try visiting several websites of the domain registrar and see how they have built their home pages and imitate their design and try to implement the additional features on your own. All you need to do is to create two files for a new feature: 1) HTML version 2) TS version, and you can add as many features as you want through components.
I have posted the project on my Github (https://github.com/danyalzia/AngularJS2-Homepage-Template), so you can see all the sources there (if you have trouble following the code here).
Summary
Let's summarize what we have learnt so far:
- Components are the backbone of AngularJS 2.
- In order to create a new component, we create a .ts file and its counterpart HTML (.html) file.
- The logic of the HTML code (binding, events, etc.) is held in the .ts file where the @Component is defined.
- CSS styles should be written in the @Component through the "styles" field.
Conclusion
You can see now how easily you can build the home page (and even the entire website!) through simple lines of code in AngularJS 2. It is highly advisable for you to test the code and learn from trial-and-error, lest you forget the cause-effect logic of the AngularJS 2. The golden rule is to learn to separate the different components and manipulate them together to achieve what you want.
If you have any questions, then please ask in the comments section below!
Recent Stories


Top DiscoverSDK Experts


Featured Products
Compare Products
Select up to three two products to compare by clicking on the compare icon () of each product.
{{compareToolModel.Error}}
{{CommentsModel.TotalCount}} Comments
Your Comment