Sponsors


Angular 5 To-Do List App - Part 2
In the previous article we created a very simple To-Do list with Angular that is almost featureless. The code of the previous article can be found in article itself and the complete project can be found in the Github repository Learn Angular With Sabuj. Code from the first 10 articles can be found by commits, but from the 11th article I have decided to put the codes under branches. So, to get the full project code of the previous article, browse to the branch named todo-app-part-1. To get the full project of the current article browse the branch named todo-app-part-2.
In this article we will make our application more functional and usable.
Making a Nicer Interface
In our previous article we only could display a list of to-dos statically from the property of an array of the component object—we had no way of adding them dynamically. Now, we will add an input field and a button to input tasks to the to-do list. We already have Bootstrap added, so we will use Bootstrap classes to style them nicely. Open the app.component.html file.
Our current markup looks like this.
<div class="container">
   <div class="row">
       <table class="table table-striped">
           <thead>
               <tr>
                   <th>To-Do list</th>
               </tr>
           </thead>
           <tbody>
               <tr *ngFor="let todo of todo_array">
                   {{todo}}
               </tr>
           </tbody>
           <tfoot>
               <tr>
                   <button class="btn btn-danger" (click)="clearToDo()">Clear</button>
               </tr>
           </tfoot>
       </table>
   </div>
</div>
We want to add the input field and the button above the To-Do list table. The input markup will look like below:
<input type="text" class="form-control" name="task" placeholder="Task">
The button markup will look like below:
<button class="btn btn-info">Add</button>To make better alignment and to go with Bootstrap we need to put them inside columns and wrap them inside a row (where the row will also be wrapped inside a container). So, our markup for the input and the button should look like below:
<div class="row">
   <div class="col-xs-8">
       <input type="text" class="form-control" name="task" placeholder="Task">
   </div>

   <div class="col-xs-4">
       <button class="btn btn-info">Add</button>
   </div>
</div>
We do not have any noticeable title for our application. We want to put a big title at the top of our page inside an h1 tag. Again, to go with Bootstrap and its grid system we need to create a container (or use an existing container), create a row inside of it, create a column, and put the h1 tag with the application title inside of it. Our markup for that will look like below:
<div class="container">
   <div class="row">
       <div class="col-xs-12">
           <h1> To-Do Application </h1>
       </div>
   </div>
</div>
So, the final markup will look like below:
<div class="container">
<div class="row">
<div class="col-xs-12">
<h1> To-Do Application </h1>
</div>
</div>
</div>
<div class="container">
<div class="row">
<div class="col-xs-8">
<input type="text" class="form-control" name="task" placeholder="Task">
</div>
<div class="col-xs-4">
<button class="btn btn-info">Add</button>
</div>
</div>
<div class="row">
<div class="col-xs-12">
<table class="table table-striped">
<thead>
<tr>
<th>To-Do list</th>
</tr>
</thead>
<tbody>
<tr *ngFor="let todo of todo_array">
{{todo}}
</tr>
</tbody>
<tfoot>
<tr>
<button class="btn btn-danger" (click)="clearToDo()">Clear</button>
</tr>
</tfoot>
</table>
</div>
</div>
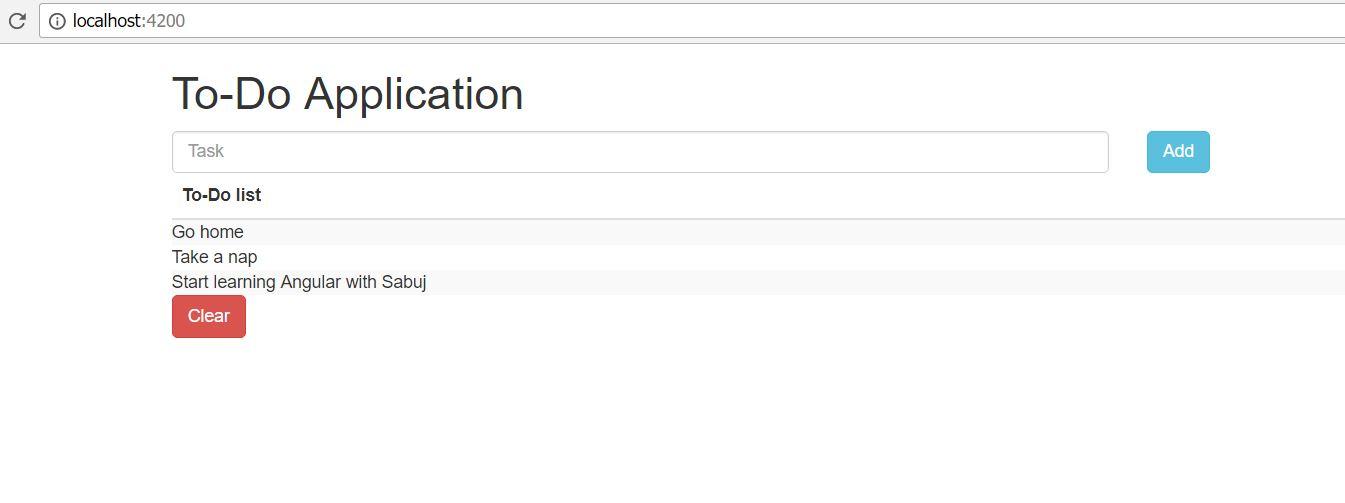
</div>Open up the browser to see a relatively nicer to-do application as the following screenshot.
Adding Tasks into To-Do
The above part was just presentational; we need to make it functional now. We need to add a click handler to the Add button like below.
<button class="btn btn-info" (click)="addTask()">Add</button>We haven't yet created the addTask() method inside the component class. Before creating that we need to make some more changes. We do not want to find the button element and get the input value from it. Instead, we want to pass the value through the click handler method. So, we need to create a template reference variable for the input field like below:
<input type="text" class="form-control" name="task" placeholder="Task" #taskInput>We can pass the input value to addTask() with the following syntax:
<button class="btn btn-info" (click)="addTask(taskInput.value)">Add</button>
Now, it's time to create the addTask() method inside the AppComponent class.
import { Component } from '@angular/core';

@Component({
 selector: 'app-root',
 templateUrl: './app.component.html',
 styleUrls: ['./app.component.css']
})
export class AppComponent {
 todo_array: Array<string> = [
   "Go home",
   "Take a nap",
   "Start learning Angular with Sabuj"
 ]

 clearToDo(){
   this.todo_array.splice(0);
 }

 addTask(value: string){
   this.todo_array.push(value);
 }
}
Go to the browser, input a task into the input field, click the add button to see that the to-do list is getting updated automatically. Awesome! We have created a functional to-do application with Angular 5.
So, now we have no need to keep that static array of tasks. You can remove it now, but I am keeping it in place so that when the app initially loads, our application does not look empty.
Numbering the Tasks
Imagine that we have a huge list of tasks that cannot fit in one page. So, we need a numbering before every task. To do so, we need to use the index of the *ngFor.
*ngFor="let todo of todo_array; let idx = index"
Indexes start at zero, so we need to add 1 with them to make it more readable.
{{ idx + 1 }}. {{todo}}
So, our final code for the loop should look like below:
<tr *ngFor="let todo of todo_array; let idx = index">
   {{ idx + 1 }}. {{todo}}
</tr>
Go to the browser to see a nicely numbered to do application. Add new tasks and you will see that they are properly numbered.
Conclusion
We are advancing in development of our To-Do application in a good speed. Try to write every line of code to keep pace with the articles. If you’re having in trouble, go to the Github repository for the full project and if you have any questions, ask them as issues on that Github repository. Keep practicing with Angular 5 until the next article.
About the Author
My name is Md. Sabuj Sarker. I am a Software Engineer, Trainer and Writer. I have over 10 years of experience in software development, web design and development, training, writing and some other cool stuff including few years of experience in mobile application development. I am also an open source contributor. Visit my github repository with username SabujXi.
Recent Stories


Top DiscoverSDK Experts


Featured Products

Compare Products
Select up to three two products to compare by clicking on the compare icon () of each product.
{{compareToolModel.Error}}
{{CommentsModel.TotalCount}} Comments
Your Comment