Sponsors


Angular 5 To-Do List App - Part 1
In the last article of Angular series we learned about "two way data binding and pipes in Angular." I covered the most important Angular fundamentals in the last 10 articles and I will cover more. But, before moving forward with other fundamental topics, it is much wiser to develop a real life application with the knowledge we already have. A suitable candidate for this is a To-Do list application.
I have setup a new Github repository titled Learn Angular With Sabuj to upload all the code in this series of articles. As usual I will place and explain the code snippets inside articles and you will be able to find that code as complete Angular projects in that repository. So, you can directly clone the repository to start practicing. In the future, bug fixes and updated code will be available through that repository. Again, if you have questions you can ask them as issues on Github.
Adding Bootstrap
In all our previous Angular codes we used plain CSS whenever we needed any styling. We can make our life easier by adding a CSS framework like Bootstrap. Bootstrap has dependency on jQuery and in Angular we do not interact with the DOM directly the way we do in vanilla JavaScript applications. So, for the Bootstrap components that depend on vanilla JavaScript we need an Angular specific version of Bootstrap components or we need to hack around to have our work done (though that is not a recommended way in Angular). I will discuss these conflicting matters in a separate article but for now we do not need to go through all the messes, because for our To-Do application we will only use CSS stuff from Bootstrap for now.
So, let's install Bootstrap 3 with npm:
npm install bootstrap@3 --save
After the Bootstrap is installed you can find the minified version of Bootstrap CSS at node_modules/bootstrap/dist/css/bootstrap.min.css. Add it to the .angular-cli.json's styles array like below:
"styles": [
   "styles.css",
   "../node_modules/bootstrap/dist/css/bootstrap.min.css"
],
To test whether the Bootstrap CSS file was properly added, create a bootstrap button inside index.html and start the Angular development server.
<button class="btn btn-info">Info Button</button>
Go to the browser to see that there is a Bootstrap info button on it. Now remove the button markup from index.html.
Cleaning up the Project
We already have a working application from the previous article. But, for our new to-do application we do not need it.
- Remove everything from styles.css if you have put anything there.
- Clear the content of app.component.css
- Clear the content of app.component.html
- Bring app.component.ts to its initial state like below.
import { Component } from '@angular/core';

@Component({
 selector: 'app-root',
 templateUrl: './app.component.html',
 styleUrls: ['./app.component.css']
})
export class AppComponent {
}
Now we are ready to start with crafting of the new To-Do application.
Creating the Skeleton
As we are using Bootstrap, we will try to stick to the Bootstrap grid system with container, columns, etc. So, let's create a container inside app.component.html:
<div class="container">
   ...
</div>
We need a row inside of it:
<div class="container">
   <div class="row">

   </div>
</div>
To place the elements of our To-Do list we are going to use an HTML table instead of an HTML list. Let's create a table inside of the row.
<div class="container">
   <div class="row">
       <table class="table table-striped">

       </table>
   </div>
</div>
Displaying a To-Do List
We have nothing inside of our To-Do list now. Let's create a component property containing an array that will help up populate our To-Do list.
app.component.ts

import { Component } from '@angular/core';

@Component({
 selector: 'app-root',
 templateUrl: './app.component.html',
 styleUrls: ['./app.component.css']
})
export class AppComponent {
 todo_array: Array<string> = [
   "Go home",
   "Take a nap",
   "Start learning Angular with Sabuj"
 ]
}
Now, in our app.component.html we need to loop over that array of strings and put inside the table rows. So, let's use our handy weapon ngFor for that purpose.
<div class="container">
   <div class="row">
       <table class="table table-striped">
           <tr *ngFor="let todo of todo_array">
               {{todo}}
           </tr>
       </table>
   </div>
</div>
Go to the browser to see our To-Do list with no functionality!
Clearing the List
Let's place a button inside the To-Do list table that will help us clear the To-Do list. Go and edit app.component.html like below:
<div class="container">
   <div class="row">
       <table class="table table-striped">
           <tr *ngFor="let todo of todo_array">
               {{todo}}
           </tr>
       </table>
   </div>


   <div class="row">
       <button class="btn btn-danger" (click)="clearToDo()">Clear</button>
   </div>
</div>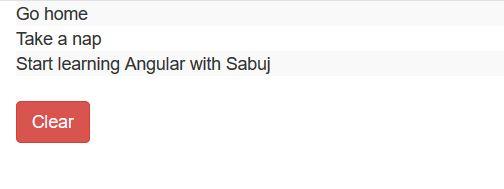
We are using a danger button from bootstrap to indicate that this is not a safe operation.
Now we need to implement the clearToDo() method inside the AppComponent class.
clearToDo(){
   this.todo_array.splice(0);
}
Further Improvement
Our newly created and very simple To-Do application does almost nothing useful. Again, it does not show us in any way that it is actually a To-Do application. So, we should place some text above it to indicate that it is a To-Do application or To-Do list. Let's put a table header for the indication.
<div class="container">
   <div class="row">
       <table class="table table-striped">
           <thead>
               <tr>
                   <th>To-Do list</th>
               </tr>
           </thead>
           <tbody>
               <tr *ngFor="let todo of todo_array">
                   {{todo}}
               </tr>
           </tbody>
           <tfoot>
               <tr>
                       <button class="btn btn-danger" (click)="clearToDo()">Clear</button>
               </tr>
           </tfoot>
       </table>
   </div>
</div>
Go to the browser to see that we have a better to do list now. Also, notice the markup that we have used thead, tbody, tfoot instead of just using plain th, tr, td. We also placed the clear button inside tfoot.
Conclusion
Learning by example is amuch better than learning theory first and then starting to implement it at the very end. I am going to write a lot of articles on Angular fundamentals, but occasionally I am going to teach creating applications in the middle with all the knowledge you will acquire up to that point of time with the help of my series on Angular. Next, we are going to give our To-Do application more functional.
About the Author
My name is Md. Sabuj Sarker. I am a Software Engineer, Trainer and Writer. I have over 10 years of experience in software development, web design and development, training, writing and some other cool stuff including few years of experience in mobile application development. I am also an open source contributor. Visit my github repository with username SabujXi.
Recent Stories


Top DiscoverSDK Experts


Featured Products
Compare Products
Select up to three two products to compare by clicking on the compare icon () of each product.
{{compareToolModel.Error}}
{{CommentsModel.TotalCount}} Comments
Your Comment