Sponsors


Vaadin with Spring Boot
This lesson will introduce you to the world of using Vaadin with Spring Boot. If you need to brush up on Spring Framework, check out our Hello World in Spring article before you go through this one.
Vaadin is a Java framework which allows us develop a clean and beautiful UI in pure Java. Yes, you can make a web app using only the Java programming language.
Vaadin provides us with elegant UI elements which can be used in an interface. Let’s take a look at this framework in action.
Creating a Project
Using your favorite IDE, create a Maven based project. Basically, the project should have a pom.xml file where you can add dependencies to be used in your project.
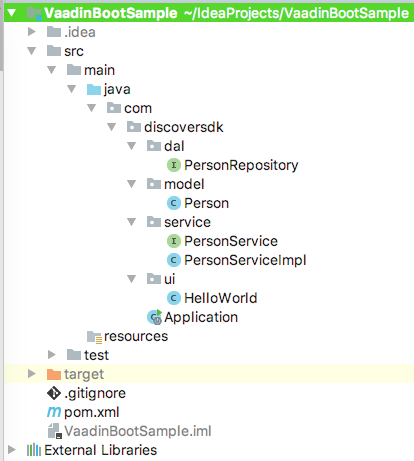
Project Structure
Once we’re done, our project structure will look like:
Adding Maven Dependencies
As this is basically a Spring Boot project with Vaadin add-ons, we will first add Spring related dependencies to the pom.xml file.
Getting Spring Boot Parent repository
Add the following section directly inside the project tag:
<parent>
  <groupId>org.springframework.boot</groupId>
  <artifactId>spring-boot-starter-parent</artifactId>
  <version>1.5.1.RELEASE</version>
  <relativePath/> <!-- lookup parent from repository -->
</parent>
This will make sure that any dependencies which relate to the same group as org.springframework.boot have the same version as this.
Next, let’s add related dependencies:
<properties>
  <project.build.sourceEncoding>UTF-8</project.build.sourceEncoding>
  <project.reporting.outputEncoding>UTF-8</project.reporting.outputEncoding>
  <java.version>1.8</java.version>
</properties>

<parent>
  <groupId>org.springframework.boot</groupId>
  <artifactId>spring-boot-starter-parent</artifactId>
  <version>1.5.1.RELEASE</version>
  <relativePath/> <!-- lookup parent from repository -->
</parent>

<dependencies>
  <dependency>
      <groupId>org.springframework.boot</groupId>
      <artifactId>spring-boot-starter-web</artifactId>
  </dependency>
  <dependency>
      <groupId>com.vaadin</groupId>
      <artifactId>vaadin-spring-boot-starter</artifactId>
  </dependency>
  <dependency>
      <groupId>org.springframework.boot</groupId>
      <artifactId>spring-boot-starter-data-jpa</artifactId>
  </dependency>
  <dependency>
      <groupId>com.h2database</groupId>
      <artifactId>h2</artifactId>
  </dependency>
</dependencies>

<dependencyManagement>
  <dependencies>
      <dependency>
          <groupId>com.vaadin</groupId>
          <artifactId>vaadin-bom</artifactId>
          <version>8.0.0</version>
          <type>pom</type>
          <scope>import</scope>
      </dependency>
  </dependencies>
</dependencyManagement>

<build>
  <sourceDirectory>src/main/java</sourceDirectory>
  <plugins>
      <plugin>
          <groupId>org.springframework.boot</groupId>
          <artifactId>spring-boot-maven-plugin</artifactId>
      </plugin>
  </plugins>
</build>
We have added the following dependencies:
- With java.version property, we set that our project will be based on Java 8.
- org.springframework.boot parent will ensure that the dependencies fetched with the same groupId will have the same version as defined by this parent repository.
- spring-boot-maven-plugin is needed to make an executable JAR when this project is packaged.
- The H2 database dependency is needed because H2 is an in-memory database. In this lesson, we will demonstrate saving entities to an in-memory database only, which means that the data will be wiped out as soon as the application is stopped.
Making the Application class
For a Spring Boot project, we must have a class with a main() method where our application can start running from. Let us define this class here:
package com.discoversdk;

import org.springframework.boot.SpringApplication;
import org.springframework.boot.autoconfigure.SpringBootApplication;

@SpringBootApplication
public class Application {
  public static void main(String[] args) {
      SpringApplication.run(Application.class, args);
  }
}
In our application, main is the entry point for the Spring Boot app. When this method runs, Spring will:
- Make the necessary Beans
- Load all components present in the project
Making the Model
To start, we will add a model in our project which we will use as a base to add data to. This model will be a Person:
package com.discoversdk.model;

import javax.persistence.Entity;
import javax.persistence.GeneratedValue;
import javax.persistence.Id;
import java.time.LocalDate;

@Entity
public class Person {

  @Id
  @GeneratedValue
  private Long id;
  private String name;
  private int age;
  private LocalDate dateOfBirth;

  public Person() {
  }

  public Person(String name, int age, LocalDate dateOfBirth) {
      this.name = name;
      this.age = age;
      this.dateOfBirth = dateOfBirth;
  }

  //getters and setters
}
Simply put, this model has three properties, out of which ID will be auto-generated by the H2 database.
We leave package statement at the top so that you know which package to put this class in.
Creating the Data Access Layer (DAL)
To access data in H2, we will create a separate data access layer. It is a good practice to do so because this helps in keeping the logic of the application completely separate.
Our JPA Repository interface looks like:
package com.discoversdk.dal;

import com.discoversdk.model.Person;
import org.springframework.data.jpa.repository.JpaRepository;
import org.springframework.stereotype.Repository;

@Repository
public interface PersonRepository extends JpaRepository<Person, Long> {
}
The importance of this JPA Repository interface will actually be reflected with its usage in service layer.
Providing the Logic for Data Access
To access our repository data, we will call different methods in the Service layer.
Our interface definition for service will be:
package com.discoversdk.service;

import com.discoversdk.model.Person;

import java.util.List;

public interface PersonService {

  Person savePerson(Person person);

  Person getPerson(Long id);

  List<Person> getAllPerson();

  void deletePerson(Long id);

  void deletePerson(Person person);

  Person updatePerson(Person person);

  long countPerson();
}
Please note that all these definitions will not be needed in our sample project. They are present just to give a good idea of how much power the JPA Repositories provide us with. Implementation of the above interface will be:
package com.discoversdk.service;

import com.discoversdk.dal.PersonRepository;
import com.discoversdk.model.Person;
import org.springframework.beans.factory.annotation.Autowired;
import org.springframework.stereotype.Service;

import java.util.List;

@Service
public class PersonServiceImpl implements PersonService {

  @Autowired
  private PersonRepository repository;

  @Override
  public Person savePerson(Person person) {
      return repository.save(person);
  }

  @Override
  public Person getPerson(Long id) {
      return repository.getOne(id);
  }

  @Override
  public List<Person> getAllPerson() {
      return repository.findAll();
  }

  @Override
  public void deletePerson(Long id) {
      repository.delete(id);
  }

  @Override
  public void deletePerson(Person person) {
      repository.delete(person);
  }

  @Override
  public Person updatePerson(Person person) {
      return repository.save(person);
  }

  @Override
  public long countPerson() {
      return repository.count();
  }
}
Here, we have defined simple CRUD methods which will allow us to create, read, update and delete a person from the database. A count method is also present which will return the total number of records present in the H2 database.
Making the UI with Vaadin
To present our data, we will make a simple UI which will allow us to add a new person and present existing data in a Grid.
We will design our UI step by step.
Creating the main layout
Every Vaadin UI lives inside a main layout. Usually, we either use vertical layouts or horizontal layouts. In this design, we will use a VerticalLayout.
In the UI package as shown in image of the project structure, we create a new class with name HelloWorld. Its definition looks as follows:
@SpringUI
@Title("Hello Vaadin")
public class HelloWorld extends UI {

  @Override
  protected void init(VaadinRequest vaadinRequest) {
    ...
  }
}
It is the init() method which is called when a SpringUI is loaded into the memory.
Also, @Title annotation simply tells the title of the window.
Inside the init() method, add the parent layout:
VerticalLayout mainLayout = new VerticalLayout();
setContent(mainLayout);
Next, we will make use of a FormLayout to keep our fields in. We will also add 3 fields and a button which we can use to submit the data.
FormLayout formLayout = new FormLayout();

TextField tfName = new TextField("Name");
tfName.setRequiredIndicatorVisible(true);
tfName.setIcon(VaadinIcons.USER);
tfName.setMaxLength(20);

final TextField tfAge = new TextField("Age");
tfAge.setRequiredIndicatorVisible(true);
tfAge.setIcon(VaadinIcons.BELL);
tfAge.setMaxLength(2);

DateField tfDateOfBirth = new DateField();
tfDateOfBirth.setDateFormat("yyyy-MM-dd");
tfDateOfBirth.setPlaceholder("yyyy-mm-dd");
tfDateOfBirth.setRequiredIndicatorVisible(true);
tfDateOfBirth.setIcon(VaadinIcons.DATE_INPUT);
tfDateOfBirth.setValue(LocalDate.now());

Button btnSubmit = new Button("Save");
The code is pretty much self-explanatory. We defined 2 TextField, 1 DateField and a Button as well. These will be turned into input fields in HTML.
If you run the app right now, you will see a blank page. This is because having only defining components is not enough—you must add them to your layout.
formLayout.addComponent(tfName);
formLayout.addComponent(tfAge);
formLayout.addComponent(tfDateOfBirth);
formLayout.addComponent(btnSubmit);
formLayout.setWidth(null);
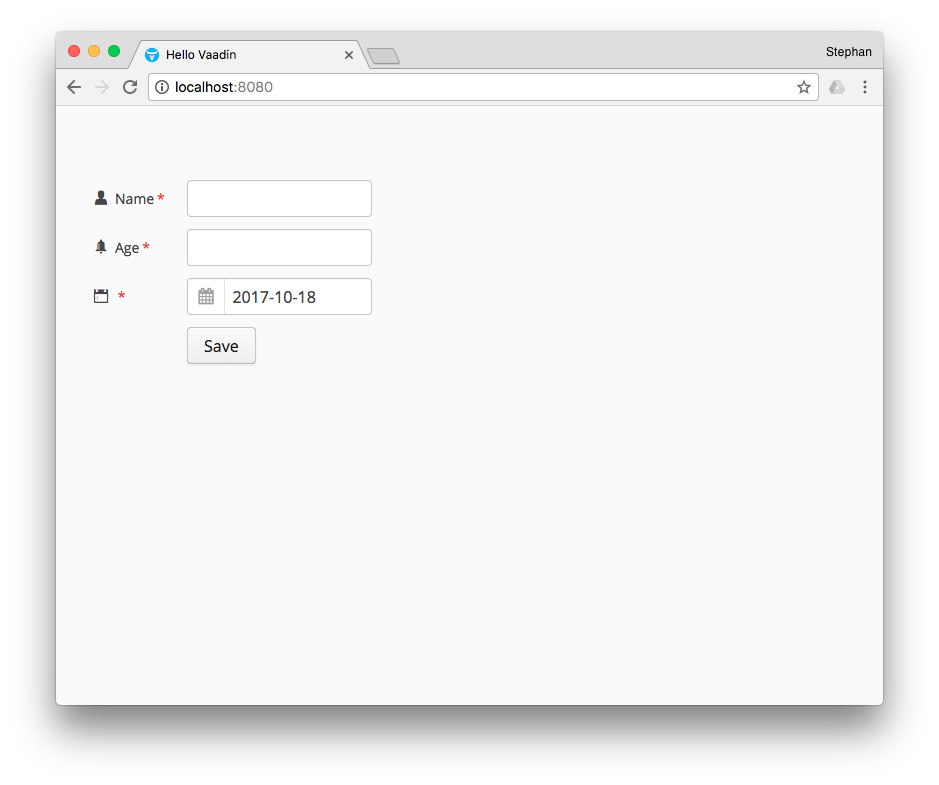
mainLayout.addComponent(formLayout);Now when you run the app, you can see the following UI when you visit http://localhost:8080/:
Excellent ! A very elegant UI made purely with Java code. Now, we will add code so that when the button is clicked, data is saved to the database. This can be done using a click listener.
To save data, we first have to define a reference to our PersonService:
Logger logger = LoggerFactory.getLogger("HelloWorld");

@Autowired
private PersonService personService;
Notice that we also added a Logger statement to log debug messages to console.
Finally, we add a click listener:
btnSubmit.addClickListener(click -> {

 if(isValidInt(tfAge)) {
   Person savedPerson = personService.savePerson(
       new Person(tfName.getValue(), Integer.valueOf(tfAge.getValue()),

           tfDateOfBirth.getValue()));

      Notification.show("Person saved with ID : " + savedPerson.getId());
  } else {
      Notification.show("Invalid data.");
  }
});
We have used a helper method to identify if the entered input is a valid integer:
private boolean isValidInt(TextField tfAge) {

       boolean isValid = true;

       try {
           String ageValue = tfAge.getValue();
           int age = Integer.valueOf(ageValue);
       } catch (Exception ex) {
           logger.error("Invalid Integer.");
           isValid = false;
       }

       return isValid;
   }
When we run this application, enter data, and hit Submit, we will see the following Notification in the browser:
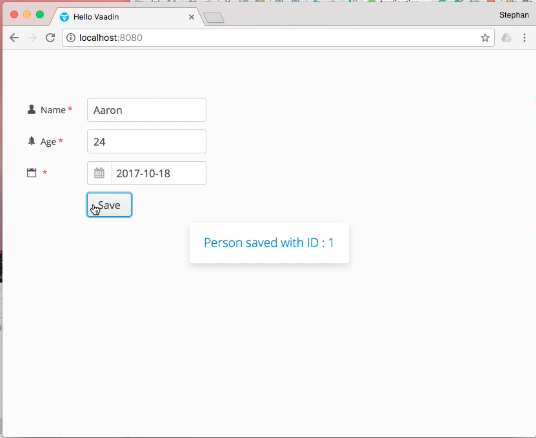
Isn’t that excellent! This default Notification is really elegant.
Now that we’re done saving data using a form, we will show this data in a Grid which will update whenever data is submitted through this form.
Grid<Person> grid = new Grid<>();
grid.addColumn(Person::getName).setCaption("Name");
grid.addColumn(Person::getAge).setCaption("Age");
grid.addColumn(Person::getDateOfBirth).setCaption("DOB");
We simply defined a Grid and provided it with the POJO information it needs with method calls it should make for each of its column.
Modify the click listener code as follows:
btnSubmit.addClickListener(click -> {

  if(isValidInt(tfAge)) {
      //...save data…


      //call service to get existing data
      grid.setItems(personService.getAllPerson());
  } else {
      Notification.show("Invalid data.");
  }
});

mainLayout.addComponent(grid);
We simply made a call to the service to get existing data. In last line, we also added this Grid to our mainLayout so that it is actually shown.
We’re done now. Let’s run our app again:
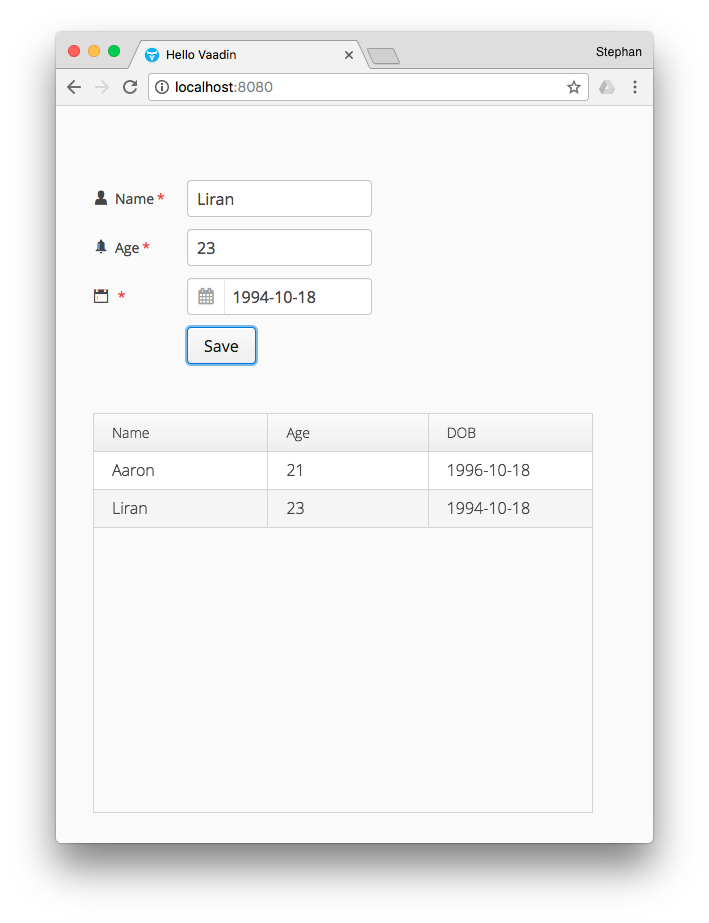
Excellent !
Our final UI class code looks like:
package com.discoversdk.ui;

import com.discoversdk.model.Person;
import com.discoversdk.service.PersonService;
import com.vaadin.annotations.Title;
import com.vaadin.icons.VaadinIcons;
import com.vaadin.server.Page;
import com.vaadin.server.VaadinRequest;
import com.vaadin.spring.annotation.SpringUI;
import com.vaadin.ui.*;
import org.slf4j.Logger;
import org.slf4j.LoggerFactory;
import org.springframework.beans.factory.annotation.Autowired;

import java.time.LocalDate;

@SpringUI
@Title("Hello Vaadin")
public class HelloWorld extends UI {

  Logger logger = LoggerFactory.getLogger("HelloWorld");

  @Autowired
  private PersonService personService;

  @Override
  protected void init(VaadinRequest vaadinRequest) {

      VerticalLayout mainLayout = new VerticalLayout();
      setContent(mainLayout);

      //mainLayout.setSizeFull();

      FormLayout formLayout = new FormLayout();

      TextField tfName = new TextField("Name");
      tfName.setRequiredIndicatorVisible(true);
      tfName.setIcon(VaadinIcons.USER);
      tfName.setMaxLength(20);

      final TextField tfAge = new TextField("Age");
      tfAge.setRequiredIndicatorVisible(true);
      tfAge.setIcon(VaadinIcons.BELL);
      tfAge.setMaxLength(2);

      DateField tfDateOfBirth = new DateField();
      tfDateOfBirth.setDateFormat("yyyy-MM-dd");
      tfDateOfBirth.setPlaceholder("yyyy-mm-dd");
      tfDateOfBirth.setRequiredIndicatorVisible(true);
      tfDateOfBirth.setIcon(VaadinIcons.DATE_INPUT);
      tfDateOfBirth.setValue(LocalDate.now());

      Button btnSubmit = new Button("Save");

      formLayout.addComponent(tfName);
      formLayout.addComponent(tfAge);
      formLayout.addComponent(tfDateOfBirth);
      formLayout.addComponent(btnSubmit);

      formLayout.setWidth(null);
      mainLayout.addComponent(formLayout);
      //mainLayout.setComponentAlignment(formLayout, Alignment.MIDDLE_CENTER);

      Grid<Person> grid = new Grid<>();
      grid.addColumn(Person::getName).setCaption("Name");
      grid.addColumn(Person::getAge).setCaption("Age");
      grid.addColumn(Person::getDateOfBirth).setCaption("DOB");

      btnSubmit.addClickListener(click -> {

          if(isValidInt(tfAge)) {
              Person savedPerson = personService.savePerson(
                      new Person(tfName.getValue(),
                              Integer.valueOf(tfAge.getValue()), tfDateOfBirth.getValue()));

              Notification.show("Person saved with ID : " + savedPerson.getId());
              logger.info("Person saved with ID : {}", savedPerson.getId());
              grid.setItems(personService.getAllPerson());
          } else {
              Notification.show("Invalid data.");
          }
      });

      mainLayout.addComponent(grid);
  }

  private boolean isValidInt(TextField tfAge) {

      boolean isValid = true;

      try {
          String ageValue = tfAge.getValue();
          int age = Integer.valueOf(ageValue);
      } catch (Exception ex) {
          logger.error("Invalid Integer.");
          isValid = false;
      }

      return isValid;
  }

}
Conclusion
In this lesson, we went through how we can make simple UI and powerful UI with Spring Boot using the Vaadin framework. Though we made use of the H2 database, any underlying database can be easily replaced using Spring configuration without touching any repository logic for the app.
Check back soon for a future article with a more complex implementation with Spring Boot and Vaadin. And stop by the homepage for tons of Java SDK and libraries.
Until next time!
Recent Stories


Top DiscoverSDK Experts


Featured Products

Compare Products
Select up to three two products to compare by clicking on the compare icon () of each product.
{{compareToolModel.Error}}
{{CommentsModel.TotalCount}} Comments
Your Comment