Sponsors


Python and C++ Interoperability using Boost.Python
Python and C++ Interoperability using Boost.Python with Python 3.6.0, Visual Studio 2015, and Boost 1.63.0
Boost.Python is a part library of Boost which is used for integrating between Python and C++, using your C++ Compiler and IDE.
There are two methods to integrate between Python and C++ with Boost.Python:
- Extend: meaning, you can take a C++ library (DLL/LIB), wrap it using Boost.Python framework (without changing the original code) and use it from Python as a regular import of extension module.
- Embed: meaning, you can load and run a Python script (py file) to your C++ program and also use it’s output values inside your C++ code. Also you can evaluate inline python expressions/statements (strings) and receive the output to your C++ code as well.
In this tutorial you will learn all the technical steps that you need to make, in order to setup your Visual Studio environment for build and run Python code that uses your C++ dll library and a C++ code which uses a python code.
Step 1 – Install Python 3.6
- Download and install (regular installation) python 3.6.0 for windows from https://www.python.org/
Check the Environment PATH variable.
Just try to run python from a command prompt window, you should see :
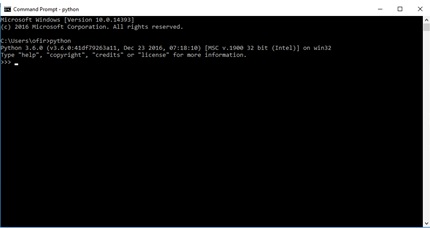
If not, make sure that the Python root folder exists on your system PATH environment variable:
C:\Users\{Your User}\AppData\Local\Programs\Python\Python36-32
and it’s not conflicts with other installed version of python
* If you already have boost installed and working with your visual studio environment, you can jump to step 4
Step 2 – Installing Boost 1.63
- Download the Boost library from : http://www.boost.org/doc/libs/1_63_0/more/getting_started/windows.html
- Extract the downloaded zip file to C:\Program Files\boost folder (or somewhere else that you prefer)
- Build the library: (Actually, most of the boost library not have to be built, because it is based on header files, but the Boost.Python library must be build, so let’s build them all)
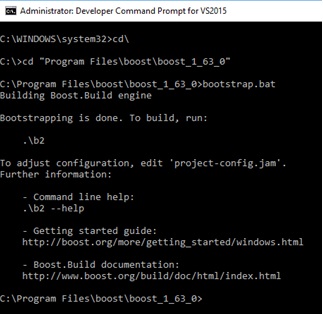
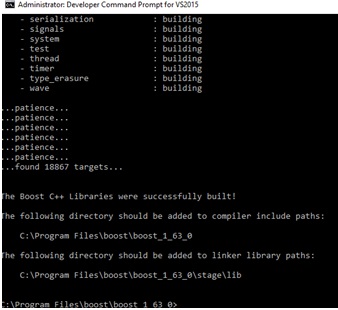
- Open a Command Prompt window. Note: Run cmd as Administrator
- cd to the your boost folder and run :
- bootstrap.bat
- b2 (takes a while…)
after : bootstrap after: b2
Step 3 – Test the Boost library from Visual Studio 2015
- Run Visual Studio and select New->Project from the file menu.
- Select Visual C++ -> Win32 -> Win32 Console Application
- Enter “TestBoost” in the name field.
- In the Application Setting dialog box, choose empty project and hit finish
- In the Solution Explorer pane right click the source files folder and add new item -> C++ File -> cpp
- First Test “Header file only library” Paste the following code:
#include <string> #include <iostream> #include <boost/foreach.hpp> int main() { std::string str("Hello Boost!\n"); BOOST_FOREACH(char ch, str) { std::cout << ch; } return 0; } - This code should fail at compilation time , you must add the boost library include folder to the project settings, by:
Right click the TestBoost project in the solution explorer pane -> properties -> Configuration Properties -> C/C++ -> General -> Additional Include Directories . Enter the path of your boost root folder e.g.: C:\Program Files\boost\boost_1_63_0 - Build and run, you should get “Hello Boost!” on the screen.
- Add some code that uses the boost built library, paste the following code just before the main function:
#include <boost/regex.hpp> bool ValidateCreditCard(const std::string& str) { static const boost::regex creditRegEx("(\\d{4}[- ]){3}\\d{4}"); return regex_match(str, creditRegEx); } - Change the main function body code with the following one:
std::cout << (ValidateCreditCard("1234-1234-1234-1234")?"Valid, ":"Not valid, ")
          << (ValidateCreditCard("1234-123-1234-1234")?"Valid":"Not valid") << std::endl;
This code should fail on link time, you must add the boost binaries folders to the project settings, by:Right click the TestBoost project in the solution explorer pane -> properties -> Configuration Properties -> Linker -> General -> Additional Library Directories. Add the following paths: C:\Program Files\boost\boost_1_63_0\stage\lib and C:\Program Files\boost\boost_1_63_0
11.Build and run, you should get “Valid, Not valid” on the screen. That’s it, boost is working!
Step 4 – Building a C++ DLL as a Python extension module
- In the Solution Explorer pane right click the source files folder and add new item -> C++ File -> cpp
- In the Application Setting dialog box, choose DLL as application type and check the empty project option , then hit finish.
- Enter “HelloExt” in the name field.
- Select Visual C++ -> Win32 -> Win32 Console Application
- Run Visual Studio and select New->Project from the file menu.
- Right click the HelloExt project in the solution explorer pane -> properties -> Configuration Properties -> C/C++ -> General -> Additional Include Directories . Add the path of your boost root folder e.g.: C:\Program Files\boost\boost_1_63_0 and also to your Python include folder e.g. C:\Users\{your user}\AppData\Local\Programs\Python\Python36-32\include
- Right click the HelloExt project in the solution explorer pane -> properties -> Configuration Properties -> Linker -> General -> Additional Library Directories. Add the following paths: C:\Program Files\boost\boost_1_63_0\stage\lib
, C:\Program Files\boost\boost_1_63_0 and C:\Users\{your user}\AppData\Local\Programs\Python\Python36-32\libs - Paste the following code to your Source.cpp file
#define BOOST_PYTHON_STATIC_LIB #include <boost/python.hpp> char const* SayHello() { return "Hello, from c++ dll!"; } BOOST_PYTHON_MODULE(HelloExt) { using namespace boost::python; def("SayHello", SayHello); } - Build the project, it should build with no warnings/errors.
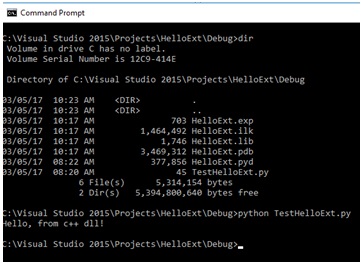
- Open a File explorer window, and navigate to your {Project Folder}\Debug. Change the name of the file: HelloExt.dll to HelloExt.pyd
- Open a text editor and paste the following Python script:
import HelloExt print(HelloExt.SayHello()) - Save this file in your {Project Folder}\Debug as TestHelloExt.py
- Open a command prompt window and cd to your {Project Folder}\Debug folder
- Run the script with the command : python TestHelloExt.py
- You should get the following output:
- That’s it, you’re done!
Step 5 – Integrate your C++ project with Python code.
- Run Visual Studio and select New->Project from the file menu.
- Select Visual C++ -> Win32 -> Win32 Console Application
- Enter “TestPythonInvoke” in the name field.
- In the Application Setting dialog box check the empty project option, then hit finish.
- In the Solution Explorer pane right click the source files folder and add new item -> C++ File -> cpp
- From Step 4 above repeat steps 6) and 7)
- Create a new text file name it hello.py , enter the following text:
print ('Hello from python py file')and save it in your project folder.
8.Paste the following code inside your Source.cpp file.
#define BOOST_PYTHON_STATIC_LIB
#include <iostream>
#include <iterator>
#include <algorithm>
#include <boost/python.hpp>
using namespace boost::python;
int main()
{
	try {
	Py_Initialize();
	object _mainModule = import("__main__");
	object _mainNamespace = _mainModule.attr("__dict__");
	// Testing python experssion evaluation
	object _evalResult = eval("2 ** 8");
	int _result = extract<int>(_evalResult);
	std::cout << "2**8 in Python is:" << _result << std::endl;
	//Testing executing python source code from str
	exec("print (\"Hello from python string code \")", _mainNamespace, _mainNamespace);
	//Testing executing a python script file
	exec_file("hello.py", _mainNamespace,_mainNamespace);
	}
	catch (error_already_set) {
		PyErr_Print();
	}
}
9.Build and run your project , you should get:
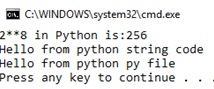 10.That’s it, you’re done!
Recent Stories


Top DiscoverSDK Experts


Featured Products
Compare Products
Select up to three two products to compare by clicking on the compare icon () of each product.
{{compareToolModel.Error}}
{{CommentsModel.TotalCount}} Comments
Your Comment