Sponsors


How React Native works
In this lesson, we’ll fill in some gaps and review how React Native works under the hood. We’ll also see how React Native components differ from their web counterparts, and cover what you’ll need to know in order to create and style components for mobile.
How Does React Native Work?
The idea of writing mobile applications in JavaScript feels a little odd. How is it possible to use React in a mobile environment? In order to understand the technical underpinnings of React Native, first we’ll need to recall one of React’s features, the Virtual DOM.
In React, the Virtual DOM acts as a layer between the developer’s description of how things ought to look, and the work done to actually render your application onto the page. To render interactive user interfaces in a browser, developers must edit the browser’s DOM, or Document Object Model.
Let’s come to React Native now. Instead of rendering to the browser’s DOM, React Native invokes Objective-C APIs to render to iOS components, or Java APIs to render to Android components. This sets React Native apart from other cross-platform app development options, which often end up rendering web-based views.

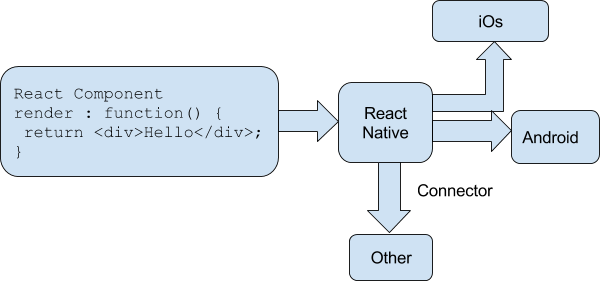
This is all possible because of the “connector,” which provides React with an interface into the host platform’s native UI elements. React components return markup from their render function, which describes how they should look. With React for the Web, this translates directly to the browser’s DOM. For React Native, this markup is translated to suit the host platform, so a <View> might become an Android-specific TextView.
React Native currently supports iOS and Android. Because of the abstraction layer provided by the Virtual DOM, React Native could target other platforms, too—someone just needs to write the connector.
Rendering Lifecycle
If you are used to working in React, the React lifecycle should be familiar to you. When React runs in the browser, the render lifecycle begins by mounting the React components.

After that, React handles the rendering and re-rendering of the component as necessary.

For the render phase, the function returns HTML markup from a React component’s render method, which React then renders directly into the page.
For React Native, the lifecycle is the same, but the rendering process is slightly different, because React Native depends on the bridge. The bridge translates JavaScript calls and invokes the host platform’s underlying APIs and UI elements (i.e. in Objective-C or Java, as appropriate). Because React Native doesn’t run on the main UI thread, it can perform these asynchronous calls without impacting the user’s experience.
Creating Components in React Native
All React code lives as React components. React Native components are largely the same as ordinary React components, with some important differences around rendering and styling.
Working with Views
When writing in React for the Web, you render normal HTML elements (<div>, <p>, <span>, <a>, etc.). With React Native, all of these elements are replaced by platform-specific React components .
|
React |
React Native |
|
<div> |
<View> |
|
<span> |
<Text> |
|
<li>, <ul> |
<ListView> |
|
<img> |
<Image> |
The most basic is the cross-platform <View>, a simple and flexible UI element that can be thought of as analogous to the <div>. On iOS, for instance, the <View> component renders to a UIView, while on Android it renders to a View.
Other components from the table act as platform-specific components. Like for a Datepicker,
<DatePickerIOS
 date={this.state.date}
 mode="date"
 timeZoneOffsetInMinutes={this.state.timeZoneOffsetInHours * 60}
/>
In iOs this will look like:

Because all of our UI elements are now React components, rather than basic HTML elements like the <div>, we will need to explicitly import each component we use. For instance, we needed to import the <DatePickerIOS> component like so:
var React = require('react-native');
var {
 DatePickerIOS
} = React;
The UIExplorer application, which is bundled into the standard React Native examples, allows you to view all of the supported UI elements. I encourage you to examine the various elements included in the UIExplorer app. It also demonstrates many styling options and interactions.
Because these components vary from platform to platform, how you structure your React components becomes even more important when working in React Native. In React for the Web, we often have a mix of React components: some manage logic and their child components, while other components render raw markup. If you want to reuse code when working in React Native, maintaining separation between these types of components becomes critical.
A React component that renders a <DatePickerIOS> element obviously cannot be reused for Android. However, a component that encapsulates the associated logic can be reused. Then, the view component can be swapped out based on your platform. You can also designate platform-specific versions of components if you want, so you can have a picker.ios.js and a picker.android.js file for instance.
Using JSX
In React Native, just as in React, we write our views using JSX, combining markup and the JavaScript that controls it into a single file. For many web developers, the separation of files based on technologies is a given—you keep your CSS, HTML, and JavaScript files separate. The idea of combining markup, control logic, and even styling into one language can be confusing.
JSX prioritizes the separation of concerns over the separation of technologies. In React Native, this is even more strictly enforced. In a world without the browser, it makes even more sense to unify our styles, markup, and behavior in a single file for each component. Accordingly, your .js files in React Native are in fact JSX files. If you were using vanilla JavaScript when working with React for web, you will want to transition to JSX syntax for your work in React Native.
If you’ve never worked on JSX before, don’t worry: it’s simple. As an example, a pure-JavaScript React component for the Web might look something like this:
var HelloMessage = React.createClass({
 displayName: "HelloMessage",

 render: function render() {
   return React.createElement(
     "div",
     null,
     "Hello ",
     this.props.name
   );
 }
});

React.render(React.createElement(HelloMessage, { name: "Bonnie" }), mountNode);
We can render this more succinctly by using JSX. Instead of calling React.createElement and passing in a list of HTML attributes, we use XML-like markup:
var HelloMessage = React.createClass({
 render: function() {
   // Instead of calling createElement, we return markup
   return <div>Hello {this.props.name}</div>;
 }
});
// We no longer need a createElement call here
React.render(<HelloMessage name="Bonnie" />, mountNode);Both of these will render the following HTML onto the page:
<div>Hello Bonnie</div>Styling Native Components
On the Web, we style React components using CSS, just as we would any other HTML element. Whether you love it or hate it, CSS is a necessary part of the Web. React usually does not affect the way we write CSS. It does make it easier to use (sane, useful) inline styles, and to dynamically build class names based on props and state, but otherwise React is mostly agnostic about how we handle styles on the Web.
Non-web platforms have a wide array of approaches to layout and styling. When we work with React Native, thankfully, we utilize one standardized approach to styling. Part of the bridge between React and the host platform includes the implementation of a heavily pruned subset of CSS. This narrow implementation of CSS relies primarily on flexbox for layout, and focuses on simplicity rather than implementing the full range of CSS rules. Unlike the Web, where CSS support varies across browsers, React Native is able to enforce consistent support of style rules. Much like the various UI elements, you can see many examples of supported styles in the UIExplorer application, which is one of the examples that ships with React Native.
React Native also insists on the use of inline styles, which exist as JavaScript objects. The React team has advocated for this approach before in React for web applications. If you have previously experimented with inline styles in React, the syntax will look familiar to you:
// Define a style...
var style = {
 backgroundColor: 'white',
 fontSize: '16px'
};

// ...and then apply it.
var tv = (
 <Text style={style}>
   A styled Text
 </Text>);
React Native also provides us with some utilities for creating and extending style objects that make dealing with inline styles a more manageable process.
Does looking at inline styles make you twitch? Coming from a web-based background, this is admittedly a break from standard practices. Working with style objects, as opposed to stylesheets, takes some mental adjustments, and changes the way you need to approach writing styles. However, in the context of React Native, it is a useful shift. Just try not to be surprised when you see them in use!
Recent Stories


Top DiscoverSDK Experts


Featured Products


Compare Products
Select up to three two products to compare by clicking on the compare icon () of each product.
{{compareToolModel.Error}}
{{CommentsModel.TotalCount}} Comments
Your Comment