Sponsors


Grid Control With Different JavaScript Frameworks
In a recent post we compared Angular JS and React JS using a grid contol. Using a simple practical example, the developer can decide which approarch is prefered.
In this article I will add 5 more JavaScript framework to compare the same example.
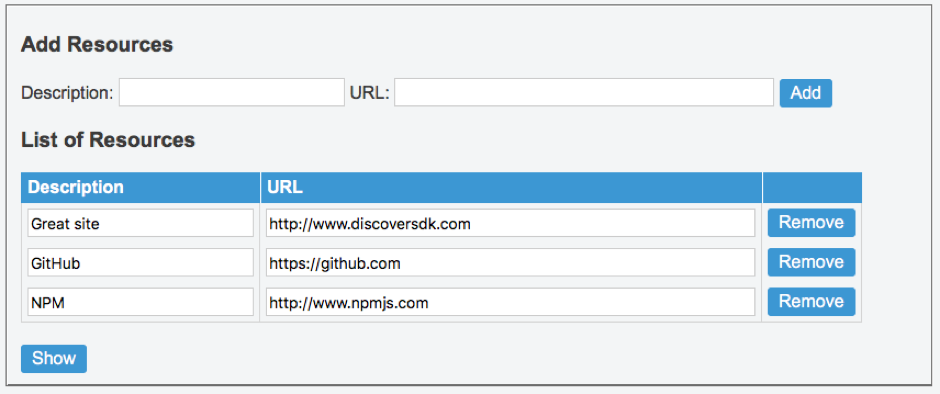
The Grid control
Using 2-way data binding the conrol allows you to add, remove and edit rows and also get all the grid data as a Json object to send it to the server.
This is how it looks like:
We already wrote a post demonstrating it using Angular JS - you can read the post here
You can also see it running here
The same as AngularJS the post is here and you can see it working here
Knockout implements MVVM (model-View-ViewModel) pattern to seperate data and view components.
The HTML part:
<fieldset>

		<h3>Add Resources</h3>
		<form data-bind="submit: $root.addResource">
			<span >Description:</span>
			<input type="text" style="width:180px;" data-bind="textInput: description"/>
			<span > URL:</span>
			<input type="text" style="width:340px;"  data-bind="textInput: url"/>
			<button type="submit">Add</button><br/>
		</form>
		<a href="#" data-bind="click: showResource">Show</a>


		<h3>List of Resources</h3>
		<table  border="1" style="width:740px;" >
		    <thead>
			    <tr>
			        <th><h4>Description</h4></th>
			        <th><h4>URL</h4></th>
			        <th></th>
			    </tr>
		    </thead>

		    <tbody data-bind="foreach: resources">
			    <tr>
			        <td><input type="text" data-bind="value: ResourceDescription"></td>
		        	<td> <input type="text" data-bind="value: ResourceAddress"></td>
		        	<td><button data-bind="click: $root.removeResource">Remove</button></td>
			    </tr>
		    </tbody>
		</table>

</fieldset>
As you can see using a simple "data-bind" attribute we bind the HTML elements to the code
The JavaScript code:
var resources = [{'ResourceAddress': 'http://www.discoversdk.com', 'ResourceDescription':'Great site'}];


// Overall viewmodel for this screen, along with initial state
function ResourceViewModel() {
    var self = this;
	self.resources = ko.observableArray(resources);

	self.description = ko.observable("");
	self.url = ko.observable("");

	self.addResource = function(formElements){
		var description = self.description();
		var url = self.url();
		if(description && url){
			self.resources.push({'ResourceAddress': url, 'ResourceDescription': description});
			self.description('');
			self.url('');
		}else{
			return;
		}
	};

	self.removeResource = function(resource){
		self.resources.remove(resource);
	};

	self.showResource = function(){
		alert(JSON.stringify(resources));
	};

};


ko.applyBindings(new ResourceViewModel());
You can see it working and play with it here (note that for simplicity we excluded the styles and CSS)
Vue is a very easy to use javascript framework for building components. It has many features like extendable 2 way data binding, simple API and many more
The HTML:
    <fieldset>
            <h3>Add Resources</h3>

            <span >Description:</span>
            <input type="text" style="width:180px;" v-model="description" />
            <span > URL:</span>
            <input type="text" style="width:340px;" v-model="url" />
            <a href="#" v-on:click="addResource">Add</a><br/>

        	<a href="#" v-on:click="showResource">Show</a>


            <h3>List of Resources</h3>
            <div>
            <table  border="1" style="width:740px;">
                <tbody>
                <tr>
                    <th><h4>Description</h4></th>
                    <th><h4>URL</h4></th>
                    <th></th>
                </tr>
                <tr v-for="resource in resources">
                    <td><input type="text" v-model="resource.ResourceDescription"></td>
                    <td><input type="text" v-model="resource.ResourceAddress"></td>
                    <td><button v-on:click="removeResource($index)">Remove</button></td>
                </tr>
                </tbody>
            </table>
            </div>


    </fieldset>
To connect the HTML tags we use "v-model" attribute
The JavaScript:
var resources = [{'ResourceAddress': 'http://www.discoversdk.com', 'ResourceDescription':'Great site'}];

new Vue({
  el: '#app',
  data: {
  	description: '',
  	url: '',
  	resources: resources
  },
  methods: {
    addResource: function () {
      var description = this.description.trim();
      var url = this.url.trim();
      if (description && url) {
        this.resources.push({'ResourceAddress': url, 'ResourceDescription':description})
        this.description = '';
        this.url = '';
      }else{
      	return;
      }
    },
    removeResource: function (index) {
      this.resources.splice(index, 1)
    },
    showResource: function(){
    	alert(JSON.stringify(this.resources));
    }
  }
});
As you can see the implementation is very simple , you can see it running here
Another framework based on MVVM pattern and provides many features like routes, templates , services and more.
The HTML:
<!doctype html>
<html>
  <head>
	 <meta charset="utf-8"><title>Ember.js Grid</title>
  </head>
  <body>
	<script type="text/x-handlebars" data-template-name="ress">
		<section id="resapp">
			<fieldset>
			<h3>Add Resources</h3>
			<form>
				<span >Description:</span>
				{{input type="text" id="description" value=description style="width:180px;"}}
				<span > URL:</span>
				{{input type="text" id="url" value=url  style="width:340px;"}}
				<button {{action "createRes"}}>Add</button>
			</form>
			<a href="#" {{action "showResource"}}>Show</a>

			<h3>List of Resources</h3>
			<table border="1" style="width:740px;">
				<thead>
					<tr>
						<th><h4>Description</h4></th>
						<th><h4>URL</h4></th>
						<th></th>
					</tr>
				</thead>
				<tbody>
				{{#each res in model itemController="res"}}
					<tr>
						<td>
						{{input type="text" value=res.ResourceDescription style="width:100%"}}
						</td>
						<td>
						{{input type="text" value=res.ResourceAddress style="width:100%"}}
						</td>
						<td><button {{action "removeRes" res.id}}>Remove</button></td>
					</tr>
				{{/each}}
				</tbody>

			</table>

			</fieldset>

		</section>


	</script>


	<script src="http://code.jquery.com/jquery-1.11.2.min.js"></script>
	<script src="https://cdnjs.cloudflare.com/ajax/libs/handlebars.js/1.3.0/handlebars.min.js"></script>
	<script src="http://builds.emberjs.com/tags/v1.8.1/ember.js"></script>
	<script src="http://builds.emberjs.com/tags/v1.0.0-beta.11/ember-data.js"></script>
	<script type="text/javascript" src="app_emb.js"></script>

  </body>
</html>
As you can see , ember uses double curly brackets added inside the HTML to implement the 2 way data binding
The JavaScript:
window.Ress = Ember.Application.create();
Ress.ApplicationAdapter = DS.FixtureAdapter.extend();

Ress.Router.map(function() {
  this.resource('ress', { path: '/' });
});

Ress.Res = DS.Model.extend({
  ResourceAddress: DS.attr('string'),
  ResourceDescription: DS.attr('string')
});

Ress.RessRoute = Ember.Route.extend({
  model: function() {
    return this.store.find('res');
  }
});


Ress.Res.FIXTURES = [{id:1, ResourceAddress: 'http://www.discoversdk.com', ResourceDescription:'Great site'}];


Ress.RessController = Ember.ArrayController.extend({
  actions: {
    createRes: function() {
      var description = this.get('description');
      var url = this.get('url');
      if (!description.trim()) { return; }
      if (!url.trim()) { return; }


      var res = this.store.createRecord('res', {
        ResourceAddress: url,
        ResourceDescription: description
      });

      this.set('url', '');
      this.set('description', '');

      res.save();
    },
    showResource: function(){
      var resources = this.store.findAll('res').then(function(data){
        var allResources = data.map(function(x) { return x.toJSON(); });
        alert(JSON.stringify(allResources));
      });
    },
    removeRes: function (index) {
      this.store.find('res', index).then(function (post) {
        post.destroyRecord();
      });
    }
  }
});


Ress.ResController = Ember.ObjectController.extend({
  isCompleted: function(key, value){
    var model = this.get('model');

    if (value === undefined) {
      return model.get('isCompleted');
    } else {
      model.set('isCompleted', value);
      model.save();
      return value;
    }
  }.property('model.isCompleted')
});
We derive from ArrayController for the resources list and add all the required methods to manipulate the grid. We extend ObjectController to create the model.
Aurelia provides an advanced UI/Front end framework and easy to use for developers. It supports many features like 2 way data binding, ES7 and more
The HTML:
<template>
	<fieldset>
	<h3>Add Resources</h3>

	<form submit.trigger="addResource()">
		<span >Description:</span>
		<input type="text" value.bind="description" style="width:180px;" />
		<span > URL:</span>
		<input type="text" value.bind="url" style="width:340px;"  />
		<button type="submit">Add</button>
	</form>
	<a href="#" click.trigger="showResource()">Show</a>


	<h3>List of Resources</h3>
	<table  border="1" style="width:740px;" >
		<thead>
			<tr>
				<th><h4>Description</h4></th>
				<th><h4>URL</h4></th>
				<th></th>
			</tr>
		</thead>
		<tbody>
			<tr repeat.for="resource of resources">
				<td>${resource.ResourceDescription}</td>
				<td>${resource.ResourceAddress}</td>
				<td><button click.trigger="removeResource(resource)">Remove</button></td>
			</tr>
		</tbody>
	</table>

	</fieldset>
</template>
We define the form and use some attributes such as submit.trigger (define the action on submit), value.bind (to bind the control) and ${ model object } to access the model
The JavaScript code
First we define the Resource class:
export class Resource {
  constructor(description, url) {
    this.ResourceAddress = url;
    this.ResourceDescription = description;
  }
}
Than the application class with all the required functions:
import {Resource} from './resource';

export class App {
  constructor() {
    this.heading = "Todos";
    this.resources = [{'ResourceAddress': 'http://www.discoversdk.com', 'ResourceDescription':'Great site'}];;
    this.description = '';
    this.url = '';
  }

  addResource() {
    if (this.description && this.url) {
      this.resources.push(new Resource(this.description, this.url));
      this.description = '';
      this.url = '';
    }
  }

  removeResource(resource) {
    let index = this.resources.indexOf(resource);
    if (index !== -1) {
      this.resources.splice(index, 1);
    }
  }

  showResource(){
    alert(JSON.stringify(this.resources));
  }
}
And the entry point:
export function configure(aurelia) {
  aurelia.use.basicConfiguration();
  aurelia.start().then(() => aurelia.setRoot());
}
Reactive JS is a template-driver UI library , great for using in an interactive application. It supports 2-way data binding, animation, SVG and many more UI features
The HTML:
<fieldset>
    <div id='container'></div>
</fieldset>
<script id='resource' type='text/ractive'>
    <h3>Add Resources</h3>
	<form on-submit="addResource">
		<span >Description:</span>
		<input type="text" style="width:180px;" name="description" />
		<span > URL:</span>
		<input type="text" style="width:340px;" name="url"/>
		<button type="submit">Add</button><br/>
	</form>
	<a href="#" on-click="showResource">Show</a>
	<h3>List of Resources</h3>
		<table  border="1" style="width:740px;" >
		    <thead>
			    <tr>
			        <th><h4>Description</h4></th>
			        <th><h4>URL</h4></th>
			        <th></th>
			    </tr>
		    </thead>

		    <tbody>
		    	{{#each resourceList:num}}
			    <tr>
			        <td><input style="width:200px;" type="text" value="{{ResourceDescription}}" /></td>
		        	<td><input style="width:443px;" type="text" value="{{ResourceAddress}}" /></td>
		        	<td><button on-click="removeResource:{{num}}">Remove</button></td>
			    </tr>
			    {{/each}}
		    </tbody>
		</table>


  </script>
Like other frameworks, also in Reactive JS to connect the HTML to the model we use curly brackets.
The javascript:
var resources = [{'ResourceAddress': 'http://www.discoversdk.com', 'ResourceDescription':'Great site'}];
var reactive = new Ractive({

    el: '#container',

    template: '#resource',

    data: {resourceList: resources},
});

reactive.on({
    addResource: function(event){
        console.log(event.node.description.value);
        var description = event.node.description.value;
        var url = event.node.url.value;
        if(description != '' && url != ''){
            var data = {'ResourceAddress': url, 'ResourceDescription': description};
            resources.push(data);
            event.node.description.value = '';
            event.node.url.value = '';
        }
        return false;
    },
    removeResource: function(event, index){
        resources.splice(index, 1);
    },
    showResource: function(){
        alert(JSON.stringify(resources));
    }
});
First we define the element, the template and the data structure and with reactive.on we define the methods. You can see it working here
You can see and clone all files in our github
Summary
We saw 7 different framework to implement the same component. The question what is the best has no clear answer. It depends on many other things and the required web application we build.
Recent Stories


Top DiscoverSDK Experts


Featured Products


Compare Products
Select up to three two products to compare by clicking on the compare icon () of each product.
{{compareToolModel.Error}}
{{CommentsModel.TotalCount}} Comments
Your Comment