Sponsors


Git - Working with SSH Keys
Most Git repositories are secure, meaning we can’t access them anonymously, but rather need a username and password. OK, no problem, right? Well for one thing it’s pretty annoying, but also it’s not very secure to work with a username and password. First off, you need to remember them. Second, because we’re passing the username and password, any ol’ keylogger out there can listen in and capture them. The best way to work is using SSH keys.
What are those, you ask? SSH keys are a mechanism that creates two keys, one private and one public, that are matched and depend upon one another to function. You give the public key to some website and it will save it in its database. When you want to be identified by said site, it will take your private key that it has saved and use it to encrypt some word. Then it sends you the hashing. With the private key, you can decipher the hashing and send the decoded word back. If the word you send back matches the word you were sent, the site then knows you have a private key that matches the public key and grants authorization.
OK, not the #1 best ever and most thorough explanation of SSH keys ever, but I hope you get the main idea; when we make SSH Keys, we’re making two keys—one public and one private.
Working with SSH Keys is quite important when working with servers and especially when working with a Git server such as GitHub, Bitbucket, or Stash. Many folks may recoil at the idea of creating SSH Keys because they’re on Windows and they think it’s going to be a major pain in the rear to make the keys. But the truth is, it’s actually quite easy to create SSH Keys in Windows (and Linux/Mac of course). And just to show how easy it is, I’ll make an exception to my norm and demonstrate on Windows here.
The requirements are:
Git installed on the machine. Git is easy to install on all systems. If you’ve read the Git series that this article is a part of, the first article has instructions for installing Git. Long story short, download the exe and run it. In the Windows distribution of Git there is a tool that is similar to cmd which is called git bash.
Git bash looks and acts just like cmd, but it also can handle Linux commands. I personally prefer to work with it. To create the key, we need to enter in the following text:
ssh-keygen -t rsa -b 4096 -C "YOURNAME@example.com"
Here we’re creating an SSH key using the RSA method, which is a method for 4096-bit encryption. You need to enter in your email which goes in as a comment. It looks like this:
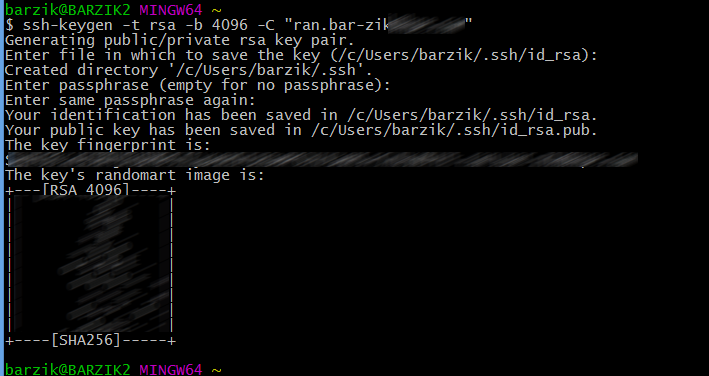
During the installation, you’ll be asked for a passphrase. You don’t have to give one but it is considered to be something worthwhile. If you don’t, anyone who has your key will have access to your services. For this example, I didn’t give a passphrase but that doesn’t mean I don’t have one in real life.
After making the key, you can go into the folder you marked while creating the key and see that there is now a new folder called ssh. (Pay attention to the dot.) Inside of the folder there are two files:
id_rsa.pub
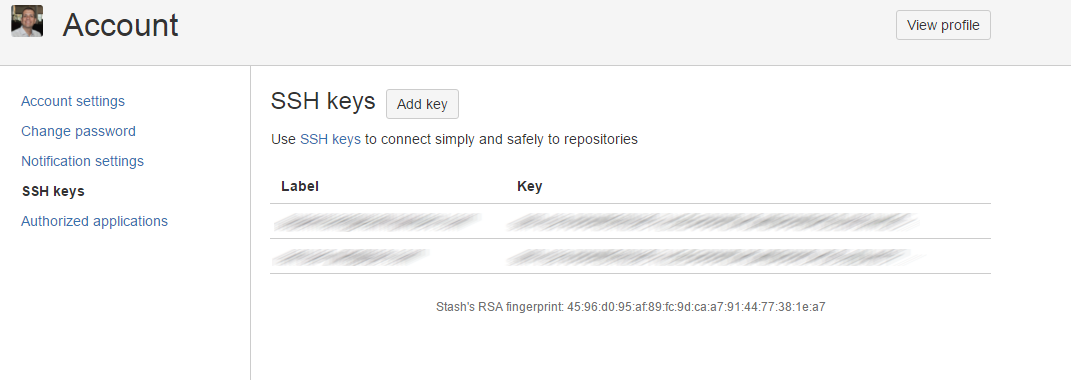
Id_rsaThe public key is the one that ends in pub. This is a normal text file that one can and should open in a normal text editor. This is the key we need to pass over to the service that we want to connect to. We’ll go to the service whether it’s GitHub or Stash. In GitHub for instance, you need to follow this link. Open the public key using the text editor, then copy and paste it into the web interface. Here’s how it looks in Stash:
Now we need to tell our Git to use our public key for encryption. Open git bash and type:
eval "$(ssh-agent -s)"
and then
ssh-add ~/.ssh/id_rsa
Here we’re essentially telling the ssh agent to use the private key for encryption.
Remember that we’re using ssh links and not https. All we have left to do is start working! When connecting the first time, you’ll be asked if you want to add the server to which you are connecting to the list of trusted servers.

After this, it should all start falling into place. If you use a passphrase you won’t need to enter in your password over and over again. You can use this nice little service called ssh-agent that will remember it for you.
More Git on the way so check back soon.
About the author: Ran Bar-Zik is an experienced web developer whose personal blog, Internet Israel, features articles and guides on Node.js, MongoDB, Git, SASS, jQuery, HTML 5, MySQL, and more. Translation of the original article by Aaron Raizen.
Recent Stories


Top DiscoverSDK Experts


Featured Products

Compare Products
Select up to three two products to compare by clicking on the compare icon () of each product.
{{compareToolModel.Error}}
{{CommentsModel.TotalCount}} Comments
Your Comment