Sponsors


Debugging and Unit Testing in Ionic 2 – Using Karma and Jasmine
It’s pretty well known that Ionic 2 puts heavy emphasis on modularity in order to enhance the reusability of the code, believing in the theory that if we can divide our application into several modules and components, then different parts of the application can be isolated and integrated to entirely different applications as if those components are pieces of a puzzle.
This not only results in ease of coding and faster overall application development, but also eases the testing phase of development, as small part of the application can be tested easily, including its methods and properties without touching the other parts or having influence of rest of the application. This is exactly what we do in unit testing, wherein we first write the tests and then we write the code and expect the code to run per our specifications or expectations.
If you have been reading my articles on Ionic 2, then you know that I have covered a bit of debugging before, so for example you can use the Chrome DevTools (https://developer.chrome.com/devtools) to see the “Console” tab where the JavaScript errors will be present, while the development console (CLI) contains the TypeScript errors. If you have enabled the sourceMap in your tsconfig.json, then you can even see the line in TypeScript where the error is occurring!
Having said that, at times simple debugging is not enough as this is done in real-time when we are developing the application and it debugs the whole application at once. So this solution is not good if we are building a complex application where many developers are working together, as new changes can break the existing code and it takes time to find out the actual cause of the breaking.
For this reason exactly, unit testing is done, because now we are not forced to test our whole application at once as the isolated components can be tested without affecting other components. Take for example, if we set all the components in our application for unit testing, and some new changes break the application, then we can check the tests to see which component exactly has broken the application.
Thankfully, there are tools available already that enable you to do unit testing in Ionic 2, meaning you will feel like creating new components/pages within the Framework and reusing the previously written code. Such tools include Karma and Jasmine which, although not included in Ionic 2 by default, we can easily install in our applications.
In this article, I am going to show you how you can unit test an Ionic 2 application. Let’s get started!
Debugging and Unit Testing in Ionic 2 – Using Karma and Jasmine
As I mentioned earlier, in unit testing we take small chunks of code and test if they work properly—basically sort of writing the code to test the code itself! Often these unit tests are used for describing the methods’ functionality in the documentation and for regression testing, as only the methods are included in the tests and not the whole implementation.
For small projects, it would be overkill to integrate unit testing, but for large projects or projects that are supposed to become big and complex eventually (especially if several developers are working on it), unit testing is a must, otherwise it becomes extremely painful to test and debug the application in a long run.
I once wrote about unit testing in AngularJS 2 in one of my previous articles, where I covered Karma and Jasmine. Thankfully, the same knowledge and experience can be utilized here, so I will focus less on material already covered and more on Ionic 2 specific testing features.
As we know, Jasmine is used to create the unit tests, while Karma runs them. Basically, Karma creates the browser environment for the testing, so the testing can run on a separate tab of your browser. Jasmine helps you in creating the tests with a behavior-driven approach. What does that really mean?
Well, Jasmine provides us several methods for creating tests, for example, we will use the describe() method for specifying our methods in components/pages, therein we will use the it() method that defines the test or “specs” and then we actually test the expectations through the expect() method.
What do I mean by “specs”? Well, specs are suite of tests—you can think of it as a collection of several tests. Here is the code of one “spec” we wrote in the past for AngularJS 2:
sampletest.spec.ts
describe('Sample Test', () => {
it('true is true', () => expect(true).toBe(true));
});

import {AppComponent} from './app.component';

describe('AppComponent', () => {
beforeEach(function() {
  this.app = new AppComponent();
});

it('should have hello property', function() {
  expect(this.app.hello).toBe('Hello, World!');
});
});
When you create a new component in AngularJS 2, then you get a .spec file in the component folder, because AngularJS 2 officially supports Karma as the preferred testing method. This is not the case with Ionic 2, as Karma isn’t included by default in Ionic 2. So, first we need to install Karma (and its required modules).
There are two approaches to unit testing through Karma: We can either write the isolated methods/components in .spec files OR we can use the TestBed, which basically allows you to set the separate module for the testing , just like @NgModule, meaning you can test several components in it that could be dependent on each others as if you were writing a different application.
By default, Ionic 2 doesn’t support TestBed unlike AngularJS 2, so we need to set it ourselves. We will look at both of these approaches.
Creating a project
Let’s first create a new project:
$ionic start ionic-testing blank –v2In the root directory, run the following (just copy and paste everything in CLI):
npm install angular-cli --save-dev && npm install codecov --save-dev && npm install -g karma-cli && npm install jasmine-core --save-dev && npm install jasmine-spec-reporter --save-dev && npm install karma --save-dev && npm install karma-chrome-launcher --save-dev && npm install karma-jasmine --save-dev && npm install karma-mocha-reporter --save-dev && npm install karma-remap-istanbul --save-dev && npm install ts-node --save-dev && npm install tslint --save-dev && npm install tslint-eslint-rules --save-dev && npm install @types/jasmine --save-dev && npm install @types/node --save-devThis will install all the required libraries from Karma dependencies to Jasmine dependencies. Now do “karma init karma.conf.js” in the root directory and copy the following content:
karma.conf.js
module.exports = function (config) {
 config.set({
   basePath: '',
   frameworks: ['jasmine', 'angular-cli'],
   plugins: [
     require('karma-jasmine'),
     require('karma-chrome-launcher'),
     require('karma-mocha-reporter'),
     require('karma-remap-istanbul'),
     require('angular-cli/plugins/karma')
   ],
   files: [
     { pattern: './src/test.ts', watched: false }
   ],
   preprocessors: {
     './src/test.ts': ['angular-cli']
   },
   mime: {
     'text/x-typescript': ['ts','tsx']
   },
   remapIstanbulReporter: {
     reports: {
       html: 'coverage',
       lcovonly: './coverage/coverage.lcov'
     }
   },
   angularCli: {
     config: './angular-cli.json',
     environment: 'dev'
   },
   reporters: config.angularCli && config.angularCli.codeCoverage
             ? ['mocha', 'karma-remap-istanbul']
             : ['mocha'],
   port: 9876,
   colors: true,
   logLevel: config.LOG_INFO,
   autoWatch: true,
   browsers: ['Chrome'],
   singleRun: false
 });
};
Basically, here we are setting which frameworks and plugins we are using for Karma tests. We need to add the angular-cli configuration for it to work properly.
Now, create a new file in your root folder “angular-cli.json” and copy the following code:
angular-cli.json
{
 "project": {
   "version": "1.0.0",
   "name": "ionic-testing"
 },
 "apps": [
   {
     "root": "src",
     "outDir": "dist",
     "assets": [
       "assets"
     ],
     "index": "index.html",
     "main": "main.ts",
     "test": "test.ts",
     "tsconfig": "tsconfig.test.json",
     "prefix": "app",
     "mobile": false,
     "styles": [
       "styles.css"
     ],
     "scripts": [],
     "environments": {
       "source": "environments/environment.ts",
       "dev": "environments/environment.ts",
       "prod": "environments/environment.prod.ts"
     }
   }
 ],
 "addons": [],
 "packages": [],
 "test": {
   "karma": {
     "config": "./karma.conf.js"
   }
 },
 "defaults": {
   "styleExt": "css",
   "prefixInterfaces": false,
   "inline": {
     "style": false,
     "template": false
   },
   "spec": {
     "class": false,
     "component": true,
     "directive": true,
     "module": false,
     "pipe": true,
     "service": true
   }
 }
}
You can see I have added some files in the “environments” array.
Now, you need to create a folder “environment” in “src/” directory. And then, create a new file “environment.prod.ts” and copy the following code:
environment.prod.ts
export const environment: any = {
  production: true,
};
Now, create a new file “environment.ts” and copy the following code:
environment.ts
This simply tells whether the application needs to be in production mode or not, even though we are not concerned with this at this moment, we need to add it anyway because this is requirement for building the tests.
Now, in your “src/” folder, create a new file “mocks.ts” and copy the following code:
mocks.ts
export class ConfigMock {
 public get(): any {
   return '';
 }
 public getBoolean(): boolean {
   return true;
 }
 public getNumber(): number {
   return 1;
 }
}
export class FormMock {
 public register(): any {
   return true;
 }
}
export class NavMock {
 public pop(): any {
   return new Promise(function(resolve: Function): void {
     resolve();
   });
 }
 public push(): any {
   return new Promise(function(resolve: Function): void {
     resolve();
   });
 }
 public getActive(): any {
   return {
     'instance': {
       'model': 'something',
     },
   };
 }
 public setRoot(): any {
   return true;
 }
}
export class PlatformMock {
 public ready(): any {
   return new Promise((resolve: Function) => {
     resolve();
   });
 }
}
export class MenuMock {
 public close(): any {
   return new Promise((resolve: Function) => {
     resolve();
   });
 }
}
These are the “mock” functions that are basically simplified versions of actual methods. If you notice the methods, they are returning Promise() imitating the asynchronous nature of services. So they are not really doing anything, but we still get the method's name, so for instance, if we want to use the Platform service, then we can use its ready() method which is actually not a real method (as it has no real implementation) but is enough to test our other methods, because we are not interesting in testing Platform and so we assume that these services run as expected.
So, whenever we need to test some provider or service, then we need to add their “mock” methods as well (we’ll look at this later on).
Now, in the same folder, create a new file “polyfills.ts” and copy the following content:
polyfills.ts
import 'core-js/es6/symbol';
import 'core-js/es6/object';
import 'core-js/es6/function';
import 'core-js/es6/parse-int';
import 'core-js/es6/parse-float';
import 'core-js/es6/number';
import 'core-js/es6/math';
import 'core-js/es6/string';
import 'core-js/es6/date';
import 'core-js/es6/array';
import 'core-js/es6/regexp';
import 'core-js/es6/map';
import 'core-js/es6/set';
import 'core-js/es6/reflect';
import 'core-js/es7/reflect';
import 'zone.js/dist/zone';
Now, create a new file “tests.ts” and copy the following code:
tests.ts
import './polyfills.ts';
import 'zone.js/dist/long-stack-trace-zone';
import 'zone.js/dist/proxy.js';
import 'zone.js/dist/sync-test';
import 'zone.js/dist/jasmine-patch';
import 'zone.js/dist/async-test';
import 'zone.js/dist/fake-async-test';
import { FormsModule, ReactiveFormsModule } from '@angular/forms';
import { getTestBed, TestBed } from '@angular/core/testing';
import { BrowserDynamicTestingModule, platformBrowserDynamicTesting } from '@angular/platform-browser-dynamic/testing';
import { App, Config, Form, IonicModule, Keyboard, DomController, MenuController, NavController, Platform } from 'ionic-angular';
import { ConfigMock } from './mocks';
declare var __karma__: any;
declare var require: any;
__karma__.loaded = function (): void {

};
getTestBed().initTestEnvironment(
 BrowserDynamicTestingModule,
 platformBrowserDynamicTesting(),
);
let context: any = require.context('./', true, /\.spec\.ts/);
context.keys().map(context);
__karma__.start();
This adds all the required modules for testing. We are using require.context('./', true, /\.spec\.ts/) to tell the compiler that any file that ends with .spec.ts needs to be considered as test files.
In your “src/” directory, create a new file “tsconfig.test.json” and copy the following code:
tsconfig.test.json
{
 "compilerOptions": {
   "baseUrl": "",
   "declaration": false,
   "emitDecoratorMetadata": true,
   "experimentalDecorators": true,
   "lib": ["es6", "dom"],
   "mapRoot": "./",
   "module": "es6",
   "moduleResolution": "node",
   "outDir": "../dist/out-tsc",
   "sourceMap": true,
   "target": "es5",
   "typeRoots": [
     "../node_modules/@types"
   ]
 }
}
This is the configuration for the test modules.
In the “scripts” array of your “package.json”, add the following line:
"test": "ng test"This sets the “test” command to “ng test”, so whenever you do “npm test”, then actually “ng test” will happen that will open the test in a browser.
Now everything is finally set! We have set the testing configuration in a way that whenever we do “npm test” then Karma finds the “.spec” files in our directories and runs the test.
So, before testing, we need to write the actual “.spec” files. Let’s create a new service:
$ionic g provider number-generator
In your “src/providers” folder, open “number-generator.ts” and copy the following content:
number-generator.ts
import { Injectable } from '@angular/core';

@Injectable()
export class NumberGenerator {

 constructor() {
   console.log('Hello NumberGenerator Provider');
 }

 getOdd(array) {
    let newArray = new Array();

    for (var i = 0; i < array.length; i++) {
        if(i % 2 === 0) {
            newArray.push(array[i]);
        }
    }

    return newArray;
 }

 getEven(array) {
    let newArray = new Array();

    for (var i = 0; i < array.length; i++) {
        if(i % 1 === 0) {
            newArray.push(array[i]);
        }
    }

    return newArray;
 }

 getRandomInt(min, max){
   return Math.floor(Math.random() * (max - min + 1)) + min;
 }
}
Here, I have defined some methods for testing. These are simple operations, so it doesn’t need any explanation.
Now, in the same folder create a new file “number-generator.spec.ts” and copy the following content:
number-generator.spec.ts
import { NumberGenerator } from './number-generator';
let numberGenerator = null;
describe('Number Generator Service', () => {
beforeEach(() => {
numberGenerator = new NumberGenerator();
});
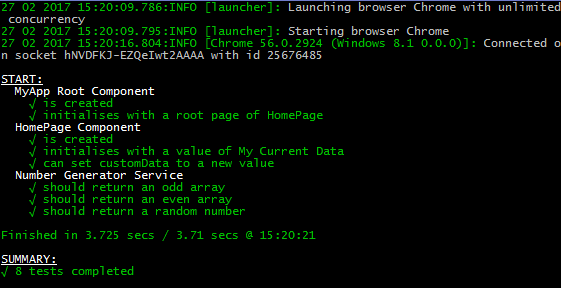
it('should return an odd array', () => {
let array: number[] = [1,2,3,4,5,6,7,8,9,10];
let result = numberGenerator.getOdd(array);
expect(Array.isArray(result)).toBeTruthy;
expect(result.length).toBeGreaterThan(0);
expect(result).toContain(3);
}
);
it('should return an even array', () => {
let array: number[] = [1,2,3,4,5,6,7,8,9,10];
let result = numberGenerator.getEven(array);
expect(Array.isArray(result)).toBeTruthy;
expect(result.length).toBeGreaterThan(0);
expect(result).toContain(4);
}
);
it('should return a random number', () => {
let result = numberGenerator.getRandomInt(5,10);
expect(result).toBeGreaterThan(0);
}
);
});You can do “npm test” to run the test environment. All the tests should be completed successfully.

This test is done without the TestBed environment, which we will look at soon.
Let’s change the code a bit, change “toContain(3);” to “toContain(4);”. This is what I got.

With this method, you can test as many services you want. But, what about the components?
Creating a TestBed environment
The problem with components/pages is that these are often dependent on other components or services, so isolating them is difficult. Thankfully, we can create a TestBed environment which will contain all those dependencies as if we are creating a different application for testing.
In “src/app”, create a new file “app.spec.ts” and copy the following content:
app.spec.ts
import { TestBed, ComponentFixture, async } from '@angular/core/testing';
import { IonicModule } from 'ionic-angular';
import { MyApp } from './app.component';
import { HomePage } from '../pages/home/home';

let comp: MyApp;
let fixture: ComponentFixture<MyApp>;

describe('MyApp Root Component', () => {

    beforeEach(async(() => {

        TestBed.configureTestingModule({

            declarations: [MyApp],

            providers: [

            ],

            imports: [
               IonicModule.forRoot(MyApp)
            ]

        }).compileComponents();

    }));

    beforeEach(() => {

        fixture = TestBed.createComponent(MyApp);
        comp     = fixture.componentInstance;

    });

    afterEach(() => {
        fixture.destroy();
        comp = null;
    });

    it('is created', () => {

        expect(fixture).toBeTruthy();
        expect(comp).toBeTruthy();

    });

    it('initialises with a root page of HomePage', () => {
        expect(comp['rootPage']).toBe(HomePage);
    });

});
Here, we are first importing the required modules and then we are initializing the component and a fixture. A fixture is basically a handle surrounding the component, through it we get the instance of the component. beforeEach() is run before tests are executed, while the afterEach() method is run after the tests are executed.
We are using configureTestingModule() of TestBed to set up the environment for testing, so here we include all the providers and dependencies. Since we want the compile the components asynchronously, we are using the async method. compileComponents() is the method that actually compiles the modules.
You can read more about all the configuration of TestBed here (https://angular.io/docs/ts/latest/guide/testing.html#!#testing-intro).
We did only two tests with this component: 1) Make sure that the component is initialized 2) The ‘rootPage’ is set to ‘HomePage’.
Now, let’s do something similar with our “HomePage” component. In the “src/pages/home/” directory, create a new file “home.spec.ts” and copy the following content:
home.spec.ts
import { TestBed, ComponentFixture, async } from '@angular/core/testing';
import { By } from '@angular/platform-browser';
import { DebugElement } from '@angular/core';
import { IonicModule } from 'ionic-angular';
import { MyApp } from '../../app/app.component';
import { HomePage } from './home';
import { NavController } from 'ionic-angular';

let comp: HomePage;
let fixture: ComponentFixture<HomePage>;
let de: DebugElement;
let el: HTMLElement;

describe('HomePage Component', () => {

    beforeEach(async(() => {

        TestBed.configureTestingModule({

            declarations: [MyApp, HomePage],

            providers: [
                NavController
            ],

            imports: [
                IonicModule.forRoot(MyApp)
            ]

        }).compileComponents();

    }));

    beforeEach(() => {

        fixture = TestBed.createComponent(HomePage);
        comp     = fixture.componentInstance;

    });

    afterEach(() => {
        fixture.destroy();
        comp = null;
        de = null;
        el = null;
    });

    it('is created', () => {

        expect(fixture).toBeTruthy();
        expect(comp).toBeTruthy();

    });

    it('initialises with a value of My Current Data', () => {
        expect(comp['customData']).toEqual('My Current Data');
    });

    it('can set customData to a new value', () => {

        comp.changeData('My New Data');
        fixture.detectChanges();
        expect(comp['customData']).toEqual('My New Data');

    });

});
Here, we are testing whether our “customData” has changed its value or not. The fixture.detectChanges() is used to detect the changes of two-way data binding manually, so whenever we are changing the data to and from the model and view, then we need to call this method.
You can see that both “MyApp” and “HomePage” is included in “declarations” array plus I have also included “NavController” in the “providers”. This shows that you can add as many dependencies as you want as you normally do with typical @NgModule.
Now, open the “home.ts” and copy the following content:
home.ts
import { Component } from '@angular/core';

import { NavController } from 'ionic-angular';

@Component({
 selector: 'page-home',
 templateUrl: 'home.html'
})
export class HomePage {

    constructor(public navCtrl: NavController) {

    }

    customData: string = "My Current Data";

    changeData(data) {
        this.customData = data;
    }
}
Here, we have defined our variable and method.
Now, open the “home.html” and copy the following content:
home.html
<ion-header>
 <ion-navbar>
   <ion-title>
    Home
   </ion-title>
 </ion-navbar>
</ion-header>

<ion-content padding>
This is an example project of Ionic 2 demonstrating the unit testing.
<div>
    {{customData}}
 </div>
</ion-content>
You can do “npm test” to see the test results.
With this approach, you can test as many components as you want.
You can also test the HTTP services by using the MockBackend that creates the mock for the REST API, so if you are testing the component that uses the HTTP methods (usually the services in the “providers” folder uses the HTTP), then you need to import the modules, as in the following:
import { Http, HttpModule, Response, BaseRequestOptions, ResponseOptions } from '@angular/http';

import { MockBackend } from '@angular/http/testing';
And let’s say your component has a method to load the .json file from the local/external drive, we can mock the response rather than actually executing the GET method and get the result, something like following:
const mockResponse = '{"mockResponse": [{"name": "Ali", "age": “20”} ] }';

       mockBackend.connections.subscribe((connection) => {

           connection.mockRespond(new Response(new ResponseOptions({
               body: mockResponse
           })));

       });
Make sure to inject your service along with MockBackend, something like following in your it() method:
…
inject([YourService, MockBackend], (yourService, mockBackend) => {
…
Also, in your “providers” array, you need to add all these modules, something like following:
….
providers: [
YourService,
               MockBackend,
               BaseRequestOptions,
               {
                   provide: Http,
                   useFactory: (mockBackend, options) => {
                       return new Http(mockBackend, options);
                   },
                   deps: [MockBackend, BaseRequestOptions]
               }
],
           imports: [
               HttpModule
           ]
…
Check out this question (http://stackoverflow.com/questions/38526079/how-to-use-mockbackend-in-angular2) for the help.
If you have trouble following the code, then I have uploaded the Github repository here (https://github.com/danyalzia/ionic2-testing-play).
Regarding Debugging
So, we’ve finally talked about the unit testing approach in Ionic 2, but what about debugging? For simple JavaScript debugging, you can add “debugger” wherever you want to set the breakpoint, something like the following:
loadData(data) {
    this.currentData = data;
    debugger;
}
When your application runs and reaches this particular state, then the application stops/breaks and you can access the state of the application untill this line.
This is useful if you want to test how variables and properties in your application are changing over-time, so if a particular variable is showing a weird value, then you can find out its root cause.
Another useful method for debugging, especially if you are testing the native plugins on the actual device is using the chrome://inspect/#devices as that allows you to control your device on your computer as if you are running an emulator, but instead of a virtual machine you are directly accessing your device. This is useful for testing native plugins that you can’t test in your browser.
Conclusion
So now you should be able to finally understand the unit testing approach in Ionic 2. With this knowledge, you can easily integrate testing into any previous Ionic 2 applications or if you are working on a complex and big project, then now is the time to integrate the testing before your errors start piling up. So avoid the nightmare start testing now!
If you have any question, then please ask in the comment section below!
And be sure to use the DiscoverSDK directory to search and compare the best cross-platform mobile development tools.
Recent Stories


Top DiscoverSDK Experts


Featured Products


Compare Products
Select up to three two products to compare by clicking on the compare icon () of each product.
{{compareToolModel.Error}}
{{CommentsModel.TotalCount}} Comments
Your Comment