Sponsors


Authentication on Angular 2 with Firebase
In modern commercial websites, you would notice that the home page includes the pages for the sign-in and sign-up. Often these websites provide the services to the vendors that can create accounts on the website, and so those services are supposed to be hidden from the mainstream audience, therefore, some functionality must be added that restricts the access to certain pages on the website for certain audiences.
Authentication has been a part of the web development process, and its intensity has increased since the advent of several networks (i.e., Google, Facebook, Twitter, etc.) that allow the login integration to typical websites. Authentication allows you to compare the provided credentials with the information on the database. So, for instance, if the credentials are matched (i.e., correct username and password is given) then the user will gain access to certain pages on the website!
In Angular 2, Authentication can be provided through several ways. Traditionally, developers used Auth0 (https://auth0.com/) with Node.js, but nowadays, many developers have moved to Firebase technology, which not only provides the authentication, but also several backend features including the NoSQL cloud database.
In this article, I will show you how to integrate Firebase with your AngularJS 2 projects, and then the setup to implement the authentication and connection to a simple Database that will send and receive values in JSON files. Let's get started!
Authentication on AngularJS 2 with Firebase - Setting up the Backend and connecting with Database
In order to integrate the Firebase into your projects, you need to first create an account on the Firebase. Go to the Firebase developer console (https://console.firebase.google.com/), and create the account. Once the account is confirmed through email, create a new project and call it whatever you want (I have called it "my-awesome-app", but you may not like your app to be awesome...).
As we are going to use the Authentication methods, you need to enable the required methods from the Authentication page (in the left side-bar) on your Firebase console dashboard. Some providers, such as, Facebook, Github, etc. require you to provide the Client ID or API ID or Secret Keys and then give you the OAuth URI as the redirect URL. If you have written blogs or made websites that needed to include the Facebook page likes widget, then you would know that you need to get the unique API ID from Facebook that is associated with your account. In order to get the API ID, you need to visit the sites of the providers and generate the API/Secret key and then enter them down in the given fields.
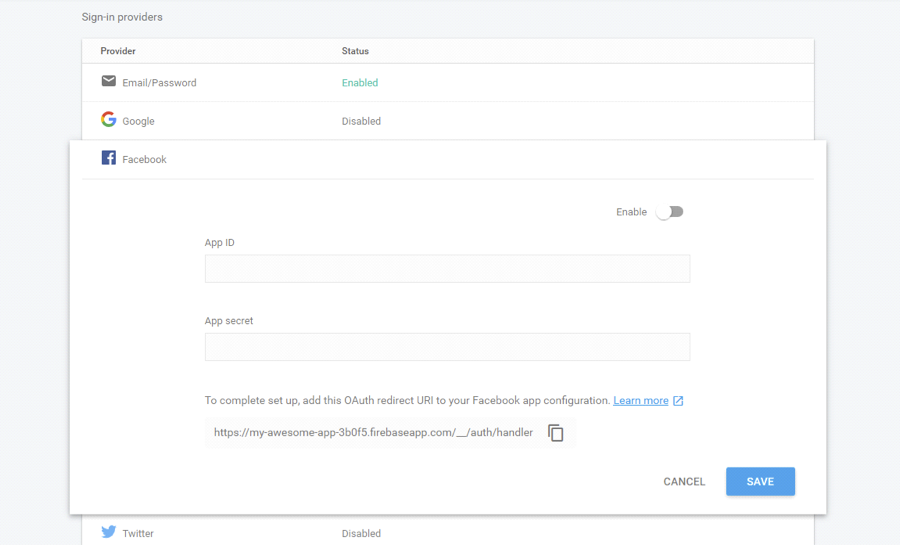
But, for now, we will simply use the email/password credentials to make things as smooth as possible, so enable the Email/Password provider, and that's it!
Creating a project
As always, we will use AngularJS 2 CLI. Create a new project called "AngularJS2-Firebase":
$ng new AngularJS2-FirebaseNow (assuming you are in the project directory) install the firebase:
$npm install firebase angularfire2 --saveNow, install the Firebase types:
$npm install @types/firebaseNow, in order to use the Firebase services in your project, you need to add the configuration to your profile that will enable the connection to Firebase website. Even though some code is already translated to TypeScript for the AngularJS 2, we will use the configuration in JavaScript to make things as smooth as possible.
On the right side of the Authentication page, click on WEB SETUP, it will give you the config code. Open the "index.html" and add the code in the <body> element. In my case, it looks like following:
<script src="https://www.gstatic.com/firebasejs/3.6.1/firebase.js"></script>
  <script>
    // Initialize Firebase
    var config = {
                                    apiKey: "AIzaSyDkzj0QeJc1n68FX-f167w7GL2NhpuZ96Y",
                                    authDomain: "my-awesome-app-3b0f5.firebaseapp.com",
                                    databaseURL: "https://my-awesome-app-3b0f5.firebaseio.com",
                                    storageBucket: "my-awesome-app-3b0f5.appspot.com",
                                    messagingSenderId: "196445321886"
    };
    firebase.initializeApp(config);
  </script>
Firebase provides several built-in UI methods for the client or user to enter the information. But, for now, we will use the simple login forms.
Now, we need to enable the routes in order for the user to navigate to different pages. Create three new components:
$ng g component signin

$ng g component signup

$ng g component showdata
The signin/signup pages will contain the login forms, and the showdata will contain the table that will display the values from the JSON on the database.
In order to provide the Authentication, we will create an Auth service that will have several methods (i.e., signin, logout, etc.) and the Auth guard that will protect the showdata from the unauthorized access. So, create two new files in the "app" directory "auth.guard.ts" and "auth.service.ts". Copy the following code into the files:
auth.guard.ts
import { Injectable } from "@angular/core";
import { CanActivate, ActivatedRouteSnapshot, RouterStateSnapshot } from "@angular/router";
import { Observable } from "rxjs/Rx";
import { AuthService } from "./auth.service";

@Injectable()

export class AuthGuard implements CanActivate {
  constructor(private authService: AuthService) {}

  canActivate(route: ActivatedRouteSnapshot, state: RouterStateSnapshot): Observable<boolean> | boolean {
    return this.authService.isAuthenticated();
  }
}
auth.service.ts
import { Injectable } from "@angular/core";
import { Router } from "@angular/router";

export interface User {
    email: string;
    password: string;
    confirmPassword?: string;
}

// Our firebase variable from index.html,..... yes we are using JavaScript Firebase code
declare var firebase: any;
@Injectable()
export class AuthService {
  constructor(private router: Router) {}
  signupUser(user: User) {
    firebase.auth().createUserWithEmailAndPassword(user.email, user.password)
      .catch(function (error) {
        console.log(error);
      });
  }

  signinUser(user: User) {
    firebase.auth().signInWithEmailAndPassword(user.email, user.password)
      .catch(function (error) {
        console.log(error);
      });
  }

  logout() {
    firebase.auth().signOut();
    this.router.navigate(['/signin']);
  }

  isAuthenticated() {
    var user = firebase.auth().currentUser;
    if (user) {
      return true;
    } else {
      return false;
    }
  }
}
Now, let's use these services in our component. Copy the following code in your "app.component.ts" and "app.component.html":
app.component.ts
import { Component } from '@angular/core';
import { AngularFire, FirebaseListObservable } from 'angularfire2';
import { AuthService } from "./auth.service";

@Component({
  selector: 'app-root',
  templateUrl: 'app.component.html',
  styleUrls: ['app.component.css']
})

export class AppComponent {
  constructor(private authService: AuthService) {
  }

  isAuth() {
    return this.authService.isAuthenticated();
  }

  onLogout() {
    this.authService.logout();

  }

}
app.component.html
<header>
                  <nav class="navbar navbar-default">
                                    <div class="container-fluid">
                                                      <ul class="nav navbar-nav">
                                                                        <li><a [routerLink]="['signup']">Sign Up</a></li>
                                                                        <li><a [routerLink]="['signin']">Sign In</a></li>
                                                                        <li><a [routerLink]="['showdata']">Show Data</a></li>
                                                      </ul>
                                                      <ul class="nav navbar-nav navbar-right" *ngIf="isAuth()">
                                                                        <li><a (click)="onLogout()" style="cursor: pointer;">Logout</a></li>
                                                      </ul>
                                    </div>
                  </nav>
</header>

<div class="container">
  <div class="row">
    <div class="col-md-10 col-md-offset-1">
      <router-outlet></router-outlet>
    </div>
  </div>
</div>
This won't do anything, as we don't have any content in our pages.
Using the database
Now you understand how the Authentication works, let's add a JSON file in our server, and then we will use HTTP's GET method to retrieve the values from the Firebase server. We are going to upload the following JSON file to the server. Create a file called "data.json" in your "app" directory:
data.json
[
  {
    "employeeName": "Richard",
    "daysWork": "15 Days",
    "hourlyRate": "$11.11"
  },
  {
    "employeeName": "John",
    "daysWork": "30 Days",
    "hourlyRate": "$20.88"
  }
]
It is nothing but a simple Employee data file (you can add as additional values as you want, just make sure to keep the structure).
In your Firebase dashboard, go to Database panel and use "Import JSON" to import our JSON file to the server.
You need to allow the read/write to the Database, for that, go to the Database, and then "Rules". Change the read and write values to "true" that is set to "auth != null" by default. That's it! You can now read and write the data! So, let's write the code for it!
In your showdata folder, open the "showdata.component.ts" and copy the following code:
showdata.component.ts
import { Component, OnInit } from '@angular/core';
import { Router, ActivatedRoute, Params } from '@angular/router';
import {Http} from "@angular/http";
import * as _ from 'lodash';
import * as Rx from 'rxjs/Rx';

@Component({
  selector: 'app-showdata',
  templateUrl: './showdata.component.html',
  styleUrls: ['./showdata.component.css']
})

export class ShowdataComponent implements OnInit {
  private data;

  constructor(
    private http:Http,
    private route: ActivatedRoute,
    private router: Router
  ) {
    http.get("https://my-awesome-app-3b0f5.firebaseio.com/.json")
      .subscribe((data)=> {
        setTimeout(()=> {
          this.data = data.json();
        }, 1000);
      });
  }

  private sortByWordLength = (a:any) => {
    return a.name.length;
  }

  ngOnInit() {
  }
}
Here, I am using lodash library which you need to download separately:
$npm install --save lodash

$npm install --save @types/lodash
We need a data table to render our list to the view, for that, we will use this (https://www.npmjs.com/package/angular2-datatable) awesome datatable component! First install it:
$npm i -S angular2-datatableAnd then add the ReactiveFormsModule in the imports of "app.module.ts".
I have altered the code to suit the project. Copy the following code to "showdata.component.html":
showdata.component.html
<div class="container" id="colorbody">
    <div class="page-header">
      <h1>
        <span>Employee List</span>
      </h1>
    </div>
    <div class="panel panel-default" style="width: 35%">
      <div class="panel-heading">User information</div>
      <table class="table table-striped" [mfData]="data" #mf="mfDataTable" [mfRowsOnPage]="10" style="width: 10%">
        <thead>
        <tr>
          <th style="width: 10%"></th>
          <th style="width: 20%">
              <mfDefaultSorter by="name">Employee Name</mfDefaultSorter>
          </th>
          <th style="width: 40%">
            <mfDefaultSorter by="email">Days Work</mfDefaultSorter>
          </th>
          <th style="width: 10%">
            <mfDefaultSorter by="age">Hourly Rate</mfDefaultSorter>
          </th>
        </tr>
        </thead>
        <tbody>
        <tr *ngFor="let item of mf.data">
          <td>
          </td>
          <td>{{item.employeeName}}</td>
          <td>{{item.daysWork}}</td>
          <td class="text-right">{{item.hourlyRate}}</td>
          <td>
          </td>
        </tr>
        </tbody>
        <tfoot>
        <tr>
          <td colspan="5">
            <mfBootstrapPaginator [rowsOnPageSet]="[5,10,15]"></mfBootstrapPaginator>
          </td>
        </tr>
        </tfoot>
      </table>
    </div>
</div>
Now, we also need to add the code for signin and signup pages. Copy the following code into "signin.component.ts":
signin.component.ts
import {Component, OnInit} from "@angular/core";
import { FormBuilder, FormGroup, Validators } from "@angular/forms";
import { AuthService } from "../auth.service";

@Component({
    templateUrl: './signin.component.html'
})
export class SigninComponent implements OnInit {
    myForm: FormGroup;
    error = false;
    errorMessage = '';
    constructor(private fb: FormBuilder, private authService: AuthService) {}
    onSignin() {
      this.authService.signinUser(this.myForm.value);
    }

    ngOnInit():any {
        this.myForm = this.fb.group({
            email: ['', Validators.required],
            password: ['', Validators.required],
        });
    }
}
Here, we are using the classic FormBuilder along with AuthService to confirm the signin. The code should be self-explanatory!
Now, for the login forms, copy the following code into "signin.component.html":
signin.component.html
<h3>You need to sign-in to see the Employee Data</h3>
<form [formGroup]="myForm" (ngSubmit)="onSignin()">
                  <div class="form-group">
                                    <label for="email">E-Mail</label>
                                    <input formControlName="email" type="email" id="email" class="form-control">
                  </div>
                  <div class="input-group">
                                    <label for="password">Password</label>
                                    <input formControlName="password" type="password" id="password" class="form-control">
                  </div>
                  <button type="submit" [disabled]="!myForm.valid" class="btn btn-primary">Sign In</button>
</form>
Now copy the following code in "signup.component.ts":
signup.component.ts
import { Component, OnInit } from "@angular/core";
import { FormBuilder, FormGroup, Validators, FormControl } from "@angular/forms";
import { AuthService } from "../auth.service";

@Component({
    templateUrl: './signup.component.html'
})

export class SignupComponent implements OnInit {
    myForm: FormGroup;
    error = false;
    errorMessage = '';
    constructor(private fb: FormBuilder, private authService: AuthService) {}

    onSignup() {
      this.authService.signupUser(this.myForm.value);
    }

    ngOnInit(): any {
        this.myForm = this.fb.group({
            email: ['', Validators.compose([
                Validators.required,
                this.isEmail
            ])],
            password: ['', Validators.required],
            confirmPassword: ['', Validators.compose([
                Validators.required,
                this.isEqualPassword.bind(this)
            ])],
        });
    }

    isEmail(control: FormControl): {[s: string]: boolean} {
        if (!control.value.match(/^\w+@[a-zA-Z_]+?\.[a-zA-Z]{2,3}$/)) {
            return {noEmail: true};
        }
    }

    isEqualPassword(control: FormControl): {[s: string]: boolean} {
        if (!this.myForm) {
            return {passwordsNotMatch: true};
        }

        if (control.value !== this.myForm.controls['password'].value) {
            return {passwordsNotMatch: true};
        }
    }
}
The code is similar to the previous component.
And for the forms, "signup.component.html":
signup.component.html
<h3>Sign-up to see the Employee page</h3>
<form [formGroup]="myForm" (ngSubmit)="onSignup()">
                  <div class="form-group">
                                    <label for="email">E-Mail</label>
                                    <input formControlName="email" type="email" id="email" #email class="form-control">
                                    <span *ngIf="!email.pristine && email.errors != null && email.errors['noEmail']">Invalid mail address</span>
                  </div>
                  <div class="form-group">
                                    <label for="password">Password</label>
                                    <input formControlName="password" type="password" id="password" class="form-control">
                  </div>
                  <div class="form-group">
                                    <label for="confirm-password">Confirm Password</label>
                                    <input formControlName="confirmPassword" type="password" id="confirm-password" #confirmPassword class="form-control">
                                    <span *ngIf="!confirmPassword.pristine && confirmPassword.errors != null && confirmPassword.errors['passwordsNotMatch']">Passwords do not match</span>
                  </div>
                  <button type="submit" [disabled]="!myForm.valid" class="btn btn-primary">Sign Up</button>
</form>
Now, as we have already defined the routes, we need to also add them in RouterModule.forRoot() function. Create a new file "app-routing.module.ts" in the "app" directory and copy the following content into it:
app-routing.module.ts
import { NgModule }     from '@angular/core';
import { RouterModule } from '@angular/router';
import {Component} from '@angular/core';
import { SignupComponent } from "./signup/signup.component";
import { SigninComponent } from "./signin/signin.component";
import { ShowdataComponent } from "./showdata/showdata.component";
import { AuthGuard } from "./auth.guard";

@NgModule({
  imports: [
    RouterModule.forRoot([
                                    // Let's redirect it to default signin page
                                    { path: '', redirectTo: '/signin', pathMatch: 'full' },
                                    { path: 'signup', component: SignupComponent },
                                    { path: 'signin', component: SigninComponent },
                                    { path: 'showdata', component: ShowdataComponent, canActivate: [AuthGuard] }
    ])
  ],
  exports: [
    RouterModule
  ],
  providers: [AuthGuard]
})

export class AppRoutingModule {}
This is what your directory should look like:

Make sure you have every component included in "app.module.ts".
If you "ng serve" now, then you can see the website that will allow you to signin and signup, and eventually you will see the data from the JSON on "Show Data" page!
If you visit the Authentication page and then click on "Users", then you will see the added users from the signup form. You can manage your accounts from here.
You can see the whole source code here (https://github.com/danyalzia/AngularJS2-Firebase).
Deploying to Firebase
It would be great if somehow your friends on the other computer can see the results. Thankfully, Firebase supports the deployement of your local website to their hosting server, so you can visit the website through a unique URL from anywhere in the world!
Assuming you are in the project directory, install the Firebase Tools:
$ npm install -g firebase-toolsNow login to your account:
$ firebase login --interactiveNow you need to initialize your directory as the Firebase project:
$ firebase initNow it will give you the list of your projects on your Firebase account. Type down the project to which you want to deploy and choose the desired option (for example, it will ask you if you want to deploy to default public, you can write something else).
....and there is more!
Firebase supports several other features. For example, it's extremely sophisticated Analytics feature provides the analysis on your website, for example, the number of visits, activities on your site, user engagement, etc. You can earn money through their AdMob Ad program by displaying website. All these options make Firebase a compelling platform for deploying advertisements to your next professional websites!
Conclusion
So....you have seen the power of Firebase, especially when combined with AngularJS 2. This combination makes it extremely easy to build any commercial website from scratch with the help of reusable components. All you need is the understanding of the if-then dynamic logic between the processes, and the willpower to merge all the stuff together to create sophisticated applications!
As always, if you think I have missed something, then please ask so in the comment section below!
Recent Stories


Top DiscoverSDK Experts


Featured Products
Compare Products
Select up to three two products to compare by clicking on the compare icon () of each product.
{{compareToolModel.Error}}
{{CommentsModel.TotalCount}} Comments
Your Comment