Sponsors


A Guide For Transitioning to Native Android from Ionic 2
(Note: This is not a beginner’s tutorial or an introduction to Native Android development, as there are many resources out there on the internet for this purpose. However, we will be redefining several basic concepts through the lens of Ionic 2)
Figuring out the similarities and differences between these two giant domains.
If you have been reading my articles on Ionic 2, then you know that I have covered most aspects of the platform so far, including its components and plugin system. There is a good chance that many readers started Android development with Ionic 2 and with no prior knowledge of native Android development, considering the fact that it has the advantage of fast development time.
Such individuals may wish to transfer the knowledge and experience they received from learning this awesome platform. After all, the general structure, organization, and the process of building Android applications remains the same in both platforms PLUS the requirements of the clients seem to match with each other pretty well.
Thus, it makes sense to figure out the easiest and most efficient method for the transition. You have probably already read several articles on the internet demonstrating how Ionic 2 development differs from native development on a fundamental level, but hardly any information when it comes to the difference between the project structure, development process, UI changes, language differences, etc.
This is because most developers start with native Android development when they touch Android for the first time, but since I personally started mobile development through Ionic 2 and recently transitioning to Native Android, it makes sense to share my experience so far on the differences between the platforms in order to enable you to easily translate your components/logic/view side to Native Java.
In this article, I am going to show you how you can convert your Ionic 2 applications to Native Java Android applications. Let’s get started!
A Guide For Transitioning to Native Android from Ionic 2/Hybrid Development
I am assuming that you have already installed Android Studio along with SDK tools, and know how to build a simple “Hello World!” application in Native Android, as we are not covering the basic build process here.
When you create a new project in Android Studio with an Empty Activity, the generated files contain an “app”, “build”, and “gradle” folder along with the gradle configuration files for building the application (i.e., two build.gradle files for both the “Root” project and “app” module).
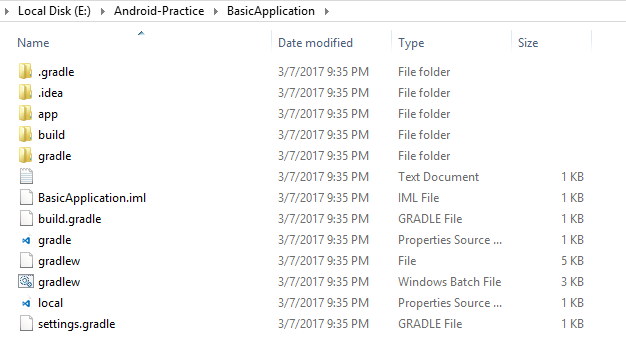
Most of the development is done within the “app” folder, specifically the “app/src/main” folder—this is similar to the “app/src” folder in Ionic 2. This folder not only contains the source code, but also the resources folder that contains the icons, images, layouts and other resources, along with a very important file: AndroidManifest.xml.
This file (AndroidManifest.xml) includes the information about your application/package, including the number of activities, services, broadcast receivers, content providers, etc. (sounds confusing? just wait a few moments). Apart from this, it allows you to set some configurations of your application, like providing permissions to access the features (i.e., Internet), Android API that the application is going to use, etc.
For example, this is what it looks like in my application:
<?xml version="1.0" encoding="utf-8"?>
<manifest xmlns:android="http://schemas.android.com/apk/res/android"
   package="com.example.personal.basicapplication">

   <application
       android:allowBackup="true"
       android:icon="@mipmap/ic_launcher"
       android:label="@string/app_name"
       android:supportsRtl="true"
       android:theme="@style/AppTheme">
       <activity android:name=".MainActivity">
           <intent-filter>
               <action android:name="android.intent.action.MAIN" />

               <category android:name="android.intent.category.LAUNCHER" />
           </intent-filter>
       </activity>
   </application>

</manifest>
This is the basic file you get when you create an Empty Activity. You can see that it contains the package name, icon, label, theme, activity and intents.
Actually, we used this file in Ionic 2 as well when manipulating or using the ID/package name of our application. When we are building an application for Android in Ionic 2, then it automatically creates this file in the “platforms/android” directory. After all, Ionic 2 is using Cordova which wraps the JavaScript/HTML code within the WebView, so we get the base Java source code just like Native Android that is compiled through SDK tools, like a normal Android application.
If you open “platforms/android”, then you can open “AndroidManifest.xml.” This is what it looks like in our previous ionic-audio project:
<?xml version='1.0' encoding='utf-8'?>
<manifest android:hardwareAccelerated="true" android:versionCode="1" android:versionName="0.0.1" package="com.ionicframework.ionicaudio429396" xmlns:android="http://schemas.android.com/apk/res/android">
   <supports-screens android:anyDensity="true" android:largeScreens="true" android:normalScreens="true" android:resizeable="true" android:smallScreens="true" android:xlargeScreens="true" />
   <uses-permission android:name="android.permission.INTERNET" />
   <application android:hardwareAccelerated="true" android:icon="@mipmap/icon" android:label="@string/app_name" android:supportsRtl="true">
       <activity android:configChanges="orientation|keyboardHidden|keyboard|screenSize|locale" android:label="@string/activity_name" android:launchMode="singleTop" android:name="MainActivity" android:theme="@android:style/Theme.DeviceDefault.NoActionBar" android:windowSoftInputMode="adjustResize">
           <intent-filter android:label="@string/launcher_name">
               <action android:name="android.intent.action.MAIN" />
               <category android:name="android.intent.category.LAUNCHER" />
           </intent-filter>
       </activity>
   </application>
   <uses-sdk android:minSdkVersion="16" android:targetSdkVersion="25" />
   <uses-permission android:name="android.permission.RECORD_AUDIO" />
   <uses-permission android:name="android.permission.MODIFY_AUDIO_SETTINGS" />
   <uses-permission android:name="android.permission.READ_PHONE_STATE" />
   <uses-permission android:name="android.permission.WRITE_EXTERNAL_STORAGE" />
   <uses-permission android:name="android.permission.READ_EXTERNAL_STORAGE" />
</manifest>
You can see that several <uses-permission> are included here automatically by Cordova, including the ones for audio reading/writing permissions.
Usually, we do not touch this file in Ionic 2, because even when we touch it, the command “ionic build android” automatically replaces the file with the new one (that is decided on the basis of our project configuration, which is normally defined in package.json), unless we have already built the project and it needs to run through “ionic run android.” In that case, we often need to change the app ID in this file, but in Native Android we touch it all the time whenever we want to create new intents, change permissions, ID, etc.
In your Native Android application folder, if you go to “app/src” you will find three folders:
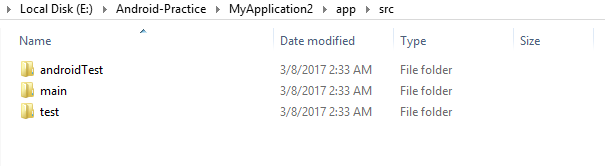
Our main source files are included in the “main” folder (this also includes the AndroidManifest.xml):
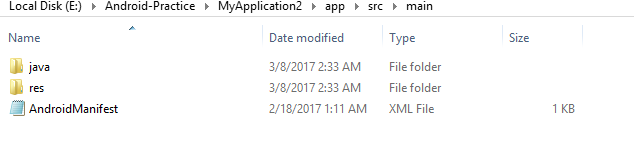
The “java” folder contains all the source code, while the “res” folder contains the resources, including the layout and menu XML files.
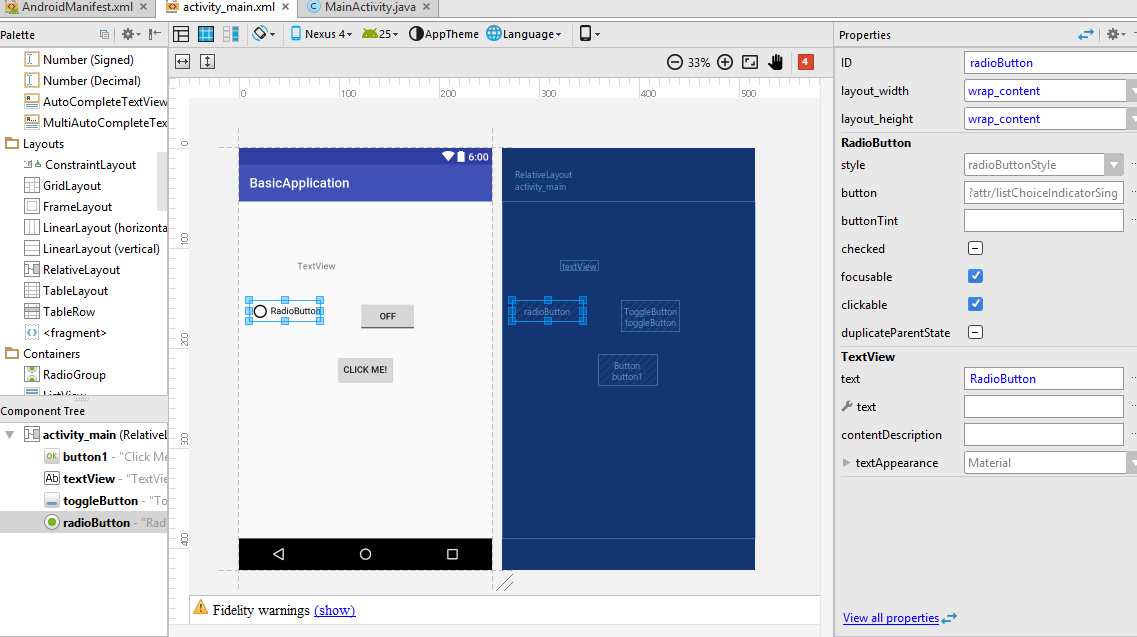
XML Files? Well, in Native Android, whenever we create an activity, we also create its corresponding layout.xml file. This is similar to how we create the component.ts file along with its corresponding component.html file for the View in Ionic 2 whenever we create new pages (see how similar pages are to activities).
This layout.xml file contains all the properties of the View for the module/component that is later manipulated in the Java source file, so for example this is what it looks like in my application:
activity_main.xml
<?xml version="1.0" encoding="utf-8"?>
<RelativeLayout xmlns:android="http://schemas.android.com/apk/res/android"
   xmlns:tools="http://schemas.android.com/tools"
   android:id="@+id/activity_main"
   android:layout_width="match_parent"
   android:layout_height="match_parent"
   android:paddingBottom="@dimen/activity_vertical_margin"
   android:paddingLeft="@dimen/activity_horizontal_margin"
   android:paddingRight="@dimen/activity_horizontal_margin"
   android:paddingTop="@dimen/activity_vertical_margin"
   tools:context="com.example.personal.basicapplication.MainActivity">

   <TextView
       android:layout_width="wrap_content"
       android:layout_height="wrap_content"
       android:text="Hello World!" />
</RelativeLayout>
This is the layout.xml file for the MainActvity. You can see that it is using a <RelativeLayout> element for specifying the layout style (the other one is LinearLayout). Within the element, there are properties defined, same for the <TextView> element that simply shows the “Hello World!” on the activity.
Ionic 2 Packaging vs Native Android Packaging
For the packaging and building, Native Android uses Gradle which provides build.gradle configuration that contains the information about the modules/packages, miniumSdk, maximumSdk, targettedSdk, etc.
Here, you can also configure the BuildTypes (i.e., Debug, Production), which applies certain settings. For example, debug build type signs the APK with the debug key, while the release signs your APK with release key. Apart from this, you can specify several ProductFlavors, for example, the free and paid/premium versions etc., which create different source files or dependencies per flavor.
You can add the dependencies, either in the form of Local Dependencies (which are present in the local drive) or Remote Dependencies (which are available online). It also allows you to add tasks and scripts through DSL (Domain Specific Language). For example, if you open “build.gradle” in your root directory, you will see the following code:
task clean(type: Delete) {
   delete rootProject.buildDir
}
This is a task script for cleaning the build files, so whenever we clean/rebuild the application in Android Studio, then this task is executed. You can also use the CMD to run the task manually through “gradle clean” in the Root directory.
If you open “build.gradle” of the app module (i.e., the one provided in the “app/” directory), then you can see several configuration for the dependencies:
dependencies {
   compile fileTree(dir: 'libs', include: ['*.jar'])
   androidTestCompile('com.android.support.test.espresso:espresso-core:2.2.2', {
       exclude group: 'com.android.support', module: 'support-annotations'
   })
   compile 'com.android.support:appcompat-v7:25.2.0'
   testCompile 'junit:junit:4.12'
}
You can either add the remote library (like how AppCompat is added above), or you can add Local library, something like:
compile project(':mylibrary')
You can even add the binary dependency:
compile fileTree(dir: 'libs', include: ['*.jar'])
This will include the “libs” directory that contains the .jar files. You can read more about this here (https://developer.android.com/studio/build/dependencies.html#dependency_types).
You can read more about Gradle here (https://developer.android.com/studio/build/index.html).
In Ionic 2, all the dependencies are covered in the package.json file, including the dependencies, plugins and typings definitions for TypeScript. In fact, we don’t even need to touch this file for the most part, as we can add or remove the libraries/plugins through Ionic CLI. So, in this case, Ionic 2 packaging is relatively faster and sophisticated.
That’s pretty much all the major differences in the project structure. Basically, you don’t define the typings or additional plugins like you do in Ionic 2, just the libraries that are needed, which you can do either manually by modifying build.gradle or you can use Android Studio. This StackOverflow post (http://stackoverflow.com/questions/16588064/how-do-i-add-a-library-project-to-android-studio) describes the process in detail of how you can add new libraries.
We will see more about activities/fragments later.
Regarding Logic/Implementation
Now comes the important part. In Ionic 2, we had to pass the options, i.e. (click), to a View element to make it clickable as well as execute the methods we have defined. We also used the Events module that allows you to publish and subscribe methods we are providing into it, something like the following:
events.publish('myevent:watch', value);

events.subscribe('myevent:watch', (value) => {
 console.log('Current Value: ', value);
});
In Native Android, the event handling is performed by defining several listener methods, which basically use the ID of the element through the help of R.java files which are basically created automatically for you when you define new elements in XML. These files contain the ID information of the resources. We don’t directly perform action on the component, but use the ID to perform action.
For example, to add the Button you do something like:
In “activity_main.xml”:
<Button
   android:id="@+id/button1"
   android:layout_width="wrap_content"
   android:layout_height="wrap_content"
   android:layout_centerHorizontal="true"
   android:layout_centerVertical="true"
   android:text="Click Me!" />
In our “MainActivity.java”:
package com.example.personal.basicapplication;

import android.os.Bundle;
import android.app.Activity;
import android.view.Menu;
import android.view.View;
import android.view.View.OnClickListener;
import android.widget.Button;
import android.widget.EditText;
import android.widget.Toast;

public class MainActivity extends Activity {

   private Button button;

   @Override
   protected void onCreate(Bundle savedInstanceState) {
       super.onCreate(savedInstanceState);
       setContentView(R.layout.activity_main);
       addListenerOnButton();
   }

   public void addListenerOnButton(){
       button=(Button)findViewById(R.id.button1);

       button.setOnClickListener(new OnClickListener(){

           @Override
           public void onClick(View view) {
               Toast.makeText(getApplicationContext(),"Clicked!",Toast.LENGTH_LONG).show();
           }

       });

   }
}
This will give you the Toast whenever you click the button. By the way, you can get the same Toast in Ionic 2 through this plugin (https://ionicframework.com/docs/v2/native/toast/).
But what about Navigation states? In Native Android, we have lifecycle events for the activities that include 7 states: onCreate(), onStart(), onResume(), onPause(), onStop(), onRestart(), onDestroy(). These 7 states are similar to navigation lifecycle events provided in the pages in Ionic 2, like ionViewDidLoad(), ionViewWillEnter(), etc.
So, for example, onCreate() is executed when the activity is initialized. You can read more about this lifecycle here (https://developer.android.com/guide/components/activities/activity-lifecycle.html).
Whether activity or fragments, both can extend these states, so most of the initialization/destruction of the elements in UI/XML takes place in these states.
But, for other events (like a click event), you need to implement the methods separately. So for example, if you have 3 buttons implemented in your UI and you want to get the click from the users, then you can define their listener methods in your code and then call it in the onCreate() method (similar to what I did above for the Button).
This means that you need to implement the event listeners for all the elements. This may sound scary at first, but it’s really easy once you understand the basic pattern of the methods.
So in a nutshell, the logic side is done with Java, while the UI side is done with XML (but this is not always the case).
Regarding View/UI
Actually, UI can be either developed programmatically, or through an XML-based UI layout. Earlier I demonstrated the XML based approach, wherein the elements along with their properties are created in an XML file, and the elements are manipulated through Java file by their IDs only. But, you can manipulate and add the properties of elements solely in Java, but I won’t cover this approach here.
The cool thing in UI of Native Android is that you don’t need to worry about the placement issues of your button as the nice UI editor helps you to simply drag and drop your preferred UI elements wherever you want and set the properties (i.e., width, height, ID, etc.) on the fly, and the results look same in all the devices without any padding issues!
In Ionic 2, you had to pass the properties/ID to the elements in HTML, but you don’t have the ability to drag and drop the UI, however, components creation are significantly faster in Ionic 2, so it’s a matter of whether you like the approach of drag and drop UI building or you prefer writing less code.
But, how the ID is used? Well, the ID of the elements will be used by the LayoutInflater to render the content from the XML, so you can define as many elements as you want in XML files, and we will be manipulating only the ID and not the element itself, and the UI will be updating dynamically!
Note that by default Android uses the Holo if building on < 5.0 version, but for versions greater than 5.0, you can use the Material Design (which we used in the Ionic 2). However, you can use the AppCompat module to use the MatieralDesign for previous versions.
Remember I used the word “fragments” earlier? Well, fragments which are like sub-activities, so within a single Activity you can have several fragments. In Ionic 2, there is no need to add a page within a page, as new pages can be created easily, as pages use the model of stack, wherein pages are on the top of other pages. In other words, Android provides a more low-level control to navigation building.
For creating new activities, Intents are used which is similar to pushing/popping pages and passing parameters in Ionic 2.
Actually, Ionic 2 by default enforces the Navigation in the application, this is why the framework is built on pages and navigation life cycle. In Native Android, you can create an activity without any navigation. This makes it more flexible, but also requires you to write the boilerplate code for creating navigation/pages/menus that Ionic 2 provides out of the box in a sophisticated manner.
In Ionic 2, you just create pages and whatever page has NavController injected, then you get all the lifecycle events. In Native Android, any class that extends the “Activity” has those 7 lifecycle events.
Some little changes…
In Ionic 2, if you had to create the lists, then you first add the <ion-list> tag, and within you add the <ion-item> elements that basically adds as many items you want. In Native Android, you need to first create the ListAdapter, which basically defines the kind of list and its properties (i.e., parent, ID, etc.), and within it, you add your list items. Actually, ListAdapter is something that renders the content of the list items.
We use ArrayAdapter to store the array list for Spinners and other array requirements. All these classes are an abstraction of the data that needs to be manipulated in the Java source code, and so both of these extend from BaseAdapter.
The “res/values/” directory contains some useful files such as, strings.xml for adding some basic values, like application name, etc.
Let’s create a simple application to demonstrate the navigation menu similar to the one we used in Ionic 2.
In Android Studio, create a new Project and name it “NavigationDrawerExample”. In the activity selection screen, select “Navigation Drawer Activity”. Thankfully, we already have the template available for such a navigation menu, which basically uses the Material Design, which is what Ionic 2 uses, so you will feel at home.
Once the project has been created, you can run the application on your Android device to test the menu.
If you open the “activity_main.xml”, then you can see the DrawerLayout element that is coming from the Material Design. Usually by default, you get the Holo design theme for the UI elements, but this Navigation Drawer was introduced only in Material Design.
You can open “build.gradle” (of the Module: app) and see that it has already included the Material Design library:
compile 'com.android.support:design:25.2.0'
This is all the major differences I have noticed so far when converting my Ionic 2 applications to Native code. Of course, it doesn’t contain things like how Promises/Callbacks are implemented in Android, the actual real-world development differences, etc., which we will probably cover in later articles.
If you know more differences, then you can tell me in the comment section below this article!
Oh by the way, in Native Android, JUnit is used for writing and executing tests, but that’s an entirely new domain, so let’s skip it for now.
Conclusion
Finally, you have witnessed the difference in these platforms and the different flavors of their communities. Even though Ionic 2 has a higher start-up cost, it has a faster development cycle, but it’s not really that big of a difference if you understand the Java language. For web developers, the Ionic 2/Hybrid approach is still preferred.
If you have any question, then please ask in the comment section below!
Recent Stories


Top DiscoverSDK Experts


Compare Products
Select up to three two products to compare by clicking on the compare icon () of each product.
{{compareToolModel.Error}}
{{CommentsModel.TotalCount}} Comments
Your Comment