Sponsors


Version Control with SVN - Basic Operations
In the first article in this series, we learned about three basic terms branch, commit and merge. We learned the main branch in SVN is call the trunk. Commit is the command we use to add code to the version control, and merge is adding the code of one branch back to the trunk.
So the question now is, how do we really start working with SVN? With SVN we need a central server. You cannot work with SVN without a server (at least not without a whole host of tricks and workarounds). Working with SVN is mostly done with a central server that contains all of the versions. This central server is called a repository or repo for short. Setting up this server is not within the bounds of this article. If you work in a development environment, the administrator will give you the server’s address. For example, when working with WordPress, they provided an SVN address to work from. What you need to install on your local machine is an SVN client. There is a Linux/Mac client and one for Windows. In Linux/Mac it's easy:
sudo apt-get install svn
After this, you can open the console and type svn –help. If everything is OK you’ll see an explanation on SVN and you’ll be able to work with it.
The popular client for Windows is called SVN tortoise and you can easily install it from their site. After installation, if you open the cmd, you can type svn -help and you're ready to work. It also has a GUI, but let's keep a little self-respect here and work with the command line.
After installing the client, in whichever OS you're in, we're ready to start:
First off, we need the server's address for SVN. For example, the SVN of my add-on in WordPress. I also have a local SVN server of my own: http://192.168.1.100/svn. The repository that we'll be working with is called testrepo.
I take the repository, and type in the console or cmd:
svn co http://192.168.1.100/svn/testrepo/
This command is called check out. I can see how project folders were created. For example, if we run...
svn co http://plugins.svn.wordpress.org/wp-notice/trunk/
then we'll see that a project folder was created called wp-notice. Cool! If I make a change to a particular folder, I can type svn status in order to see which files were changed. If I want to see
the exact changes, I need to type svn diff and then the name of the file. Here's an example:
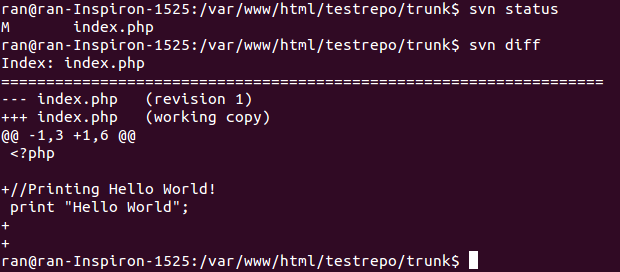
$ svn status
M       index.php
$ svn diff
Index: index.php
===================================================================
--- index.php (revision 1)
+++ index.php (working copy)
@@ -1,3 +1,6 @@
< ?php
+//Printing Hello World!
print "Hello World";
+
+
The diff can look a little strange, but in general it's pretty easy. We have a ++ to mark add-ons and -- for downloads when SVN shows us the lines close by. In the example above we see that I added a comment Printing Hello World and two line breaks.
If I'm happy with the changes, I can add the operation to the trunk. We do this with check in:
svn ci
The client will ask us to type a comment, which should be relevant and easily understandable (more on this later). If the check in was successful here's what you'll see:
If I made a new file that doesn't exist on my branch, I need to add it via the command svn add.
If someone else updated the branch, we can pull the updates via the command update:
svn up
You can do svn up before we execute check in.
Creating a new branch is done with svn copy:
svn copy http://localhost/svn/testrepo/trunk/ http://localhost/svn/testrepo/branches/develop/ -m'Creating Develop'Here I'm using the URL of my repository, although any URL will do, so long as I have permission. For instance:
svn copy http://plugins.svn.wordpress.org/wp-notice/trunk/ http://plugins.svn.wordpress.org/wp-notice/branches/develop/ -m'Creating Develop'After this, all that I can do is go into the folder where I did check out to the project and pull the changes using svn up. If all is well, I'll see that I have the trunk as well as the develop branch which at this point is a perfect copy of the trunk:
.
├── branches
│   └── develop
│       └── index.php
└── trunk
   └── index.php
We learned here a few important terms. The terms branch, merge, and commit we know from the previous article. The new terms we learned are:
Repository (repo) - the central server. It has a trunk which is the main branch, and also has other branches.
Check out - pulling from the repository. This is done via the command svn co. This command pulls all the data from the repo to our local machine.
Update - updates the repo or a specific branch. This is done via the command svn update. This command updates the local files with changes that were made remotely to the repository.
Check in - pushes the local changes to the repo. This is done via the command svn ci.
In the next article we'll learn about conflicts.
About the author: Ran Bar-Zik is an experienced web developer whose personal blog, Internet Israel, features articles and guides on Node.js, MongoDB, Git, SASS, jQuery, HTML 5, MySQL, and more. Translation of the original article by Aaron Raizen.
Recent Stories


Top DiscoverSDK Experts


Featured Products

Compare Products
Select up to three two products to compare by clicking on the compare icon () of each product.
{{compareToolModel.Error}}
{{CommentsModel.TotalCount}} Comments
Your Comment