Sponsors


Tuning Web behaviour with Spring Boot
In this Spring Boot based tutorial, we will continue our journey with our Student application and learn about the following concepts:
- Configuring custom static path mappings
- Tuning Tomcat via the EmbeddedServletContainerCustomizer
- Choosing embedded servlet containers
- Adding custom connectors
We will continue to look further into enhancing our web application by doing behavior tuning, configuring the custom routing rules and patterns, adding additional static asset paths, and adding and modifying servlet container connectors and other properties such as enabling SSL.
Configuring custom static path mappings
It is possible to control how our web app deals with static asset files and the files that exist on the file system or are bundled in the deployable archive.
Suppose we want to expose our internal application.properties file via the static web URL of http://localhost:8080/internal/application.properties from our app.
To get started with this, proceed with these steps:
- Let's add a new method, addResourceHandlers, to the WebConfiguration class with the following content:
@Override
public void addResourceHandlers(ResourceHandlerRegistry registry) {
 registry.addResourceHandler("/internal/**")
   .addResourceLocations("classpath:/");
}- Start the application by running ./gradlew clean bootRun.
- Let's open http://localhost:8080/internal/application.properties in the browser to see the following results:
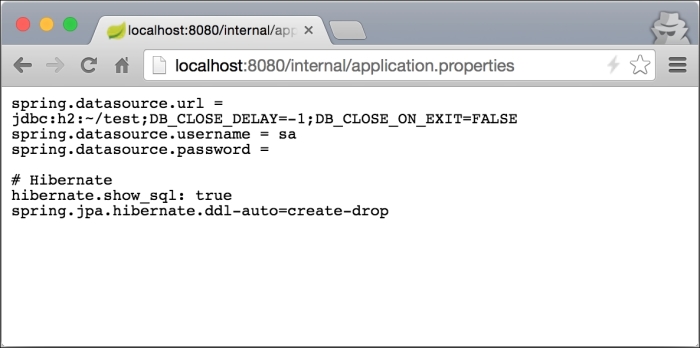
The method that we override, addResourceHandlers(ResourceHandlerRegistry registry), is another configuration method from WebMvcConfigurer, which gives us an ability to define custom mappings for static resource URLs and connect them with the resources on the file system or application classpath.
In our case, we defined a mapping of anything that is being accessed via the / internal URL to be looked for in classpath:/ of our application. (For production environment, you probably don't want to expose the entire classpath as a static resource!) So let's look at what we did in detail, as follows:
- The registry.addResourceHandler("/internal/**") methods adds a resource handler to the registry to handle our static resources and it returns a ResourceHandlerRegistration to us, which can be used to further configure the mapping in a chained fashion. The /internal/** string is a path pattern that will be used to match against the request URL using PathMatcher. We have seen how PathMatcher can be configured in the previous article, but by default an AntPathMatcher implementation is used. We can configure more than one URL pattern to be matched to a particular resource location.
- The addResourceLocations("classpath:/") method is called on the newly created instance of ResourceHandlerRegistration and it defines the directories where the resources should be loaded from. These should be valid file systems or classpath directories, and there can be more than one entered. If multiple locations are provided, they will be checked in the order in which they were entered.
We can also configure a caching interval for the given resource using the setCachePeriod(Integer cachePeriod) method.
Tuning Tomcat via EmbeddedServletContainerCustomizer
Spring Boot provides many of the server properties that can be used to modify properties such as port for the app, SSL, and others by simply setting the values in application.properties. However, if we need to do any more complex tuning, Spring Boot provides us with an EmbeddedServletContainerCustomizer interface to programmatically define our configuration.
Even though the session timeout can be easily configured by setting the server.session-timeout property in application.properties to our desired value in seconds, we will do it using EmbeddedServletContainerCustomizer to demonstrate the functionality.
Let’s follow some simple steps to achieve this:
- Let's say that we want our session to last for two minutes. To make this happen, we will add an EmbeddedServletContainerCustomizer bean to our WebConfiguration class with the following content:
@Bean
public EmbeddedServletContainerCustomizer

 embeddedServletContainerCustomizer() {


 return new EmbeddedServletContainerCustomizer() {


   @Override
   public void
     customize(ConfigurableEmbeddedServletContainer
       container) {
       container.setSessionTimeout(2, TimeUnit.MINUTES);
   }
 };
}- Just for the purpose of demonstration, we will ask the request object for the session by calling getSession() method, which will force its creation. To do this, we will add a new request mapping to our StudentController class with the following content:
@RequestMapping(value = "/session", method = RequestMethod.GET)
public String getSessionId(HttpServletRequest request) {
 return request.getSession().getId();
}- Start the application by running ./gradlew clean bootRun.
- Let's open http://localhost:8080/students/session in the browser to see the following results:
|
SBIWBS6D3S2876VD82738DV2I |
If we wait for more than 2 minutes and then reload this page, the session ID will change to a different one.
How Spring handles it?
The EmbeddedServletContainerCustomizer interface defines the customize(ConfigurableEmbeddedServletContainer container) method. This is actually a nice convenience for those using Java 8 as we can just return a lambda rather than create an implementation of the class. In this case, it would look as follows:
public EmbeddedServletContainerCustomizer
embeddedServletContainerCustomizer() {
     return (ConfigurableEmbeddedServletContainer container) -> {
       container.setSessionTimeout(2, TimeUnit.MINUTES);
     };
}
During the application startup, the Spring Boot autoconfiguration detects the presence of the customizer and invokes the customize(…) method, passing the reference to a servlet container. In our specific case, we actually get an instance of the TomcatEmbeddedServletContainerFactory implementation; but depending on the kind of servlet container that is used, such as Jetty, or Undertow, the implementation will vary.
Adding custom connectors
In production, we may face a challenge in which we need to run our application with two separate HTTP port connectors: one for HTTP and the other for HTTPS.
In order to create an HTTPS connector, we will need a few things; but most importantly, we will need to generate Certificate keystore that is used to encrypt and decrypt the SSL communication with the browser.
If you are using Unix or Mac, you can do this by running the following command:
|
$JAVA_HOME/bin/keytool -genkey -alias tomcat -keyalg RSA |
On Windows, this could be achieved via the following code:
|
"%JAVA_HOME%\bin\keytool" -genkey -alias tomcat -keyalg RSA |
During the creation of the keystore, you should enter the information that is appropriate to you, including passwords, name, and so on. For this article, we will use the default password: discoversdk. Once the execution is complete, a newly generated keystore file will appear in your home directory under the name: .keystore.
Next Steps
Let us follow some simple steps to achieve this:
- First, we will create a new properties file named tomcat.https.properties in the src/main/resources directory from the root of our project with the following content:
custom.tomcat.https.port=8443
custom.tomcat.https.secure=true
custom.tomcat.https.scheme=https
custom.tomcat.https.ssl=true
custom.tomcat.https.keystore=${user.home}/.keystore
custom.tomcat.https.keystore-password=discoversdk- Next, we will create a nested static class named TomcatSslConnectorProperties in our WebConfiguration class with the following content:
@ConfigurationProperties(prefix = "custom.tomcat.https")
public static class TomcatSslConnectorProperties {


 private Integer port;
 private Boolean ssl= true;
 private Boolean secure = true;
 private String scheme = "https";
 private File keystore;
 private String keystorePassword;


 //getters and setters (required)

 public void configureConnector(Connector connector) {


   if (port != null)
     connector.setPort(port);
   if (secure != null)
     connector.setSecure(secure);
   if (scheme != null)
     connector.setScheme(scheme);
   if (ssl!= null)
     connector.setProperty("SSLEnabled", ssl.toString());
   if (keystore!= null && keystore.exists()) {
     connector.setProperty("keystoreFile", keystore.getAbsolutePath());
     connector.setProperty("keystorePassword", keystorePassword);
   }
 }
}- Now, we will need to add our newly created tomcat.http.properties file as a Spring Boot property source and enable TomcatSslConnectorProperties to be bound. This can be done by adding the following code right above the class declaration of the WebConfiguration class:
@Configuration
@PropertySource("classpath:/tomcat.https.properties")
@EnableConfigurationProperties(WebConfiguration.TomcatSslConnectorProperties.class)
public class WebConfiguration extends WebMvcConfigurerAdapter {...}- Finally, we will need to create an EmbeddedServletContainerFactory Spring bean where we will add our HTTPS connector. We will do that by adding the following code to the WebConfiguration class:
@Bean
public EmbeddedServletContainerFactory servletContainer(TomcatSslConnectorProperties properties) {
     TomcatEmbeddedServletContainerFactory tomcat = new TomcatEmbeddedServletContainerFactory();
     tomcat.addAdditionalTomcatConnectors(

       createSslConnector(properties));
     return tomcat;
}

private Connector createSslConnector(TomcatSslConnectorProperties properties) {


   Connector connector = new Connector();
   properties.configureConnector(connector);
   return connector;
}- Start the application by running ./gradlew clean bootRun.
- Let's open https://localhost:8443/internal/tomcat.https.properties in the browser to see the following results:
custom.tomcat.https.port=8443
custom.tomcat.https.secure=true
custom.tomcat.https.scheme=https
custom.tomcat.https.ssl=true
custom.tomcat.https.keystore=${user.home}/.keystore
custom.tomcat.https.keystore-password=discoversdk
The @ConfigurationProperties(prefix = "custom.tomcat.https") call is an important annotation for our TomcatSslConnectorProperties instance. It tells Spring Boot to automatically bind the properties with the custom.tomcat.https prefix to fields that are declared in TomcatSslConnectorProperties class.
In order for the binding to jump in action, in addition to defining the fields in the class, it is very important to define the getters and setters as well. It is also worth mentioning that during the binding process, Spring will automatically try to convert the property values to their appropriate data types. For example, the value of custom.tomcat.https.keystore gets automatically bound to a private File keystore field object.
Recent Stories


Top DiscoverSDK Experts


Compare Products
Select up to three two products to compare by clicking on the compare icon () of each product.
{{compareToolModel.Error}}
{{CommentsModel.TotalCount}} Comments
Your Comment