Sponsors


MongoDB - Creating Replications
In the previous article we talked about Aggregation, and here today we’ll cover Replication. In actuality, the subject is much wider than what can be covered in one article, and should really be in the category of DBA (database administrator). But it’s something that’s nice to know, play around with, and learn about—especially for those who know how hard it is in MySQL.
When we have a database and application connected to it, everything is great. But what happens when the database falls? Usually something lovely like this:
A “database not available message” from Drupal
How do we prevent this kind of thing in our applications? Just for this purpose MongoDB allows us to use replication. In other words, it’s like instances of MongoDB that simply backup one another. These instances can sit in the same machine (not such a great idea, but good for practicing) or on different machines.
We’ll look at the concept of Replication on a local environment.
In principal, we work with primary MongoDB which is basically our master. We write and record with it. We also have Secondaries that can only read data. If the Primary falls, it has a process called ‘voting’ in which the Secondaries choose the Primary. (We can also add members that are neither a primary or a secondary called an Arbiter, which decides who the Primary is. It doesn’t contain a copy of the data, and we’re not going to go into it here.)
Here’s a diagram from the documentation on this subject, which is excellent and worth the read.
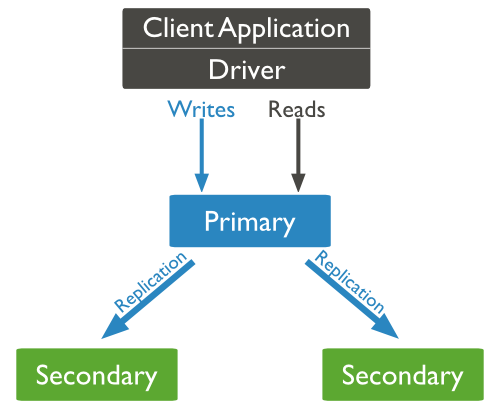
Reading and writing process in the Replication Set
We’ll need a MongoDB server. This server is created automatically if we create it while working in a PHP environment (as part of a MongoDB module, which we covered in the MongoDB with PHP article) or we can make it manually if we’re working with Node.js, for instance.
Creating a server goes like this:
mongod --port "PORT" --dbpath "YOUR_DB_DATA_PATH" --replSet "REPLICA_SET_INSTANCE_NAME"Running this line of code allows us to run as many MongoDB servers as we want.
How can we simulate this on our local environment? Very simply. First we make the directories:
sudo mkdir -p /srv/mongodb/rs0-0 /srv/mongodb/rs0-1 /srv/mongodb/rs0-2
Then we make the servers—one for each directory:
sudo mongod --port 27018 --dbpath /srv/mongodb/rs0-0 --replSet rs0 --smallfiles --oplogSize 128
sudo mongod --port 27019 --dbpath /srv/mongodb/rs0-1 --replSet rs0 --smallfiles --oplogSize 128
sudo mongod --port 27020 --dbpath /srv/mongodb/rs0-2 --replSet rs0 --smallfiles --oplogSize 128
Each line is run in a different window. What’s important is that we set the port where we can run the server (it’s not crucial that we run each server on a different machine). The most important is replSet rs0 where the rs0 is our identification. –smallfiles –oplogSize 128 is for saving the small instances—so that our machine doesn’t die on us.
In order to check that our server is in good working order, we can go to localhost:27018 in our browser and see something like this:
It looks like you are trying to access MongoDB over HTTP on the native driver port.
Now we’ll go into the first server which will be our Primary.
mongo --port 27018
It’s here that we’ll execute the configuration. The entire configuration is done via rs (short for Replica Set). First off, the configuration file is like this:
rsconf = {
          _id: "rs0",
          members: [
                     {
                      _id: 0,
                      host: "YOUR_IP:27018"
                     }
                   ]
        }
The host is your machine’s IP. It can be the name of the machine. After, we put the config file in like so:
rs.initiate( rsconf )
If everything is OK, we’ll receive something like:
{ "ok" : 1 }
Now we add the secondaries:
rs.add("YOUR_IP:27019")
rs.add("YOUR_IP:27020")
How do we know that everything is OK? First off we can have a look at some logs (these are what’s printed in the terminals, where you typed the commands to start the server) or, with the rs.status command. For example something like this:
rs0:PRIMARY> rs.status()
{
"set" : "rs0",
"date" : ISODate("2014-10-16T13:35:37Z"),
"myState" : 1,
"members" : [
{
"_id" : 0,
"name" : "10.0.0.5:27018",
"health" : 1,
"state" : 1,
"stateStr" : "PRIMARY",
"uptime" : 359,
"optime" : Timestamp(1413466397, 1),
"optimeDate" : ISODate("2014-10-16T13:33:17Z"),
"electionTime" : Timestamp(1413466179, 1),
"electionDate" : ISODate("2014-10-16T13:29:39Z"),
"self" : true
},
{
"_id" : 1,
"name" : "10.0.0.5:27019",
"health" : 1,
"state" : 2,
"stateStr" : "SECONDARY",
"uptime" : 178,
"optime" : Timestamp(1413466397, 1),
"optimeDate" : ISODate("2014-10-16T13:33:17Z"),
"lastHeartbeat" : ISODate("2014-10-16T13:35:35Z"),
"lastHeartbeatRecv" : ISODate("2014-10-16T13:35:36Z"),
"pingMs" : 0,
"syncingTo" : "10.0.0.5:27018"
},
{
"_id" : 2,
"name" : "10.0.0.5:27020",
"health" : 1,
"state" : 2,
"stateStr" : "SECONDARY",
"uptime" : 140,
"optime" : Timestamp(1413466397, 1),
"optimeDate" : ISODate("2014-10-16T13:33:17Z"),
"lastHeartbeat" : ISODate("2014-10-16T13:35:37Z"),
"lastHeartbeatRecv" : ISODate("2014-10-16T13:35:37Z"),
"pingMs" : 0,
"syncingTo" : "10.0.0.5:27018"
}
],
"ok" : 1
}
Now, if you create collections, documents, or db’s, they will also be created in the databases! Try for yourselves!
Working with the Replica Set depends largely upon how you’re working. With Node.js for example, we do it with Mongodb native. If you’re working with PHP, there’s a full explanation of how to work with the replica set.
It’s very important to understand that replication only helps maintain data integrity and preservation. A production environment that uses replication will be much better and more stable.
Sharding is not replication, but rather a way to divide the database among several machines. We won’t add sharding to this article.
In the next article, we’ll talk about RoboMongo, which is a UI tool for managing databases in MongoDB.
|
Next article: coming soon! |
About the author: Ran Bar-Zik is an experienced web developer whose personal blog, Internet Israel, features articles and guides on Node.js, MongoDB, Git, SASS, jQuery, HTML 5, MySQL, and more. Translation of the original article by Aaron Raizen.
Recent Stories


Top DiscoverSDK Experts


Featured Products


Compare Products
Select up to three two products to compare by clicking on the compare icon () of each product.
{{compareToolModel.Error}}
{{CommentsModel.TotalCount}} Comments
Your Comment