Sponsors


Local and Push Notifications in Ionic 2
Mobile applications are built with the user in mind, meaning the user experience is emphasized as much as possible. If you're familiar with Android or iOS applications, then you know that many applications give you certain messages or alerts in the form of notifications when the app is either closed or running in the background. For example, your messenger application or WhatsApp notifies you whenever there is a new message or activity.
Such notifications are very important when it comes to enhancing the experience and convenience of the application, but for certain apps this feature is an absolute must, otherwise the app cannot work. We have seen both kinds of notifications so far: Local Notification and Push Notification.
With Local Notifications, the application uses the mobile device to notify the user locally, meaning if the application is already opened (or at least running in the background as a service), then the hard coded notifications in the code can be sent to the user of the application. On the other hand, Push notifications use the server to send the notification to the device, so even if the app is closed, the user can receive the alert.
Thankfully, Ionic 2 has a built-in support of local and push notifications through an awesome Cordova plugin for the Local Notifications and FCM (Firebase Cloud Messaging) support for Push Notifications that make it a seamless process to add notifications to any application.
In this article, I am going to show you how you can implement both kinds of notifications in Ionic 2. I will highlight different ways notifications can be received by the user. Let’s get started!
Working with Local and Push Notifications in Ionic 2
So, what are notifications really? Simply put, notifications are messages that pop up on the user’s device from time to time in the form of alerts. Think of your email application that is running in the background and sending you recent developments (i.e., new emails/messages, etc.).
What sets Local and Push Notifications apart is the source from which the messages come. The advantage of Local notifications over Push notifications is that they don’t rely on any external service for giving the notification as the app itself can send the notification to mobile, but this has a disadvantage when the app in question is a messenger app that needs to be notified in real-time.
You use social media networks, like Facebook, right? Well, they are using Push notifications to send you the recent updates on your profile, even though your Facebook application might not be running in the foreground. You receive the notifications from an external service or server so long as your internet is connected.
Basically, local notifications are only triggered by the event on the user’s device, whereas push notifications are triggered by events outside of the user’s device, because the server that is sending the push notifications is outside the device.
For Push Notifications, usually FCM (Firebase Cloud Messaging) is used (previously known as Google Cloud Messaging), which sends the notifications to a registered device at any time. So, even if the user has closed the application,they can still get notified. Ionic Push can also be used for Push notifications, although it charges a monthly fee.
Local notifications does not deal with the server, because the application itself has the notification mechanism, so the device sends the notifications to itself. Sounds weird?
Creating a project
We are going to create a very simple app that implements both the Local and Push Notification. So, let’s create a new project:
$ionic start --v2 ionic-notifications blankWe need to install the Cordova plugin for the local notifications:
$ionic plugin add de.appplant.cordova.plugin.local-notificationWe will be implementing both Local and Push Notification, so let’s create two new pages:
$ionic g page local

$ionic g page push
We are not going to touch the “home” directory much; we’ll just make a few changes in “home.html”:
home.html
<ion-header>
 <ion-navbar>
   <button ion-button menuToggle>
     <ion-icon name="menu"></ion-icon>
   </button>
   <ion-title>Home</ion-title>
 </ion-navbar>
</ion-header>

<ion-content padding>
This is the example project of Local and Push Notification in Ionic 2.
</ion-content>
Now, open the “local.ts” and start modifying the code. Basically, we need to import “LocalNotifications” from “ionic-native” as that’s the plugin we are using. It exposes very simple methods for scheduling notifications. For example, the schedule() method has everything for you by default to schedule the notifications of your choice, all you need to do is just give certain parameters.
So, let’s implement a simple method in “local.ts”:
public schedule() {
// Schedule a single notification
LocalNotifications.schedule({
 id: 1,
 text: 'Hello, World!',
 sound: null
});
}
Open “local.html” and add the following in <ion-content> tag:
<button ion-button full primary (click)="schedule()">Schedule</button>You can test the app now, but before that you need to add this page to “app.component.ts” and “app.module.ts”.
Also, make sure that “local.html” contains the menu button:
<ion-header>
 <ion-navbar>
   <button ion-button menuToggle>
     <ion-icon name="menu"></ion-icon>
   </button>
   <ion-title>Local</ion-title>
 </ion-navbar>
</ion-header>
It will only give you notification if you are running on the device, running on a browser or the simulator does nothing, so you need to build for either Android or iOS.
You can implement multiple and delayed notifications as well through the schedule() method (which we will see later). You can update the notifications, clear the previous notifications and much more through this plugin. See more about it here (https://ionicframework.com/docs/v2/native/local-notifications/).
Now add the moment plugin for working with dates and times:
$npm install moment --saveThis will allow us to get the device’s current date and time in ISO format, which is necessary for working with <ion-datetime>. That’s really all the use we have of this at the moment. So, let’s start with a simple test. We will create some variables for storing time and notifications. We will also create an array for storing the days.
In our HTML template, we will use the <ion-list> for adding the time period and days. I have adapted the time picker code from joshmorony’s website (https://www.joshmorony.com). Here is the complete content of “local.ts”:
local.ts
import { Component } from '@angular/core';
import { NavController, Platform, AlertController, Alert } from 'ionic-angular';
import { LocalNotifications } from 'ionic-native';

// For date/time
import * as moment from 'moment';

@Component({
 selector: 'page-local',
 templateUrl: 'local.html'
})
export class LocalPage {

ionViewDidLoad() {
console.log('ionViewDidLoad LocalPage');
}
public schedule() {
// Schedule a single notification
LocalNotifications.schedule({
 id: 1,
 title: "Test Single Notification",
 text: 'Hello, World!',
 sound: null
});
}
// 5 seconds from now, one time notification!
public scheduleDelay() {
LocalNotifications.schedule({
id: 1,
title: "Test Delayed Notification (5 seconds)",
text: "Hey!",
at: new Date(new Date().getTime() + 5 * 1000),
sound: null,
// Let's use an icon from external source
icon: "https://freeiconshop.com/wp-content/uploads/edd/notification-flat.png"
});
}
public scheduleMultiple() {
// Schedule multiple notifications
LocalNotifications.schedule([{
  id: 1,
  title: "Test Multiple Notification 1",
  text: 'Cheer up!',
  sound: null,
 },{
  id: 2,
  title: "Test Multiple Notification 2",
  text: 'Beautiful People!'
}]);
}
time: any;
notifications: any[] = [];
days: any[];
hours: number;
minutes: number;

constructor(public navCtrl: NavController, public platform: Platform, public alertCtrl: AlertController) {
this.giveAlert();
// Get the Date/Time in ISO Format
this.time = moment(new Date()).format();

this.hours = new Date().getHours();
this.minutes = new Date().getMinutes();

this.days = [
{title: 'Monday', day: 1, checked: false},
{title: 'Tuesday', day: 2, checked: false},
{title: 'Wednesday', day: 3, checked: false},
{title: 'Thursday', day: 4, checked: false},
{title: 'Friday', day: 5, checked: false},
{title: 'Saturday', day: 6, checked: false},
{title: 'Sunday', day: 0, checked: false}
];

}
giveAlert() {
// Give the alert once the notification is clicked/scheduled
LocalNotifications.on("click", (notification, state) => {
           let alert = this.alertCtrl.create({
               title: "Notification Clicked",
               subTitle: "You just clicked the scheduled notification",
               buttons: ["OK"]
           });
           alert.present();
       });
}
setTimeChange(time){
this.hours = time.hour.value;
this.minutes = time.minute.value;
}

addNotifications(){

let currentDate = new Date();
let currentDay = currentDate.getDay();

for(let day of this.days){
if(day.checked){

let firstNotificationTime = new Date();
let dayDifference = day.day - currentDay;

if(dayDifference < 0){
dayDifference = dayDifference + 7;
}

firstNotificationTime.setHours(firstNotificationTime.getHours() + (24 *(dayDifference)));
firstNotificationTime.setHours(this.hours);
firstNotificationTime.setMinutes(this.minutes);

let notification = {
id: day.day,
title: 'Hey!',
text: 'You just got notified :)',
at: firstNotificationTime,
every: 'week'
};

this.notifications.push(notification);

}

}

console.log("Notifications to be scheduled: ", this.notifications);

if(this.platform.is('cordova')){

LocalNotifications.cancelAll().then(() => {

LocalNotifications.schedule(this.notifications);

this.notifications = [];

let alert = this.alertCtrl.create({
title: 'Notifications set',
buttons: ['Ok']
});

alert.present();

});

}

}
}
Here, I have added the code for single, multiple and delayed notifications. You can add as much code as you want. You can use the icons as well, which could either come from a folder or from an online website. Apart from that, you can add your custom sounds as well. See more here (https://github.com/katzer/cordova-plugin-local-notifications/wiki/10.-URIs).
The methods are defined for use in HTML side.
Now, edit the “local.html”. The following is the complete content:
local.html
<ion-header>
 <ion-navbar>
   <button ion-button menuToggle>
     <ion-icon name="menu"></ion-icon>
   </button>
   <ion-title>Local</ion-title>
 </ion-navbar>
</ion-header>

<ion-content padding>
This is a local notification page. You need to set the app to background to get the Scheduled notification. One time notification can be received while the app is running in the foreground.
<div>
<br>
<h2>Schedule</h2>
<button ion-button full primary (click)="schedule()">Schedule Single</button>
<button ion-button full primary (click)="scheduleDelay()">Schedule Delay</button>
<button ion-button full primary (click)="scheduleMultiple()">Schedule Multiple</button>
</div>

<div>
<br>
<h2>Schedule With Date and Time</h2>
<ion-list no-lines>

<ion-item>
 <ion-datetime displayFormat="h:mm A" pickerFormat="h mm A" [(ngModel)]="notifyTime"(ionChange)="setTimeChange($event)"></ion-datetime>
</ion-item>

<ion-item *ngFor="let day of days">
<ion-label>{{day.title}}</ion-label>
<ion-checkbox [(ngModel)]="day.checked" color="primary"></ion-checkbox>
</ion-item>

</ion-list>
<button (click)="addNotifications()" ion-button full>Schedule</button>
</div>
</ion-content>
Note that you need to install the app on your Android or iOS device as it is using the Cordova plugin, so running it on the browser won’t send any notifications (you can see the errors on the “Console” screen). I have tried Ionic View as well, and it doesn’t work there either, so build the app for your platform and test it.
This is for Local Notifications. You can click on schedule buttons for either receiving a single time notification or date/time specific notification. You can close the app after the scheduling, and you will see the notification alert.
Implementing Push Notification
Push Notifications require a server to send messages/notifications to a device.The server could be created either custom-based or by using an online service, like FCM (Firebase Cloud Messaging) for Android or APNS (Apple Push Notification service) for iOS. I only have an Android device for testing, therefore, I will be implementing Push Notification for Android only, but I am pretty confident that similar protocol will be used for iOS as well.
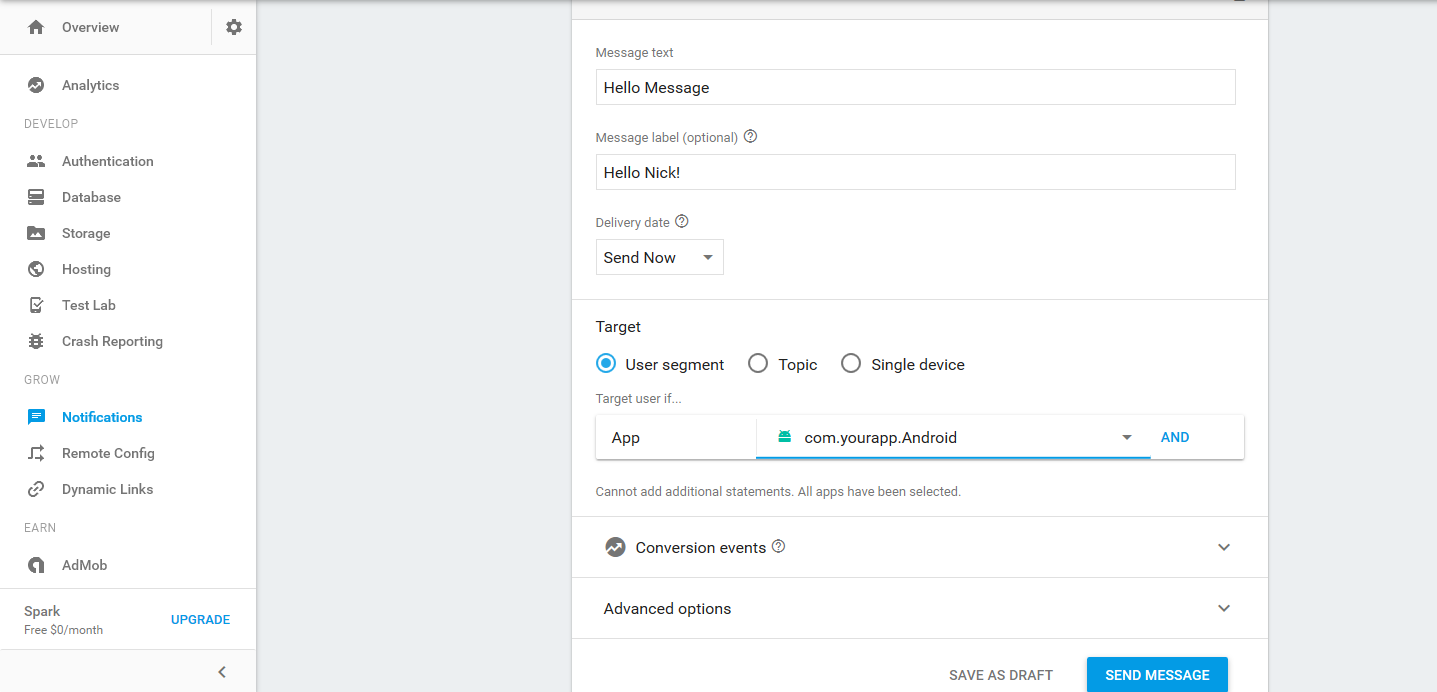
You need to add your app to your Firebase project. Go to the “Notifications” tab in the Firebase console, and there you can add the app for the Android. It will ask the package name. I have called it “com.yourapp.Android”. Once your app is added, copy the package name and replace it with “id” in “widget” of your “config.xml” (which you can find in root folder of the project).
You will also need to download the “google-services.json” from your project settings on Firebase console. Make sure the “api_key” is not empty in it, otherwise download it again. In your “google-services.json”, make sure the “package_name” is same as the one you have mentioned in “config.xml”.
Copy the “google-services.json” in the root directory of the project as well as “platform/android/” (assuming you have added the android platform) and “platform/android/src/debug/” (create the “debug” folder if it is not there already). I had to copy this file to these three places, as it was giving me errors of FCM not defined.
You need to install the Cordova FCM plugin as well:
$cordova plugin add cordova-plugin-fcm –save
Add the following in “config.xml”:
<plugin name="cordova-plugin-fcm" spec="~1.1.5" />Then do “npm install”.
So, let’s edit our “push/” directory. Open the “push.ts” and copy the following content:
push.ts
import { Component, ViewChild } from '@angular/core';
import { NavController, NavParams, Platform, Nav } from 'ionic-angular';
import {StatusBar} from 'ionic-native';

declare var FCMPlugin;

@Component({
 selector: 'page-push',
 templateUrl: 'push.html'
})
export class PushPage {
 @ViewChild(Nav) nav:Nav;
 constructor(public navCtrl: NavController, public navParams: NavParams, private platform:Platform) {
 this.initializeApp();
 }

 initializeApp() {
       this.platform.ready().then(() => {
if (this.platform.is('android') || this.platform.is('ios')) {
// Okay, so the platform is ready and our plugins are available.
// Here you can do any higher level native things you might need.
StatusBar.styleDefault();

FCMPlugin.getToken(
function (token) {
console.log(token);
alert(token);
},
function (err) {
console.log('error retrieving token: ' + err);
}
);
// Notifications is supposed to be received on device tray
FCMPlugin.onNotification(
function(data){
if(data.wasTapped){
// Notification is tapped by the user on device tray
alert(JSON.stringify(data));
}else{
//Notification is received in foreground
alert(JSON.stringify(data));
}
},
function(msg){
console.log('onNotification callback successfully registered: ' + msg);
},
function(err){
console.log('Error registering onNotification callback: ' + err);
}
);
}
       });
   }
 ionViewDidLoad() {
   console.log('ionViewDidLoad PushPage');
 }

}
Here, we are first declaring the “FCMPlugin” which has been exposed from the “config.xml”. You can see the lack of typings here, otherwise we would have imported it like a typical Ionic 2/AngularJS 2 library. The most important stuff here is getToken() and onNotification() methods which get the token and notify the user respectively. A token in this case is a message or alert being received from the server.
The plugin is actually very easy to understand, thanks to its simple structure. You can read more about it here (https://github.com/fechanique/cordova-plugin-fcm).
Now, let’s edit the “push.html”. Following is the complete content:
push.html
<ion-header>
 <ion-navbar>
   <button ion-button menuToggle>
     <ion-icon name="menu"></ion-icon>
   </button>
   <ion-title>Push</ion-title>
 </ion-navbar>
</ion-header>

<ion-content padding>
This is a push notification page. You can close the app now and send the message from the Firebase console, and you will receive the notification on your device. Clicking on the notification will open the application again. Unlike local notifications, you are receiving messages from a server instead of a device itself.
</ion-content>
Here, we are not doing anything apart from printing some text on the screen. If you noticed earlier, I added the platform checking for Android and iOS, so the notifications will only be received on the supported device. If you don’t add the checking, then it will give the errors.
You can build and run the app on Android. Once you have opened the app, you can close it and send the message from “Notifications” on Firebase console.
Within a few seconds, you will receive a notification in your device tray! You can send as many messages as you want. Make sure your package name is selected in the target.
That’s it! You can read more about the FCM plugin from here (https://github.com/fechanique/cordova-plugin-fcm).
If you have trouble following the code, then I have uploaded the repository to Github (https://github.com/danyalzia/ionic2-notifications-play).
Conclusion
You can see that it’s not really difficult to implement local and push notifications in your Ionic 2 applications. Even though local notifications are not as flexible as push notification, they are still relevant in basic applications. You can combine both of these notifications in your application to make it very compelling to the users.
If you have any questions, feel free to ask in the comment section below!
Recent Stories


Top DiscoverSDK Experts


Featured Products
Compare Products
Select up to three two products to compare by clicking on the compare icon () of each product.
{{compareToolModel.Error}}
{{CommentsModel.TotalCount}} Comments
Your Comment