Sponsors


JavaScript in Android Applications
What is JavaScript?
JavaScript is a high level programming language traditionally used together with html to create interactive and dynamic web applications. It is the most well-known scripting language for web pages. A majority of websites employ it and all modern web browsers support it without the need of external plugins or API’s. That’s why it is very easy to learn. And even though it’s still used mainly in web development, it is increasingly being used in other areas as well—namely in android applications.
JavaScript in Android Applications
As the global trends shift to a post-pc era, mobile platforms play an ever increasing and essential role in our daily lives. Whether for fun or for profit, developing Android apps can be rewarding, both personally and financially. Assuming you have a certain level of technical knowledge then it is possible to develop Android apps yourself—but what programming languages do you need to learn? Actually, you have a number of options. The official language for the development of mobile android applications is Java. But other than Java, we can also use other programming languages such as C, C++, JQuery, HTML, CSS and JavaScript.
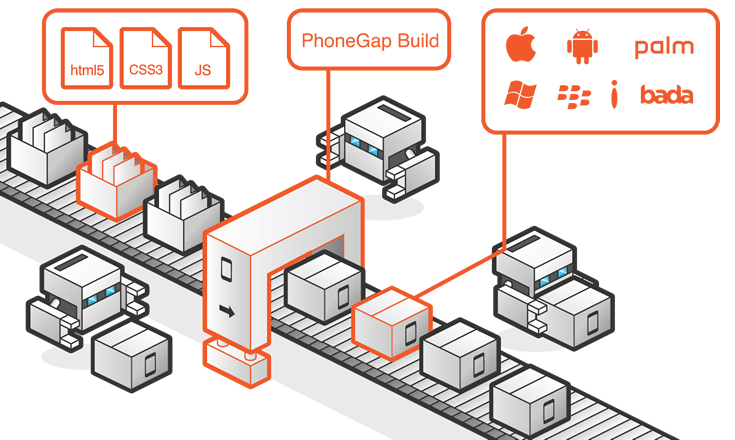
If you are a web developer and already know HTML, CSS, and most importantly JavaScript, then rather than learn Java, LUA or any other programming language, you can build Android apps using the skills you already have. PhoneGap is based on Apache’s Cordova project. Basically it creates a webview which you can then populate and manipulate using JavaScript. The web app can interact with the various device features, just like a native app, by referencing the cordova.js file to get the API bindings. Native functions which PhoneGap supports include the accelerometer, the camera, the current location, the local storage and so on. JQuery Mobile, Sencha Touch, Ionic, Jo, Lungo, JQT and Junior are different frameworks used to build mobile applications using HTML, CSS and JQuery. Other than PhoneGap, there are many frameworks that can be used to develop Android applications with JavaScript. Here are a few of the most popular:
Meteor
Meteor is a platform for building mobile and web apps using JavaScript. Meteor allows developers to use the same JavaScript code base to build apps for iOS, Android and the web. Once you learn to develop with Meteor, you can quickly translate your JavaScript web apps into native mobile apps without needing to learn new programming languages. Meteor relies on a technology known as Cordova. This clever technology allows HTML and JavaScript to run on a mobile phone without using a browser. It also allows developers to write JavaScript code that controls the basic functions of mobile devices. For example, a developer who uses Cordova can write JavaScript code that can access the camera function of an iOS or Android mobile device, just as it would access the webcam on a laptop or desktop computer. Meteor takes the powerful functionality of Cordova and simplifies it. Meteor’s interface is easy to use and allows you to quickly compile, test and deploy apps, cutting down the time spent trying to figure out how to get the app working on various iOS and Android devices.
Ratchet was originally used by Twitter as an internal tool to create their mobile app prototype which was then released publicly as an open source project. Ratchet comes with a collection of User Interface and JavaScript plugins for building simple mobile apps and providing reusable HTML classes. In version 2.0, Ratchet is also shipped with its proprietary font icon set named Ratcheticon and two pre-made UI themes for iOS and Android.
Node.js
The definition of Node.js as supplied by its official documentation is as follows:
Node.js is a platform built on Chrome's JavaScript runtime for easily building fast and scalable network applications. Node.js uses an event-driven, non-blocking I/O model that makes it lightweight and efficient, perfect for data-intensive real-time applications that run across distributed devices.
Tabris.js
Tabris.js is a mobile framework that lets you develop native iOS and Android apps from a single code base written entirely in JavaScript. When HTML5 doesn’t cut it, Tabris.js will give you an easy path to native apps while building upon your existing JavaScript knowledge. Tabris.js does not use webviews for rendering the UI. Instead it creates native widgets on the mobile platform via a JavaScript to native bridge. This also enables the quick develop/deploy cycle that you know from web development. While Tabris.js does not use WebViews, you are more than welcome to use existing JavaScript libraries, node modules and Cordova plugins to build your apps. Tabris.js implements many APIs core to web applications, e.g. XMLHttpRequest or the 2d canvas.
Now that we’ve listed some of the most popular, let give one of them a test run. In this tutorial, we will use PhoneGap to develop a straightforward Android application.
What is PhoneGap?
PhoneGap is a software development framework by Adobe System, which is used to develop mobile applications. To develop apps using PhoneGap, the developer is not require to have knowledge of a mobile programming language like Java but only web-development languages like, HTML, CSS, and JavaScript. PhoneGap produces apps for different mobile platforms like iOS, Android, windows phone and Blackberry. It uses standards-based web technologies to bridge web applications and mobile devices. Since PhoneGap apps are standards compliant, they’re future-proofed to work with browsers as they evolve.
Nitobi was the original creator and is one of the primary contributors to the PhoneGap framework. In October 2011, Adobe acquired Nitobi enabling the team to focus solely on the PhoneGap project and continue its work on efficient development across mobile platforms.
How PhoneGap works
Development in PhoneGap is done by simply using JavaScript, CSS and HTML. PhoneGap is not a “native application development” framework, even though it provides access through several device features using an abstraction layer, which otherwise are inaccessible to a normal webpage. In simple words, it provides a “WebView” with extended capabilities. Using PhoneGap one can access the many device features such as camera, geolocation, compass, contacts, media, accelerometer, network, notification, storage, filesystems and many more.
The core of Apache Cordova applications use CSS3 and HTML5 for their rendering and JavaScript for their logic. HTML5 provides access to the underlying hardware such as the accelerometer, camera, and GPS. However, browsers' support for HTML5-based device access is not consistent across mobile browsers, particularly older versions of Android. To overcome these limitations, Apache Cordova embeds the HTML5 code inside a native WebView on the device, using a foreign function interface to access the native resources.
Apache Cordova can be extended with native plug-ins, allowing developers to add more functionalities that can be called from JavaScript, making it communicate directly between the native layer and the HTML5 page. These plugins allow access to the device's accelerometer, camera, compass, file system, microphone, and more.
However, the use of Web-based technologies leads some Apache Cordova applications to run slower than native applications with similar functionality. Adobe Systems warns that applications may be rejected by Apple for being too slow or not feeling "native" enough (having appearance and functionality consistent with what users have come to expect on the platform). This can be an issue for some Apache Cordova applications.
Getting started with PhoneGap
- Installation
The installation process for PhoneGap desktop app is very quick and easy. It’s very efficient as it simply uses a drag and drop interface for creating PhoneGap applications. It's an alternative to using the PhoneGap CLI built for those who prefer a visual user interface over a command line interface approach.
Step 1:
Got to the website
http://docs.phonegap.com/getting-started/1-install-phonegap/desktop/
to download PhoneGap.
Step 2:
Select your platform either for Windows or for iOS.
For Windows
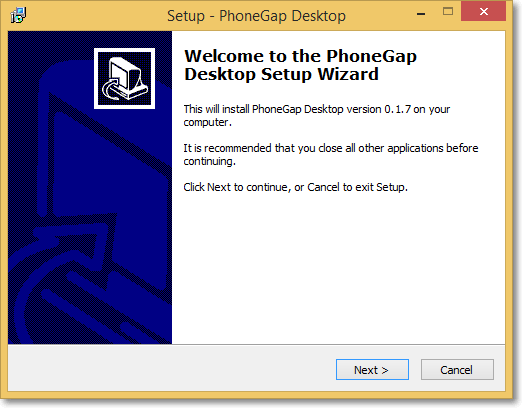
Double click the downloaded file to run the installer. You will be prompted with the PhoneGap Desktop Setup Wizard:
Accept the license agreement

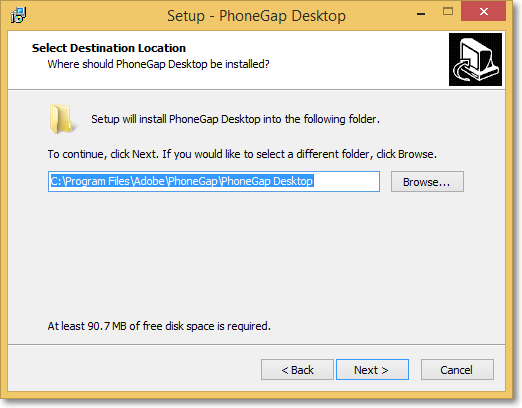
Select the desired destination for the application and click Next:
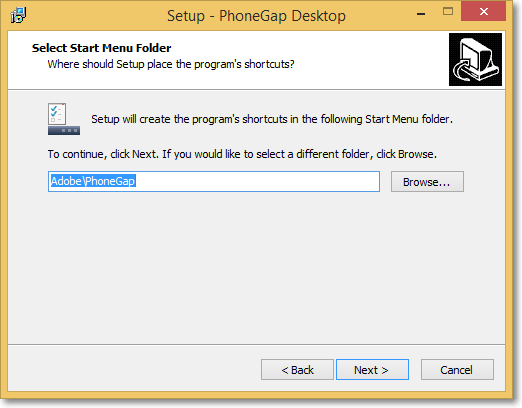
Select the desired location for the shortcut and click Next
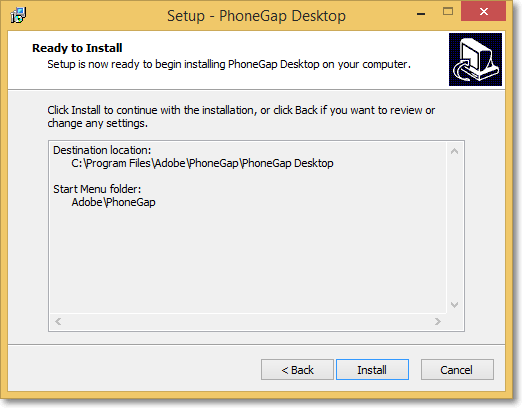
Click Install to begin the installation
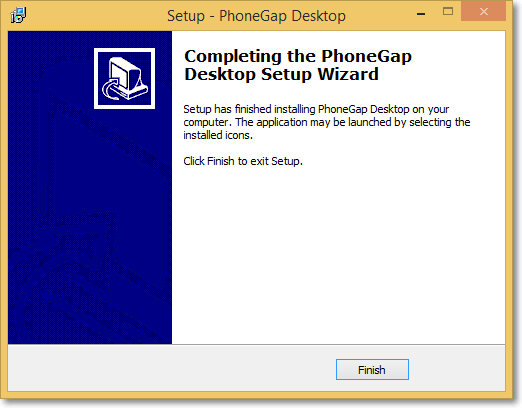
Click Finish to close the Setup Wizard:
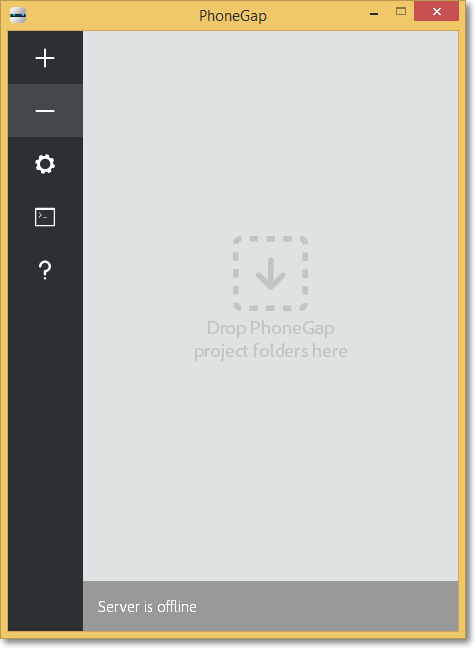
Next simply open the application and proceed to next step below where you will install the PhoneGap Developer App on your mobile device for previewing the apps you build.
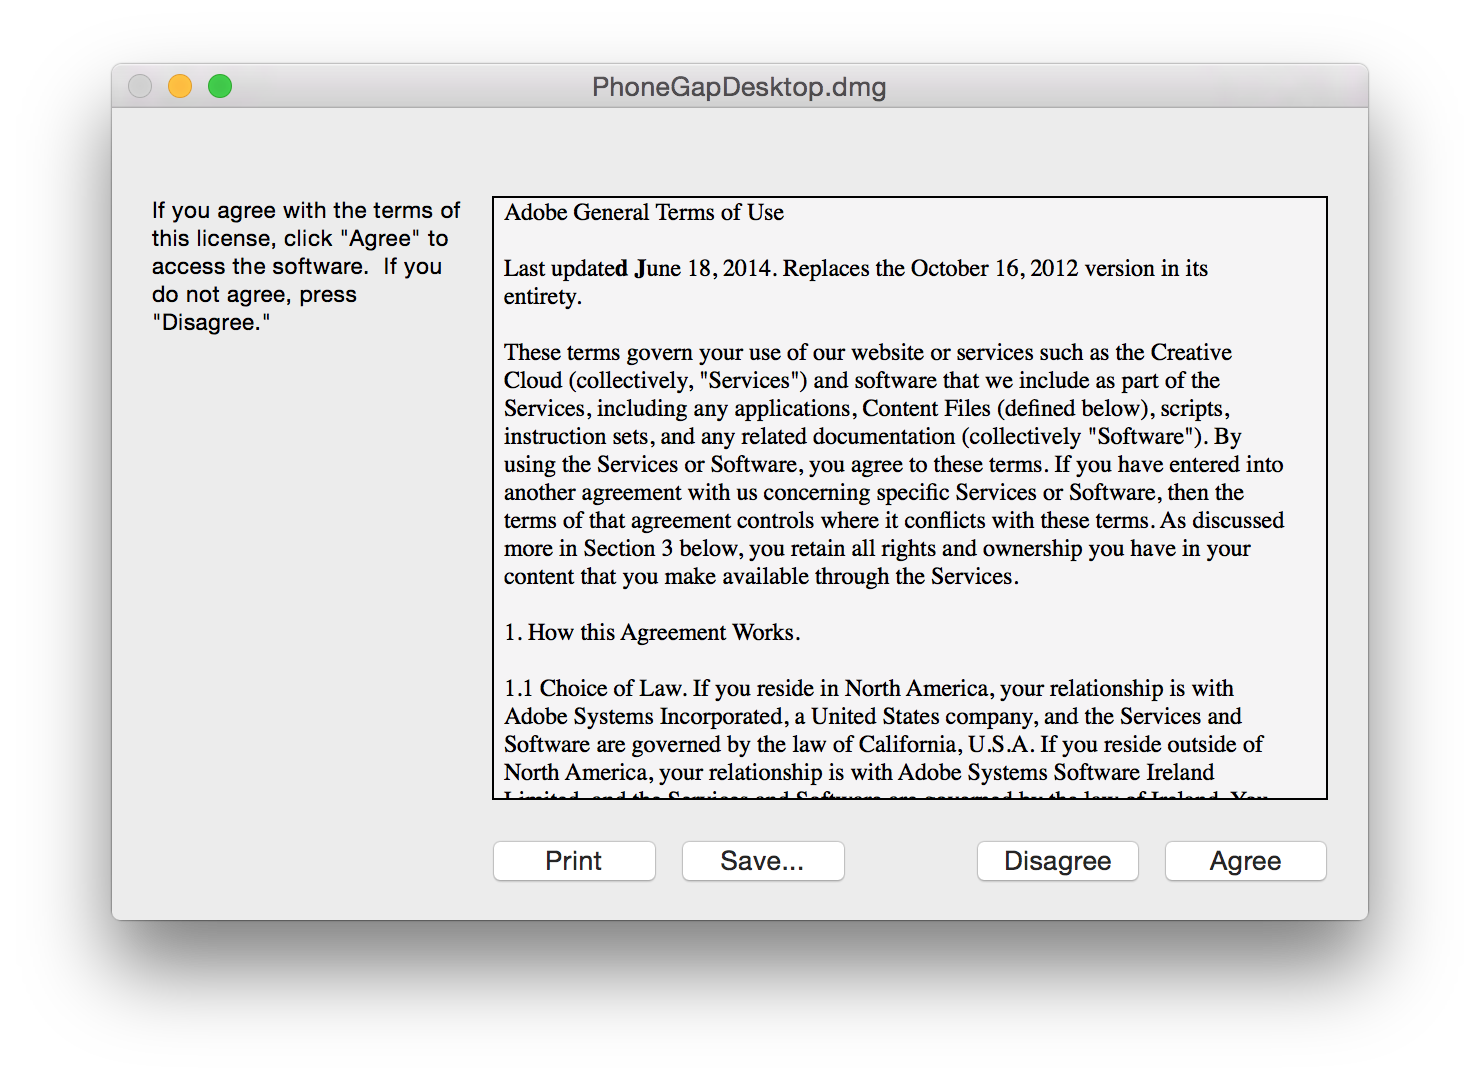
Mac OS X Installation
- Download the latest Mac OS X Installer.
- Double-click the downloaded file to run the installer. You will initially be prompted with a license agreement to accept:
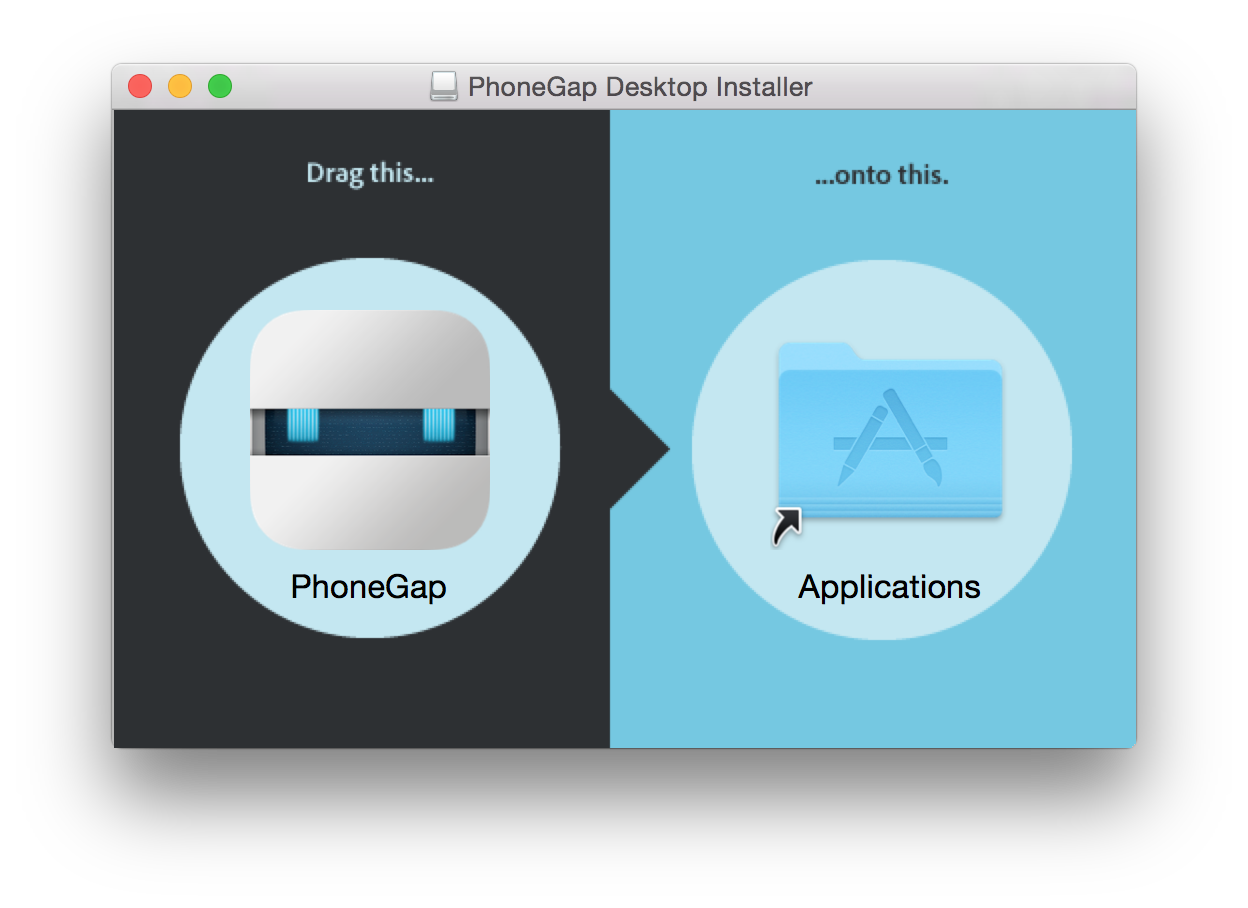
Drag and drop the application into the Applications folder on your Mac as prompted:
Next simply open the application and proceed to Step 2 where you will install the PhoneGap Developer App to your mobile device for previewing the apps you build.
- Installing PhoneGap Developer App
The next step is to install PhoneGap Developer app. It is a mobile app that runs on devices and allows you to preview and test the PhoneGap mobile apps you build across platforms without additional platform SDK setup. It automatically provides access to the PhoneGap core APIs providing instant access to the native device features without having to install any plugins or compile anything locally. It's meant to provide an easy way for developers to get started creating and testing their PhoneGap applications quickly and with minimal setup.
Locate the free PhoneGap Developer app from one of the following supported app marketplaces and install it to your mobile device:
Once installed, tap the PhoneGap Developer app icon from your home screen to open it:
- Create your first Hello World App
- Open the PhoneGap application
- Click the plus sign and select Create new PhoneGap project
- You will be prompted with the template list dialog, where you can choose to create an app based on a sample project.
- Each template has a brief description below the name indicating what type of project will be created. To select a template, click on the radio button next to it. In the image below, the Hello World template is selected.
- Enter the path of for desired location for your app
- Enter any name for your application
- Enter ID for your application (The unique identifier access app store. E.g. com.phonegap.helloworld) ID field is also known as package identifier for Android and bundle identifier for iOS.
- Click Create project button
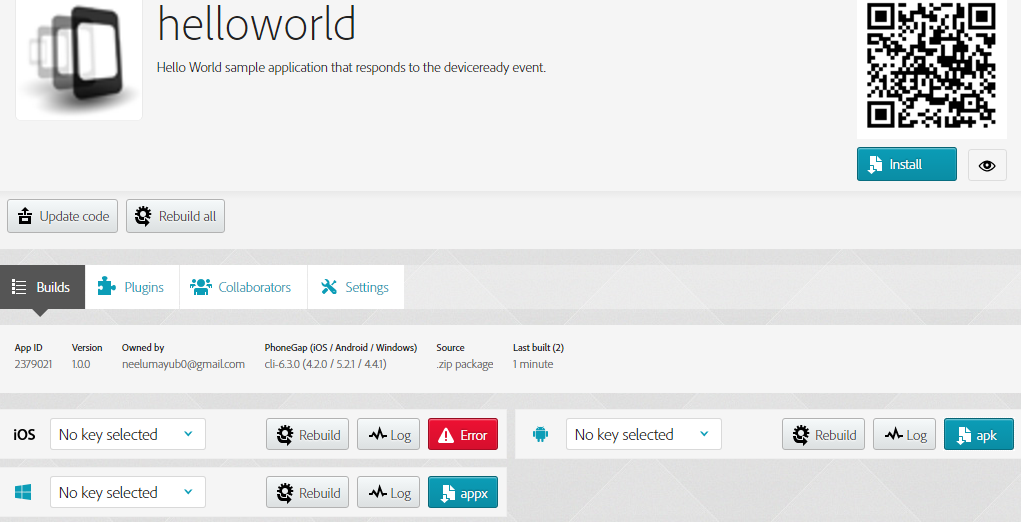
- The following screen will appear
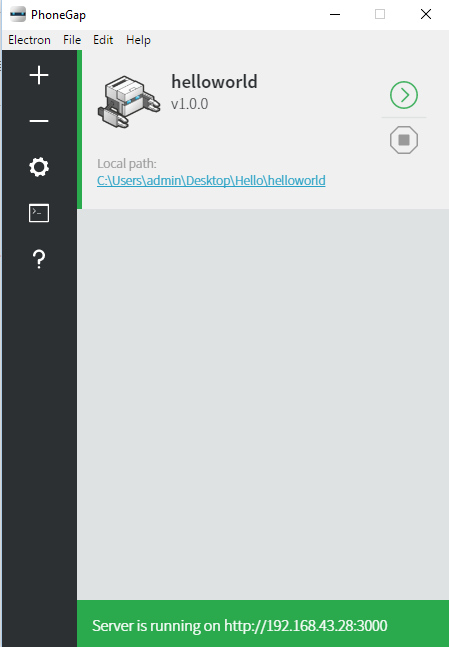
- Open the application in folder what you specified in path location.
- Search for “www” folder.
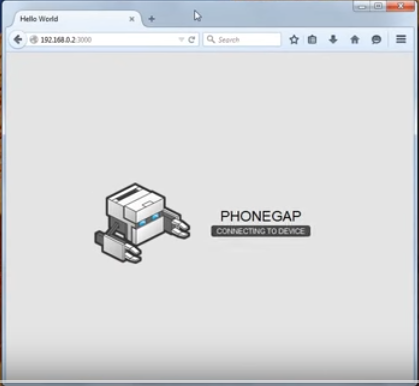
- Open “index.html”
- Following page will be shown in browser
- Open index.html in a text editor
- You will see the following lines of code
<html>
<head>
<meta charset ="utf-8" />
<meta name = "format-detection" content = "telephone=no" />
<meta name = "msapplication-tap-highlight" content="no" />
<meta name = "viewport" content="user-scalable=no, initial-scale=1, maximum-scale=1, minimum-scale=1, width=device-width" />
<!-- This is a wide open CSP declaration. To lock this down for production, see below. -->
<meta http-equiv="Content-Security-Policy" content="default-src * 'unsafe-inline'; style-src 'self' 'unsafe-inline'; media-src *" />
<link rel="stylesheet" type="text/css" href="css/index.css" />
<title>Hello World</title>
</head>
<body>
<div class = ”app”>
<h1> PhoneGap </h1>
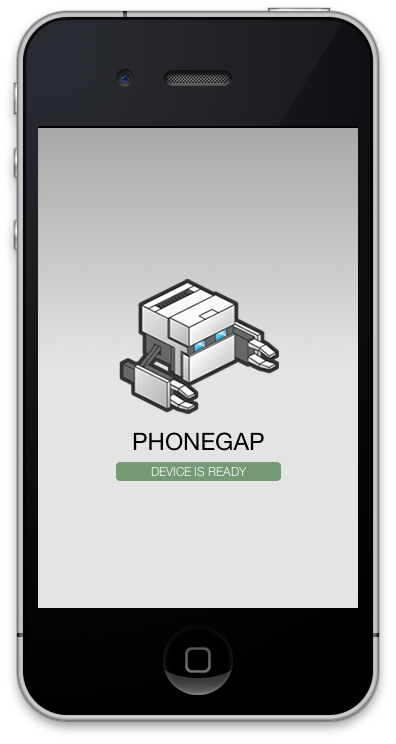
<div id = ”deviceready” class = ”blink”>
<p class = ”event listening”> Connecting to Device </p>
<p class = ”event received” > Device is Ready </p>
<div>
</div>
<script type = "text/javascript" src = "cordova.js"></script>
<script type = "text/javascript" src = "js/index.js"></script>
<script type = "text/javascript">
app.initialize();
</script>
</body>
</html>- Remove these lines
	<div class="”app”">
		<h1>PhoneGap</h1>
		<div class="”blink”" id="”deviceready”">
			<p class="”event">Connecting to Device</p>
			<p class="”event">Device is Ready</p>
			<div></div>
		</div>
</div>- Add following line for hello world
<h1> Hello World </h1>Save the file (press control +S)
- Copy “www” folder and paste on desktop.
- Open this www folder and create a new folder called “XML” in it.
- Now search for “config” file in application folder
- Copy it and paste this config file in XML folder placed on desktop.
- Now go to the link https://www.dropbox.com/s/asy4nrg7dtf... and download the Cordova Files.
- Extract these Cordova Files and paste them in the www folder placed on the desktop of your pc.
- Compress this www folder into a .zip folder
- Building an APK file
Android application package (APK) is the package file format used by the Android operating system for distribution and installation of mobile apps and middleware. APK files are analogous to other software packages such as APPX in Microsoft Windows or Deb packages in Debian-based operating systems like Ubuntu.
To build android APK of your app follow these steps
- Go to https://build.phonegap.com
- Sign Up , if you don’t have account( sign up for free using Adobe ID)
- In Bd tab, search for button “Upload a zip file”
- Upload your www.zip file here
- It will take few seconds to make the APK file of your app for different platforms
- After completion, download the APK for your desired platform and run this APK on your device, you will see your app running.
In the same way, you can create your fully functional applications and publish them in the play store. If you are a web developer then you can easily convert your web application into a mobile application without even getting into the pain of adopting new language. By using HTML, CSS and JavaScript, web developers can easily make their mobile applications compatible across platforms such as Android, iOS, windows and blackberry. Building mobile applications is not a dream anymore for web developers.

Tutorial 2: Creating Simple Calculator mobile application
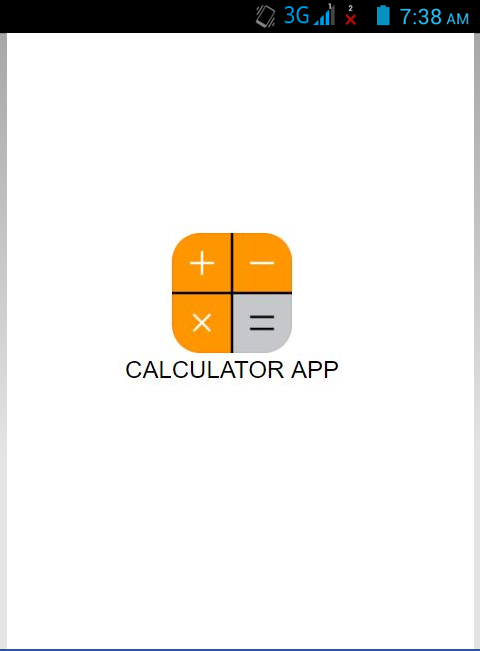
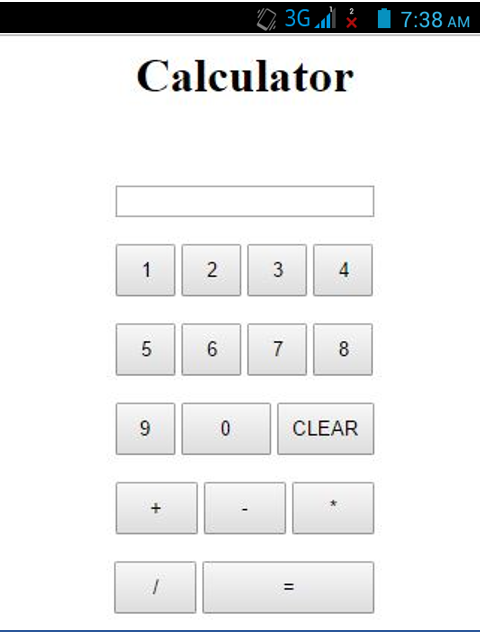
This tutorial is designed for creating a simple calculator application for your mobile using JavaScript and HTML. Both of these are web programming languages but now you can use them even in mobile development using different frameworks of JavaScript like PhoneGap. Follow these steps for a calculator mobile application. This application has two screens. The first will show a calculator logo and name and when user clicks on logo image, the main screen will appear where you can perform calculations. Here are the images of both screens below.
Second screen is main screen of calculator
Follow these steps to create an Android calculator application
- Open the PhoneGap application
- Click the plus sign and select Create new PhoneGap project
- You will be prompted with the template list dialog, where you can choose to create an app based on a sample project.
- Each template has a brief description below the name indicating what type of project will be created. To select a template, click on the radio button next to it. In the image below, the Blank template is selected.
- Enter the path for your app
- Enter any name for your application
- Enter ID for your application (The unique identifier access app store. E.g. com.phonegap.calculator) ID field is also known as package identifier for Android and bundle identifier for iOS.
- Click Create project button
- The following screen will appear

- Go to the application folder and open www folder
- Search for index.html file
- Open it in a text editor
- Remove div classes
   <div class = "app" >
       <h1> PhoneGap </h1>
       <div id = "deviceready" class = "blink">
           <p class = "event listening" > Connecting to Device </p>
           <p class = "event received" > Device is Ready </p>
       </div>
  </div>
- Write your code here
(It will display first screen of calculator app)
<body>
<center>
<br><br><br><br><br>
<br><br><br><br><br>
<br><br><br><br><br>
<a href = "cal.html" >
<img src="Cal.png" alt="HTML tutorial" style="width:120px;height:120px;border:0">
</a>
<h1> Calculator App </h1>
</center>
   <script type = "text/javascript" src = "cordova.js" > </script>
   <script type = "text/javascript" src = "js/index.js" > </script>
   <script type = "text/javascript" >
       app.initialize();
   </script>
</body>
(Cal.png is image used for calculator logo)
- Create another html file called calculator.html. In this file write all code for your calculator main screen using HTML, CSS and JavaScript
<html>
   <head>
      <link rel = "stylesheet" type =  "text/css" href  = "css/style.css" />
      <!—style.css stylesheet code is given below -->
      <h1>
         <center> Calculator  </center>

      </h1>
   </head>
   <body>
      <p id = "demo">
         <br>
      <center>
         <input type =  "text" id = "input" name =  "input" > <br> <br>
         <button class = "NumButton" onclick =  "Function1()" > 1 </button>
         <!—JavaScript code starts from here -->
         <script>
            var op;              //variable used to store operator

            var x;                //variable used to store first value before operator

            var y;               //variable used to store second value after operator

            //function for 1 button

            function Function1() {

               document.getElementById("input").value =

            document.getElementById( "input" ).value+ "1";

            }

            //function for 2 button

            function Function2() {

               document.getElementById("input").value= document.getElementById("input").value+"2";

            }

            //function for 3 button

            function Function3() {

               document.getElementById("input").value= document.getElementById("input").value+"3";

            }

            //function for 4 button

            function Function4() {

               document.getElementById("input").value= document.getElementById("input").value+"4";

            }

            //function for 5 button

            function Function5() {

               document.getElementById("input").value= document.getElementById("input").value+"5";

            }

            //function for 6 button

            function Function6() {

               document.getElementById("input").value= document.getElementById("input").value+"6";

            }

            //function for 7 button

            function Function7() {

               document.getElementById("input").value= document.getElementById("input").value+"7";

            }

            //function for 8 button

            function Function8() {

               document.getElementById("input").value= document.getElementById("input").value+"8";

            }

            //function for 9 button

            function Function9() {

               document.getElementById("input").value= document.getElementById("input").value+"9";

            }

            //function for 0 button

            function Function0() {

               document.getElementById("input").value= document.getElementById("input").value+"0";

            }

            //function for Clear button

            function FunctionClear() {

               document.getElementById("input").value = "";

            }

            //function for add button

            function FunctionAdd() {

            op=1;

            x=document.getElementById("input").value;

               document.getElementById("input").value= document.getElementById("input").value+"+";

            }

            //function for subtract button

            function FunctionSub() {

            op=2;

            x=document.getElementById("input").value;

               document.getElementById("input").value= document.getElementById("input").value+"-";

            }

            //function for multiply button

            function FunctionMul() {

            op=3;

            x=document.getElementById("input").value;

               document.getElementById("input").value =document.getElementById("input").value+"*";

            }

            //function for division button

            function FunctionDiv() {

            op=4;

            x=document.getElementById("input").value;

               document.getElementById("input").value= document.getElementById("input").value+"/";

            }

            //function for equal button

            function FunctionEq() {

            var length= x.length;

            y=document.getElementById("input").value;

            var z=y.slice(length+1);

            if(op==1){

               document.getElementById("input").value = x-(-z);

            }

            if(op==2){

               document.getElementById("input").value = x-z;

            }

            if(op==3){

               document.getElementById("input").value = x*z;

            }

            if(op==4){

               document.getElementById("input").value = x/z;

            }

            }

         </script>
         <button class = "NumButton" onclick = "Function2()" > 2 </button>
         <button class = "NumButton" onclick = "Function3()" > 3 </button>
         <button class = "NumButton" onclick = "Function4()" > 4 </button> <br> <br>
         <button class = "NumButton" onclick = "Function5()" > 5 </button>
         <button class = "NumButton" onclick = "Function6()" > 6 </button>
         <button class = "NumButton" onclick = "Function7()" > 7 </button>
         <button class = "NumButton" onclick = "Function8()" > 8 </button> <br> <br>
         <button class = "NumButton" onclick = "Function9()" > 9 </button>
         <button class = "buttonZero" onclick = "Function0()" > 0 </button>
         <button class = "clear" onclick = "FunctionClear()" > CLEAR </button> <br> <br>
         <button class = "button" onclick = "FunctionAdd()" > + </button>
         <button class = "button" onclick = "FunctionSub()" > - </button>
         <button class = "button" onclick =  "FunctionMul()" > * </button> <br> <br>
         <button class = "button" onclick = "FunctionDiv()" > / </button>
         <button class = "buttonEqual" onclick = "FunctionEq()" > = </button>
      </center>
      </p>
   </body>
</html>- Style sheet code included here is Style.css
-
Open application path folder.button{ height: 35px; width: 55px; } .buttonEqual { height: 35px; width: 115px; } .NumButton { height: 35px; width: 40px; } .buttonZero { height : 35px; width: 60px; } .clear{ height: 35px; width: 65px; } - Search for www folder
- Copy “www” folder and paste on desktop.
- Open this www folder and create a new folder called “XML” inside of it.
- Now search for the “config” file in the application folder.
- Copy it and paste this config file into the XML folder placed on desktop.
- Now go to the link https://www.dropbox.com/s/asy4nrg7dtf... and download Cordova Files.
- Extract these Cordova Files and paste them in the www folder placed on the desktop of your pc.
- Compress this www folder to a zip folder
- Building APK file
- See the instruction listed above and follow the same steps here.
So there you have it--your first phone gap applicaton. Pretty easy, right?! Let continue with a few more Javascript highlights.
Use of form validation in JavaScript Application
This makes JavaScript more attractive as it can do form validation.
<!DOCTYPE html>
<html>
<head>
<script>
function validateForm() {
   var x = document.forms["myForm"]["fname"].value;
   if (x == "") {
       alert("Name must be filled out");
       return false;
   }
}
</script>
</head>
<body>

<form name = "myForm" action = "demo_form.asp"
Onsubmit = "return validateForm()" method = "post" >
Name: < input type = "text" name= "fname" >
< input type = "submit" value = "Submit" >
</form>
</body>
</html>
Other uses of JavaScript
Other than web applications and mobile applications, JavaScript has many other interesting uses, some of them are given below.
- You can write server side applications in JS
- JS is widely used in client side
- You can create simple web games by using JavaScript.
- You can create cross platform mobile application with HTML5 & CSS3 and JavaScript.
- There are lots of open source JavaScript libraries that solve non-web problems. For example, Grunt (http://gruntjs.com/) is a popular automation framework, and Mocha (https://github.com/visionmedia/m...) can be used to write arbitrary unit tests.
- Projects like Tessel (http://tessel.io) even use JavaScript to develop right on the hardware!
- also, most of your browser is probably written in Javascript (like Mozilla Firefox)—not the rendering engine though
- JSON (Javascript Object Notation) is now extensively used as a format to send and receive data around and has recently had much more attention than XML, although it has not fully replaced it yet. Although it’s used for internet applications 90% of the time, you can start using it in many other areas as well (ex. configuration files in Sublime Text).
Mobile Applications using Webview
A “webview” is a browser bundled inside of a mobile application producing what is called a hybrid app. Using a webview allows mobile apps to be built using Web technologies (HTML, JavaScript, CSS, etc.) but still package it as a native app and put it in the app store. In addition to allowing devs to work with familiar technologies, other advantages of building a hybrid app include greater code reuse across the app and the website, and easier support for multiple mobile platforms.
Android WebView is a system component for the Android operating system (OS) that allows Android apps to display content from the web directly inside an application. In the past, WebView was tightly coupled with the operating system and the component would only be updated with the release of a new version of the operating system. When Google released Android 5, however, Google separated WebView from the core operating system so that updates to WebView could be distributed through the Google Play app store. This is good news for end users whose Android devices run newer versions of the operating system. If a bug is found in the WebView component, Google can push out a fix and end users can get it at the Google Play store and install it.
In order to add WebView to your application, you have to add the <WebView> element to your xml layout file. Its syntax is as follows −
<WebView  xmlns:android="http://schemas.android.com/apk/res/android"
  android:id="@+id/webview"
  android:layout_width="fill_parent"
  android:layout_height="fill_parent"
/>
That’s it for now! Leave a comment below if you have any questions or anything to add.
Recent Stories


Top DiscoverSDK Experts


Featured Products

Compare Products
Select up to three two products to compare by clicking on the compare icon () of each product.
{{compareToolModel.Error}}
{{CommentsModel.TotalCount}} Comments
Your Comment