Sponsors


JavaFX Calculator with Java code
Now that we’ve completed our Hello World tutorial let’s move on to another awesome app we’re going to build called CalculatorFX—a simple calculator done up twice. First we’ll code the screen directly with a single class file and then we’ll use FXML Scene Builder. Try both and then you can judge which approach you like better.
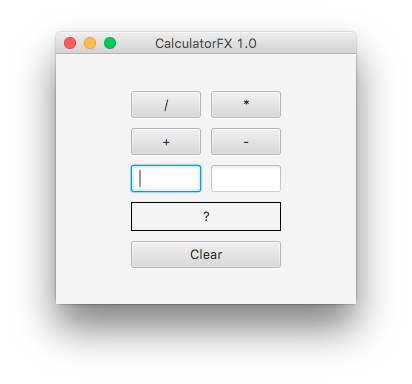
Our final app will look like:
In this tutorial, we’re going to cover the Java Code approach. We will cover the FXML approach in the next article.
New JavaFX Document
As we move on to build our app, we'll make use of GridPane as our root container. Try to see the application like this, with rows and columns starting at 0, 0.
We start by declaring the control elements that we'll need at the top of the application. This goes above the start method:
TextField tfNum1;
TextField tfNum2;
Button btnDivide;
Button btnMultiply;
Button btnAddition;
Button btnSubtraction;
Button btnClear;
Label lblAnswer;
Now we create each control and give it a label. Notice how we style the answer label using css-like syntax to attach a border and padding. Very cool!
tfNum1 = new TextField();
tfNum2 = new TextField();
btnDivide = new Button("/");
btnMultiply = new Button("*");
btnAddition = new Button("+");
btnSubtraction = new Button("-");
btnClear = new Button("Clear");
lblAnswer = new Label("?");

lblAnswer.setAlignment(Pos.CENTER);
lblAnswer.setStyle("-fx-border-color: #000; -fx-padding: 5px;");
Using GridPane
Now that we have the elements ready, we can add them to a new GridPane. The GridPane uses a column-row style where we can tell it which cell we want to add the elements to. Notice that last 2 controls span across 2 columns. We also set the pane to the middle of the scene (which we will make later):
GridPane root = new GridPane();
root.setAlignment(Pos.CENTER);

root.setHgap(10);
root.setVgap(10);

root.add(btnDivide, 0, 0);
root.add(btnMultiply, 1, 0);
root.add(btnAddition, 0, 1);
root.add(btnSubtraction, 1, 1);
root.add(btnClear, 0, 4, 2, 1);

root.add(tfNum1, 0, 2);
root.add(tfNum2, 1, 2);
root.add(lblAnswer, 0, 3, 2, 1);

setWidths();
attachCode();

Scene scene = new Scene(root, 300, 250);
primaryStage.setTitle("CalculatorFX 1.0");
primaryStage.setScene(scene);
primaryStage.show();
To layout the app properly, I iterated on each control and set how wide it should be. To keep things modular in the ‘start’ method, I added a separate method called ‘setWidths’. I also added a way to tell each button what to do when it gets clicked, so again a separate method is used to attach the code to the button. The ‘start’ method then finishes with the usual code that NetBeans provides for you.
private void setWidths() {
   tfNum1.setPrefWidth(70);
   tfNum2.setPrefWidth(70);
   btnDivide.setPrefWidth(70);
   btnMultiply.setPrefWidth(70);
   btnAddition.setPrefWidth(70);
   btnSubtraction.setPrefWidth(70);
   btnClear.setPrefWidth(150);
   lblAnswer.setPrefWidth(150);
}

public void attachCode() {
   //have each button run BTNCODE when clicked
   btnAddition.setOnAction(e -> btncode(e));
   btnSubtraction.setOnAction(e -> btncode(e));
   btnMultiply.setOnAction(e -> btncode(e));
   btnDivide.setOnAction(e -> btncode(e));
   btnClear.setOnAction(e -> btncode(e));
}
The attach-code method tells each button to run the same method when it is clicked upon. If we send in ‘e’ (the click event) to the btnCode method, we can use it to tell us which button was pressed. That way we can use 1 method for all 5 buttons.
Here is the first part of the method that runs whenever a button is clicked. If we click the clear button we will erase the text in the textfields placing a ? in the labelReturn that prevents if from going any further.
int num1, num2, answer;
char symbol;
//e tells us which button was clicked
if (e.getSource() == btnClear) {
   tfNum1.setText("");
   tfNum2.setText("");
   lblAnswer.setText("?");
   tfNum1.requestFocus();
   return;
}
We start by reading in 2 integer numbers from the 2 text fields (this can throw an error which I am not catching). Depending on the button clicked it will either add, subtract, divide or multiply to get an answer. I also use a char variable to represent the kind of calculation I am doing. Then I put the answer together in the label along with the symbol.
//read numbers in from textfields
num1 = Integer.parseInt(tfNum1.getText());
num2 = Integer.parseInt(tfNum2.getText());
if (e.getSource() == btnAddition) {
symbol = '+';
answer = num1 + num2;
} else if (e.getSource() == btnSubtraction) {
symbol = '-';
answer = num1 - num2;
} else if (e.getSource() == btnMultiply) {
symbol = 'x';
answer = num1 * num2;
} else {
symbol = '/';
answer = num1 / num2;
}
//display answer
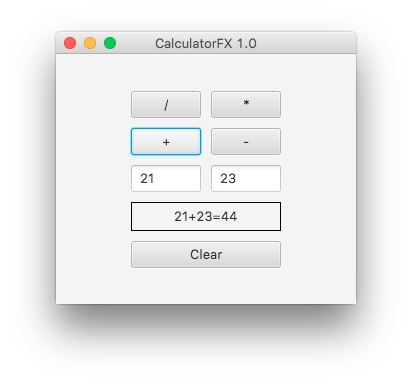
lblAnswer.setText("" + num1 + symbol + num2 + "=" + answer);The final app looks just like what we showed in the beginning. Let us put it again here, with an input and output.
Things to know
Let’s pin down some of the important things to note regardign the basic structure of any JavaFX application:
- The main class for a JavaFX application extends the javafx.application.Application class. The start() method is the main entry point for all JavaFX applications.
- A JavaFX application defines the user interface container by means of a stage and a scene. The JavaFX Stage class is the top-level JavaFX container. The JavaFX Scene class is the container for all content. In JavaFX, the content of the scene is represented as a hierarchical scene graph of nodes. In this example, the root node is a StackPane object, which is a resizable layout node. This means that the root node's size tracks the scene's size and changes when the stage is resized by a user.
- The root node contains one child node, a button control with text, plus an event handler to print a message when the button is pressed.
- The main() method is not required for JavaFX applications when the JAR file for the application is created with the JavaFX Packager tool, which embeds the JavaFX Launcher in the JAR file. However, it is useful to include the main() method so you can run JAR files that were created without the JavaFX Launcher, such as when using an IDE in which the JavaFX tools are not fully integrated. Also, Swing applications that embed JavaFX code require the main() method.
Conclusion
This project was straightforward but quite interesting. You can find all the source code for this project in this Github project. It is a netbeans based project so it should be easy to import into Netbeans and run as is.
Recent Stories


Top DiscoverSDK Experts


Featured Products


Compare Products
Select up to three two products to compare by clicking on the compare icon () of each product.
{{compareToolModel.Error}}
{{CommentsModel.TotalCount}} Comments
Your Comment