Sponsors


Integrating Native Facebook Login and Graph API into Ionic 2
In one of my previous articles, I talked about Firebase integration that enables you to do authentication through several providers, including email/password, Google, Facebook, etc. Actually, we implemented only the email/password provider, as that’s the simplest and most common method to authenticate the users, even though with few instructions you can integrate other providers too.
However, for the applications that only require the Facebook Login, especially if the target devices have the Facebook application installed already, then it doesn’t make sense to initialize and integrate Firebase all over again just for this authentication, especially if the said applications don’t have any database requirements, and just need something to authenticate users with.
Thankfully, Ionic 2 provides a Facebook Native Login plugin that gives you simple API methods allowing you to add the login integration into your application that automatically opens the Facebook app on the device for the login credentials, rather than asking the username/password within the app through a new tab or in-app browser.
This approach is highly preferred, not just by the developers but by users as well, because users feel annoyed when typing the same information again and again, especially if they have already logged-in to their account in their Facebook application.
But applications don’t just require login functionality. They also should have the ability to get details on other information Facebook provides such as user id, age, birthdate, profile picture, etc. Further, an ability to do tasks through the application, using services like posting a status on the wall, posting a photo, sharing a link, etc. can be highly beneficial. You would be glad to hear that such plugins already support these functionalities through simple methods.
But what about Facebook pages? Well, in order to get information from pages, there is already a solution: Facebook Graph API, which basically supports the “social graph” that gives you the ability to send and retrieve the data using HTTP methods, kind of how we used the Yahoo Finance API in the past.
In this article, I am going to show you how you can integrate the native Facebook login and then I will demonstrate the usage of Graph API for performing several operations. Let’s get started!
Integrating Native Facebook Login and Graph API into Ionic 2
There are applications that need to show information from Facebook pages. For example, there might be an agency using the application to get the information of all the agency Facebook pages in their local area. Instead of going through all the pages on Facebook manually, they can simply use the UI in the application to get whatever information they want within seconds in their own custom approach!
As I mentioned earlier, the Graph API gives you the HTTP based methods to query the data and post stories to the Facebook platform. Basically, it contains a “social graph”, which is kind of a representation of all the things happening on Facebook (at least the public stuff anyway) so you can use HTTP’s GET and POST methods to retrieve and send the required data.
However, it only allows you to post and retrieve text information such as status, stories, posts, etc. For video uploading and downloading, we need to use the graph-video.facebook.com (but we won’t cover video uploading here). But, let’s forget about this API and focus on Login first.
For the login, we will use this plugin (https://ionicframework.com/docs/v2/native/facebook/), which basically opens kind of an in-app browser for login confirmation without actually opening a browser. It uses the login credentials from the Facebook app if installed on your device. If you are not already logged-in, then you will be given a login screen, just like the one you received when you open the Facebook app.
It doesn’t give the popup which you may receive in non-native approach with other solutions, so this is really a sophisticated method to integrate Facebook login in a native manner. This is something native Android developers also prefer.
Before implementing the plugin, you first need to register your app to Facebook Developers. Go to the Apps dashboard (https://developers.facebook.com/apps), and click on “Add a New App.” This will give you the dialog to enter the Display Name, Contact Email and Category.
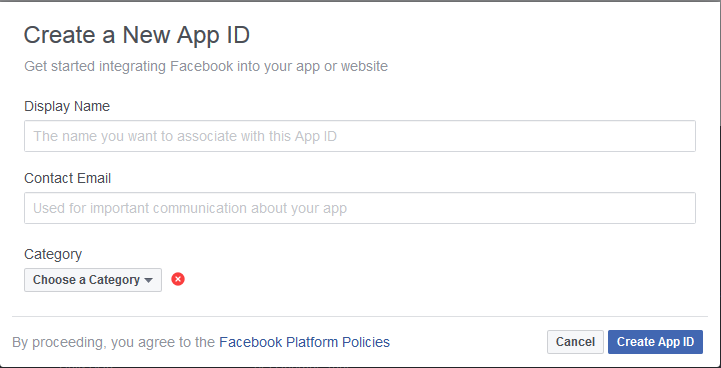
Enter a cool name for your project. It’s recommended that you write the name without spaces e.g. “ionic2login”, as this will make the plugin installation easier. For the category, you can choose whatever you want. I’ve chosen “Navigation” but you may not like your users to navigate. Now go to the “Dashboard” and notice the “App ID.”
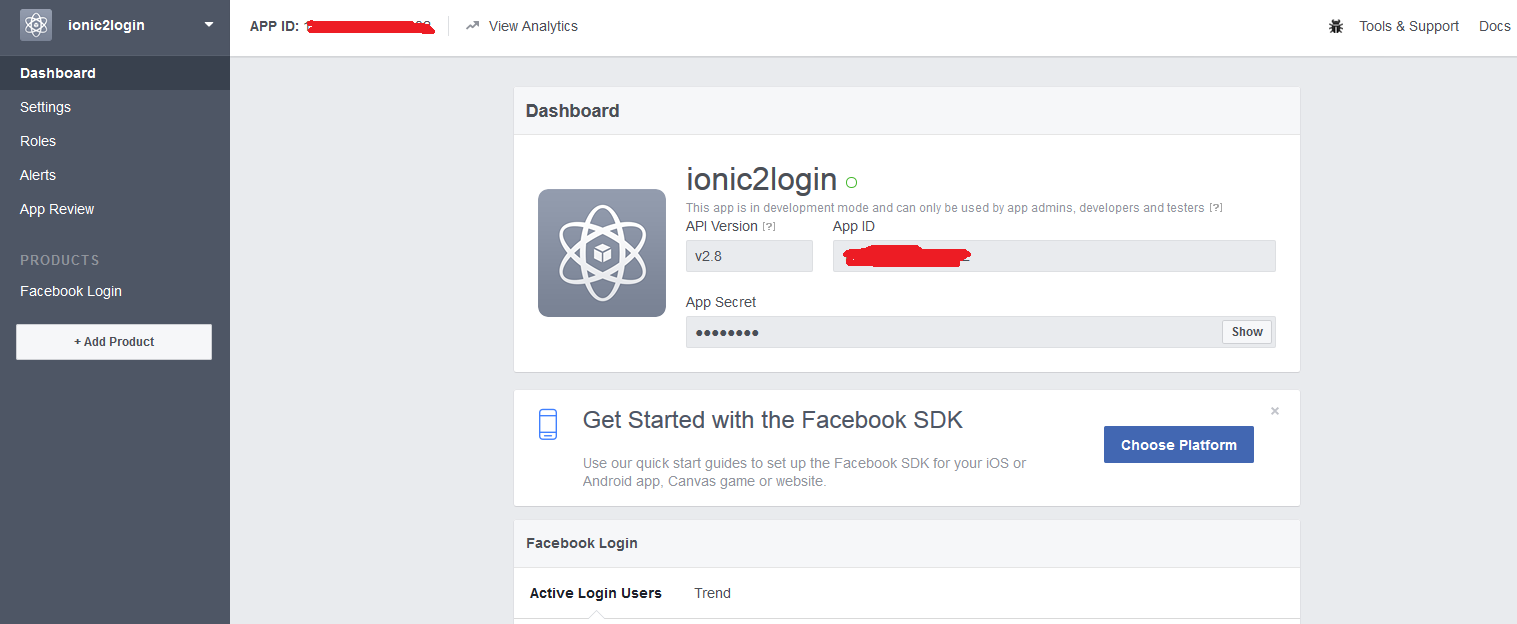
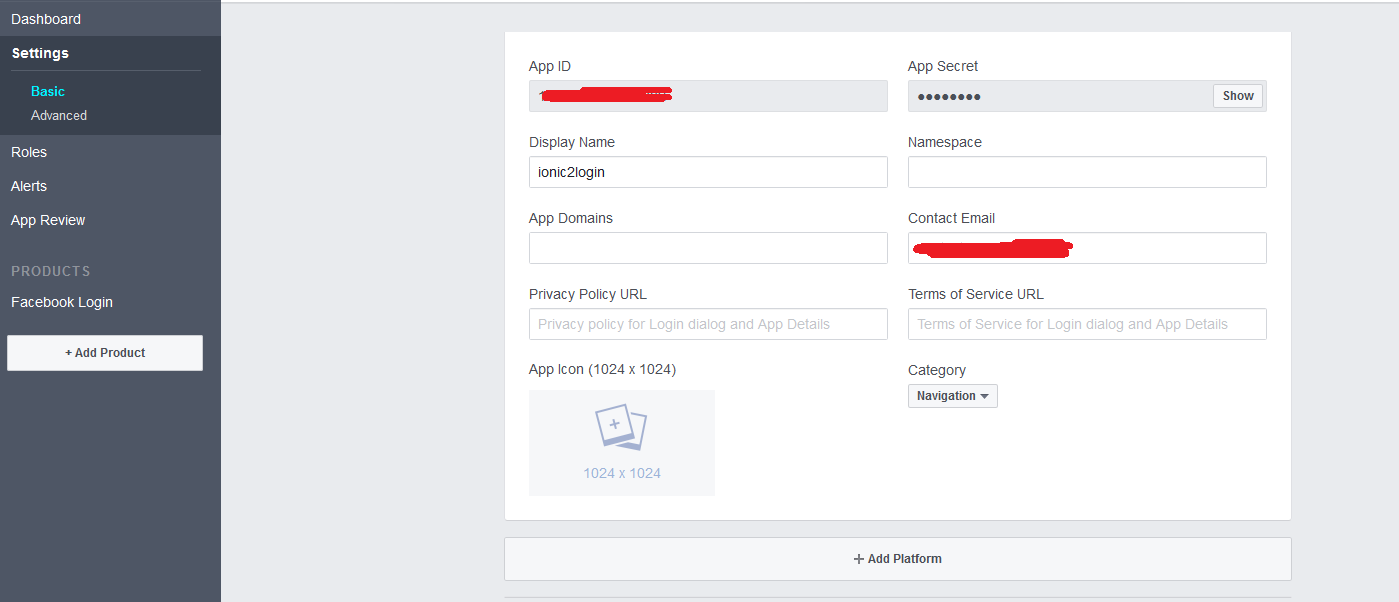
We’ll need this “App ID” later. Now, as the application is created, let’s add our platform (in this case Android). Go to Settings -> Basic page, and click on “Add Platform”.
It will give you the screen to select the Platform. As I am testing on Android, I have selected Android.
Now, in the root directory of your project open “config.xml” and notice the “<widget id="com.ionicframework.ionicfacebook972220"…..” part. This is the default name of your project when you created the project through CLI. Copy this “id” and paste it in “Google Play Package Name” and set the “Class Name” to com.facebook.FacebookActivity. Turn on the “Single Sign On”.
(Note that I have hidden the “App ID” in the screenshots because it is not meant to be publicly displayed, as other people can misuse the ID)
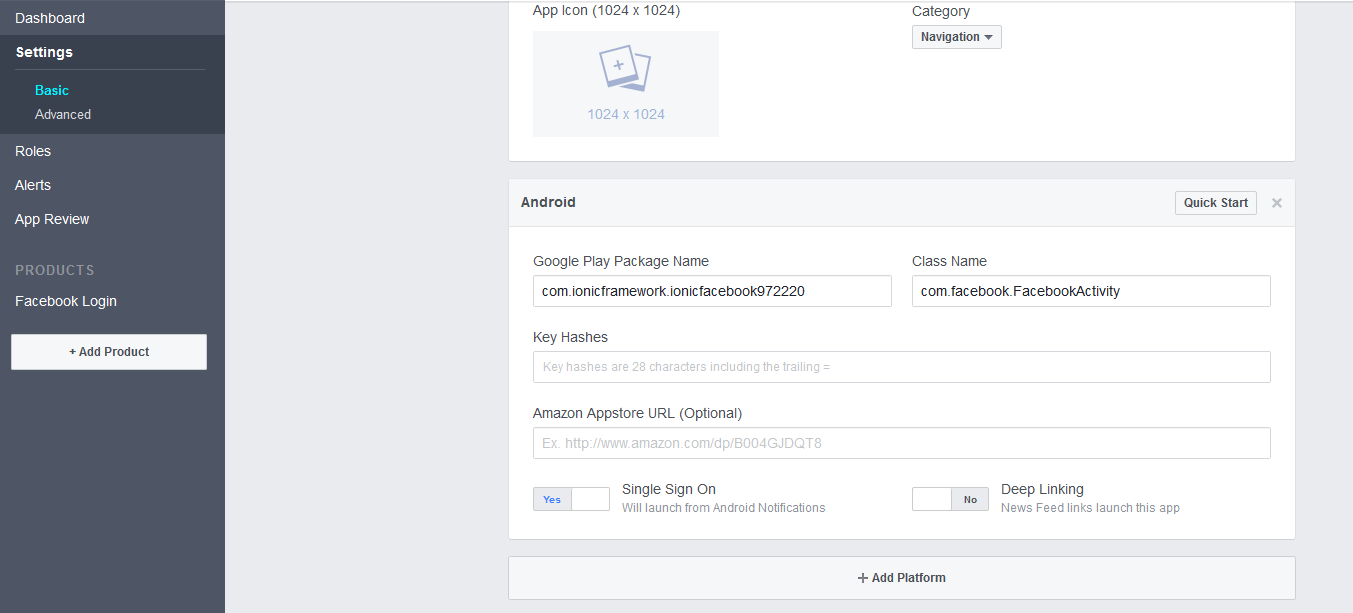
Now, as you can see you need to generate the key hash for putting in the field. I have tried following the approach mentioned here (https://developers.facebook.com/docs/android/getting-started#samples) for generating the key using the command line (check the Windows section), but the given key didn’t work for me (how sad!), and so the running application was giving me invalid key hash error.
So, what I did is that I build the application on Android and tested on the device (through ionic run android), which gives me the hash key (along with the error of invalid hash key ;)), so I added the given key on this “Key Hashes” field, and the application started working!
Thanks to the solution provided here (http://stackoverflow.com/questions/30934225/facebook-android-app-error-invalid-key-hash). This is the easiest way to get the hash key by first building/running the application (we will look at this later).
For getting the public posts on a Facebook page, we will be using the Graph API as I mentioned earlier. We will create a separate page for implementation of this API, which will basically allow the users to enter the link to the Facebook page, and then the magic will happen inside the code which eventually displays the photos from the posts.
You need to get the Facebook App Token from here (https://developers.facebook.com/tools/explorer). Click on “Graph API Explorer” and select your project, then click on “Get Token” and then “Get App Token” to get the App Token.
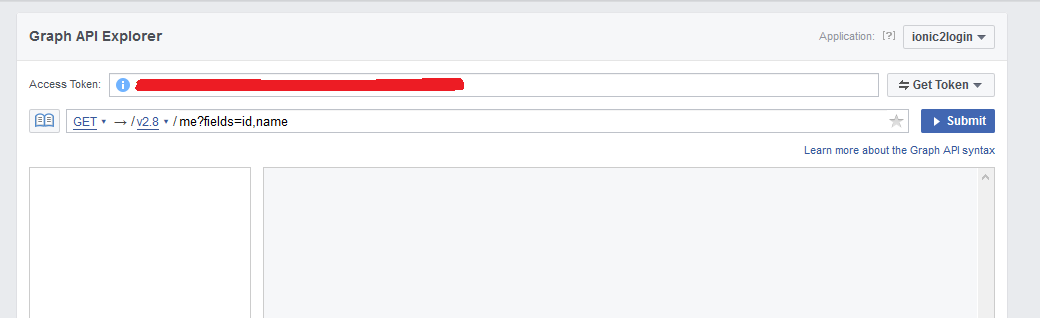
Below it, you can find the GET field where you can input the queries. Try typing “michaelhyatt?fields=posts{from,created_time,message,attachments,comments}” in it. It will give a bunch of data to play with.
You can modify the fields as much as you want:
michaelhyatt?fields=posts.limit(5){from,created_time,message,attachments,comments.order(chronological)}
Here, I have limited the post count to “5”, and made sure that posts come in chronological order.
See more about the fields options here (https://developers.facebook.com/docs/graph-api/using-graph-api/).
We will be using this data in our application and then display the posts and photos.
Enough talk, let’s create a project!
Creating a project
As the basic configuration is done for the Facebook native login integration, let’s now create a project:
$ionic start ionic-facebook blank –v2
You need to set “app.component.ts” and “app.html” to accommodate the pages and navigation. Take a look at our previous applications for the code.
Open “home.html” and copy the following content:
home.html
<ion-header>
 <ion-navbar>
   <button ion-button menuToggle>
     <ion-icon name="menu"></ion-icon>
   </button>
   <ion-title>Home</ion-title>
 </ion-navbar>
</ion-header>

<ion-content padding>
 This is an example project of Ionic 2 demonstrating the native Facebook integration and Graph API.
</ion-content>
Before adding/editing our pages, you need to first install the plugin:
$ionic plugin add cordova-plugin-facebook4 --variable APP_ID="yourId" --variable APP_NAME="yourAppName”
Replace “yourId” with the “App ID” you received for your app, and set “yourAppName” to the name of your app (ionic2login in my case). This will install the plugin.
Now, add the following providers:
$ionic g provider graph
$ionic g provider facebook
Open “providers/facebook.ts” and copy the following content:
facebook.ts
import { Http } from '@angular/http';
import { Injectable } from '@angular/core';

import { Observable } from 'rxjs/Rx';
import 'rxjs/add/operator/map';

import { Facebook } from 'ionic-native';

@Injectable()
export class FacebookService {
 APP_ID: number = <Add-your-APP-ID-Here>;

 constructor(private http: Http) {

 }

 init() {
    Facebook.browserInit(this.APP_ID, "v2.8");
 }
}
Here, I have added the APP_ID and simply initialized the browser. You need to add your App ID to the variable.
Now, open “providers/graph.ts” and copy the following content:
graph.ts
import { Http } from '@angular/http';
import { Injectable } from '@angular/core';

import { Observable } from 'rxjs/Rx';
import 'rxjs/add/operator/map';

@Injectable()
export class GraphService {

 private accessToken = <Add-your-Access-Token-Here>;

 private url = 'https://graph.facebook.com/';
 private query = `?access_token=${this.accessToken}&date_format=U&fields=`;

 constructor(private http: Http) { }

 getPosts(pageName, fields): Observable<any[]> {
   let url = this.url + pageName + this.query + fields;
    console.log(url);

    // get the "data" array of "posts"
   return this.http
       .get(url)
       .map(response => response.json().posts.data);
  }
}
Here, I have defined the method for getting the posts through an HTTP method. Again, you need to add your access token to the variable.
Now, let’s create a few pages:
$ionic g page login
$ionic g page profile
$ionic g page graph
Open “login.ts” and copy the following content:
login.ts
import { Component } from '@angular/core';
import { NavController, NavParams, Platform } from 'ionic-angular';

import { Facebook, NativeStorage } from 'ionic-native';

import { ProfilePage } from '../profile/profile';

import { FacebookService } from '../../providers/facebook';

import { ModalController } from 'ionic-angular';

@Component({
 selector: 'page-login',
 templateUrl: 'login.html',
 providers: [FacebookService]
})
export class LoginPage {

 authResponse: any;
 isLogged: boolean;

 constructor(public navCtrl: NavController, public navParams: NavParams, public facebookService: FacebookService, public platform: Platform, public modalCtrl: ModalController) {
     this.platform.ready().then(() => {
        this.isLogged = false;
        this.facebookService.init();
     });
 }

 ionViewDidLoad() {
   console.log('ionViewDidLoad LoginPage');
 }

 login() {
    let permissions = new Array<string>();
   let nav = this.navCtrl;
    permissions = ["public_profile"];

    Facebook.login(permissions).then((response) => {
     let userId = response.authResponse.userID;
     let params = new Array<string>();

     Facebook.api("/me?fields=name,gender", params)
     .then(function(profile) {
       profile.picture = "https://graph.facebook.com/" + userId + "/picture?type=large";
       NativeStorage.setItem('profile',
       {
         name: profile.name,
         gender: profile.gender,
         picture: profile.picture
       })
       .then(function(){
       }, function (error) {
         console.log(error);
       })
     })

     alert('Logged in Successfully!');
     alert(JSON.stringify(response.authResponse));
     this.authResponse = response.authResponse;
     this.isLogged = true;
   }, (error) => {
     alert(error);
     console.log(error);
   });
 }

 post() {
    Facebook.showDialog({
        method: "share"
    });
 }

 getBirthday() {
     Facebook.getLoginStatus().then((response) => {
     if(response.status == 'connected') {
       Facebook.api("me/?fields=id,birthday", ["user_birthday"]).then((data)=>{
         alert(JSON.stringify(data));
       }, (error) => {
         alert(error);
       })
     }
     else {
       alert('Logged in Failed');
     }
   })
 }

 publishPhoto() {
     Facebook.showDialog({
        method: "share",
        picture:'https://images-na.ssl-images-amazon.com/images/I/51%2BVlDDzumL.jpg',
        name:'Sample Post',
        message:'My First Photo Post',
        caption: 'Phonegap Plugin Testing',
        description: 'Testing the Plugin'
     });
 }

 getDetails() {
    var self = this;
   Facebook.getLoginStatus().then((response) => {
     if(response.status == 'connected') {
       Facebook.api('/' + response.authResponse.userID + '?fields=id,name,gender',[]).then((response)=>{
         alert(JSON.stringify(response));

         let addModal = self.modalCtrl.create(ProfilePage);
         addModal.present();
       }, (error) => {
         alert(error);
       })
     }
     else {
       alert('Logged in Failed');
     }
   })
 }

 logout() {
   Facebook.logout().then((response) =>{
     alert(JSON.stringify(response));
     this.isLogged = false;
   }, (error) => {
     alert(error);
   })
 }
}
Here, I have defined several methods that show the power of the Facebook native plugin. In login() method, I am initializing the login through Facebook.login() which asks the permission for which the login needs to be done. Here we have passed the "public_profile" because we need to access the details of the user ID.
Then we are passing the fields options to Facebook.api() to tell the plugin to retrieve the required data from the API. We are using NativeStorage for storing the information, so that we can later retrieve the information in another page. This is preferable to storing data in arrays, as you can simply use the key/value pair to get everything in the data.
Oh you need to install the NativeStorage plugin:
$ionic plugin add cordova-plugin-nativestorage
We are using the Facebook.showDialog() method for opening the dialog for posting the status on the user’s wall. This provides several options, so for example, you can post the photo as well. The rest should be self-explanatory. For more information on the methods see here (https://ionicframework.com/docs/v2/native/facebook/).
Now, open “login.html” and copy the following content:
login.html
<ion-header>
<ion-navbar>
<button ion-button menuToggle>
<ion-icon name="menu"></ion-icon>
</button>
<ion-title>Facebook Login</ion-title>
</ion-navbar>
</ion-header>
<ion-content padding>
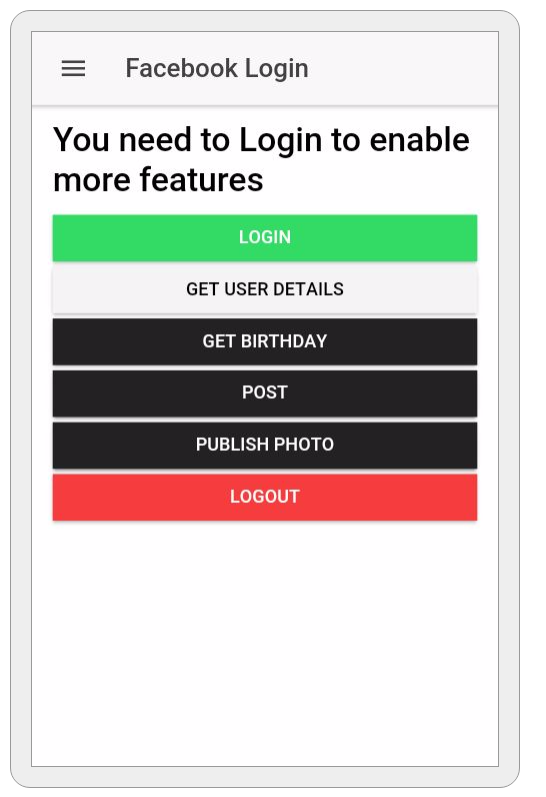
<h1>You need to Login to enable more features</h1>
<button ion-button full color="secondary" (click)="login()">Login</button>
<div *ngIf = "isLogged">
<button ion-button full color="light" (click)="getDetails()">Get User Details</button>
<button ion-button full color="dark" (click)="getBirthday()">Get Birthday</button>
<button ion-button full color="dark" (click)="post()">Post</button>
<button ion-button full color="dark" (click)="publishPhoto()">Publish Photo</button>
<button ion-button full color="danger" (click)="logout()">Logout</button>
</div>
</ion-content>Here, we have defined some buttons for executing our methods.
Now, open “graph.ts” and copy the following content:
graph.ts
import { Component } from '@angular/core';
import { NavController } from 'ionic-angular';
import { GraphService } from '../../providers/graph';
import { Observable } from 'rxjs/Rx';
import 'rxjs/add/operator/map';
@Component({
selector: 'page-graph',
templateUrl: 'graph.html',
providers: [GraphService]
})
export class GraphPage {
pagelink: string;
ionViewDidLoad() {
console.log('ionViewDidLoad GraphPage');
}
public data: Observable<any[]>;
constructor(public navCtrl: NavController,
public graphService: GraphService) {
this.pagelink = "michaelhyatt";
this.saveLink();
}
saveLink() {
var fields = "posts{from,created_time,message,attachments,comments.order(chronological)}";
var page;
if (this.pagelink.includes("https://www.facebook.com/")) {
page = this.pagelink.replace("https://www.facebook.com/", '');
}
else if (this.pagelink.includes("https://facebook.com/")) {
page = this.pagelink.replace("https://facebook.com/", '');
}
else if (this.pagelink.includes("www.facebook.com/")) {
page = this.pagelink.replace("www.facebook.com/", '');
}
else if (this.pagelink.includes("facebook.com/")) {
page = this.pagelink.replace("facebook.com/", '');
}
else {
page = this.pagelink;
}
// Get the data
this.data = this.graphService
.getPosts(page, fields)
.map(data => data.map((post) => {
return {
from: post.from,
id: post.id,
time: post.created_time * 1000,
message: post.message,
photos: this.getPhotos(post)
};
}));
}
getPhotos = (post) => {
if (!post.attachments)
return [];
let attachments = post.attachments.data[0].subattachments ||
post.attachments;
return attachments.data
.filter(x => x.type == "photo")
.map(x => x.media.image);
}
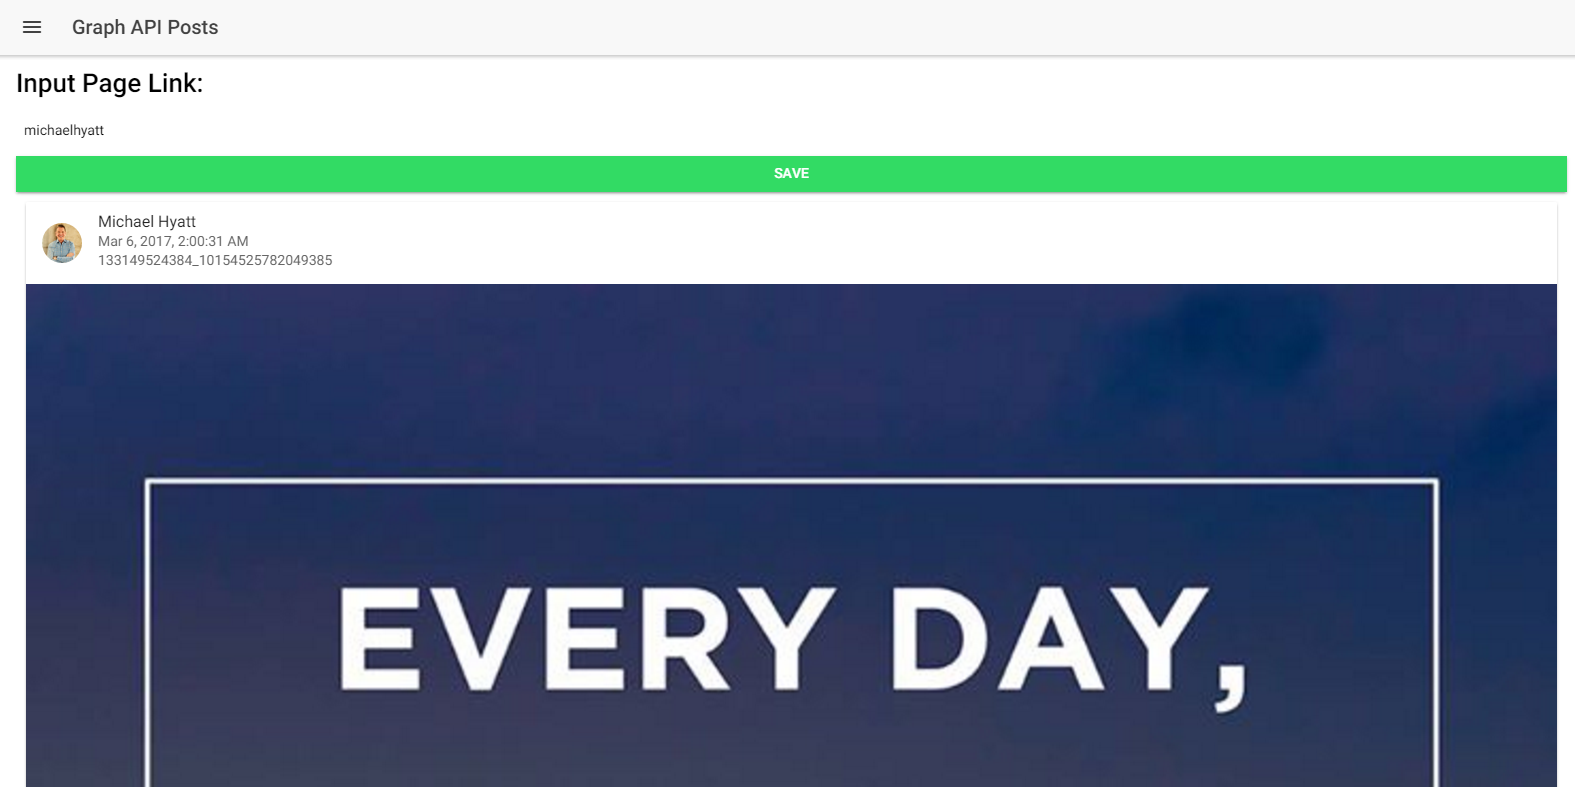
}Here, we are using the Graph API to retrieve the posts data of the Facebook page (the default is set to “michaelhyatt”, which is a cool page that gives productivity tips). We are allowing the users to manually set the link to Facebook page through the UI. We are going to display only the photos (actually the first photo in the post if there are several photos) and the message/status with the photo. Thanks to this link (http://gonehybrid.com/how-to-query-facebook-graph-api-in-an-ionic-2-app/) for giving us this idea.
In saveLink(), we are checking if the given link is correct and valid, so we are replacing the string with the correct version. Then, we are importing our posts through our GraphService, and then applying the map() method to get only the data that we want.
We are not implementing the comments at this moment, but you can do so using this method if you want.
Now, open “graph.html” and copy the following content:
graph.html
<ion-header>
 <ion-navbar>
   <button ion-button menuToggle>
     <ion-icon name="menu"></ion-icon>
   </button>
   <ion-title>Graph API Posts</ion-title>
 </ion-navbar>
</ion-header>

<ion-content padding>
 <h1>Input Page Link:</h1>
 <ion-input type="text" [(ngModel)]=pagelink></ion-input>
 <button full ion-button color="secondary" (click)="saveLink()">Save</button>

 <div *ngFor="let post of data | async">
   <ion-card *ngIf="post.photos.length > 0">
     <ion-item>
       <ion-avatar item-left>
         <img src="http://graph.facebook.com/{{post.from.id}}/picture" />
       </ion-avatar>
       <h2>{{ post.from.name }}</h2>
       <p>{{ post.time | date:'medium' }}</p>
        <p>{{ post.id }}</p>
     </ion-item>
     <img [src]="post.photos[0].src" />
     <ion-card-content>
       <p>{{ post.message }}</p>
     </ion-card-content>
   </ion-card>
 </div>
</ion-content>
This code should be self-explanatory, so let’s skip the explanation.
Now for the profile page, open “profile.ts” and copy the following content:
profile.ts
import { Component } from '@angular/core';
import { NavController, ViewController } from 'ionic-angular';
import { Facebook, NativeStorage } from 'ionic-native';
import { LoginPage } from '../login/login';

@Component({
 selector: 'page-profile',
 templateUrl: 'profile.html'
})

export class ProfilePage {

 profile: any;
 userIsReady: boolean = false;

 constructor(public navCtrl: NavController, public view: ViewController) {}

 ionViewCanEnter(){
   let self = this;
   NativeStorage.getItem('profile')
   .then((data) => {
     self.profile = {
       name: data.name,
       gender: data.gender,
       picture: data.picture
     };
       self.userIsReady = true;
   }, (error) => {
     console.log(error);
   });
 }

 logout(){
   var nav = this.navCtrl;
   Facebook.logout()
   .then((response) => {
     NativeStorage.remove('profile');
     nav.push(LoginPage);
   }, (error) => {
     console.log(error);
   });
 }

 close(){
        this.view.dismiss();
 }
}
This code should be easy to understand. We are using NativeStorage.getItem() to get our data for the profile. We have also created close() method for dismissing the view.
Now open “profile.html” and copy the following content:
profile.html
<ion-header>
 <ion-toolbar color="secondary">
     <ion-title>
         User Profile
     </ion-title>
       <ion-buttons end>
           <button ion-button icon-only (click)="close()"><ion-icon name="close"></ion-icon></button>
       </ion-buttons>
   </ion-toolbar>
</ion-header>

<ion-content *ngIf='userIsReady'>
 <ion-item>
   <ion-label>Name: {{profile.name}} </ion-label>
 </ion-item>
 <ion-item>
   <ion-label>Gender: {{profile.gender}} </ion-label><br>
 </ion-item>
 <ion-item>
   <ion-label>Profile picture:</ion-label>
 </ion-item>
 <ion-item>
   <img [src]="profile.picture">
 </ion-item>
 <ion-row>
   <ion-col>
     <button ion-button block (click)="logout()">Logout</button>
   </ion-col>
 </ion-row>
</ion-content>
This will show the nice profile Modal whenever you click on the “Get Details” button. This also shows the profile picture.
We could also use global state variables to store our user information, but we want to store the information for a little longer. So for instance, if the user has already logged-in and performed different operations, then visiting the user profile still retains the information unless the user explicitly click on “Logout”.
You can do “ionic serve” to see the cool results!
If you have trouble following the code, then you can read the uploaded repository here (https://github.com/danyalzia/ionic2-facebook-play).
Conclusion
So, you can see that it’s not really difficult to integrate the native Facebook login PLUS Graph API, as long as you understand how different components work in Ionic 2. Whatever knowledge we have discussed in this article can be transferred to other frameworks as well, so these features are not exclusive to Ionic 2. Will those alternatives also provide such fast development? That’s debatable for sure!
If you have any question then please ask in the comment section below!
Recent Stories


Top DiscoverSDK Experts


Featured Products

Compare Products
Select up to three two products to compare by clicking on the compare icon () of each product.
{{compareToolModel.Error}}
{{CommentsModel.TotalCount}} Comments
Your Comment