Sponsors


Docker - Creating a Settings File
In our last Docker article, I showed you how to create containers from the collection of premade containers that are available on Docker’s website which has thousands of different settings files. For instance, when I wanted to run a PHP environment, I used something along the lines of the following:
docker run -d -p 80:80 --name my-apache-php-app -v /c/temp:/var/www/html php:7.0-apacheThe string php:7.0-apache is not something I made up—it’s from Docker’s official PHP distribution. The official distribution is PHP and the ‘branch’ is apache-7.0. What’s really behind this distribution is a settings file that tells the container to install Apache, PHP version 7, and all kinds of other things. So we have a choice. We can go with the official settings file provided by Docker which will be good for simple scripts, or we can create our own settings file that contains exactly what we need. This custom settings file is called an image, and from this image we create containers.
But first, why would someone want to make their own image? There are countless scenarios really. Imagine an application that has for example both PHP and Python and a few specific frameworks or specific modules of PHP. If I need to maintain a website, the development environment needs to be identical to the production environment. Sometimes I may want to create a container for a very specific purpose that does one specific thing. The best and most realistic example I can give is running a static code analysis on a PHP file. More than a few times I’ve needed to check specific add-ons written in PHP to make sure they match the standard and that the developer who wrote them knows what they’re doing. For this, I need to run PHP code sniffer whose installation on a local machine can be challenging. Why drive yourself crazy when you can just make a container in Docker and do the code checking inside of it?
So here’s our goal: Create an image that will create a container so that we can check all the folders that have a PHP file or files, and then print out all of the PHP errors in them. Take for example, if a customer sends me some PHP files, I should probably check it out to make sure they’re OK. I can run the check right away without checking to make sure I have PHPCS or various other settings. If that sounds complicated, then just think of the goal as having a line that I can run in the console in Windows that will give me an immediate indication if the code is OK or not.
OK, so how do we do this? It’s easy to understand that I can’t just use an official Docker settings file like the PHP one, though that could be the basis since I need a container that runs PHP. But I need a few other things as well, the first of which being PHPCS, the tool I intend to use. PHPCS depends on PHP but it is not included in the official Docker PHP settings file. To put it into a container, I can either install it manually each time I create a new container from the official premade PHP file (a bad idea), or make my own settings file that says “please take the official container and install PHPCS.”
In order to do this, I’ll make a file called Dockerfile (with an uppercase D) which I’ll put in my project. This file is a kind of pattern into which I can put various instructions that will work just as if I were in a real machine. So here’s my Docker:
FROM php:7-alpine

RUN cd /usr/local/bin \
   && curl -sL http://cs.sensiolabs.org/download/php-cs-fixer-v2.phar -o php-cs-fixer \
   && chmod +x php-cs-fixer \
   && curl -sL https://squizlabs.github.io/PHP_CodeSniffer/phpcs.phar -o phpcs \
   && chmod +x phpcs

WORKDIR /app
FROM
In general, we start with FROM which indicates the official image that we will build upon. Since I’m ultimately basing my file on the official image of PHP in Docker it will be a good idea to indicate it, and that’s what we’re doing here. The text string is identical to that found on Docker’s site.
RUN
This command is used for, well, running. Whatever comes after it will run. Notice I’m using the concatenation syntax &&. In Linux concatenation means to execute the command that comes after the && immediately after the previous command finishes. This the same as:
RUN cd /usr/local/bin \
RUN curl -sL http://cs.sensiolabs.org/download/php-cs-fixer-v2.phar -o php-cs-fixer \
RUN chmod +x php-cs-fixer \
RUN curl -sL https://squizlabs.github.io/PHP_CodeSniffer/phpcs.phar -o phpcs \
RUN chmod +x phpcs
It’s generally practice to connect each RUN to a series of commands that are relevant to the subject. For example one RUN for the installation of PHPCS and another for the installation of an additional component, where for each RUN the command that’s relevant to it will be concatenated using &&. If this sounds like Chinese to you, that’s OK. Just remember that && means concatenate (like saying “after that finishes, run this one.”)
WORKDIR
This the setting for the work environment. In this case, I instruct the container to go to the /app folder right after the phpcs finishes installing.
So really, these three commands are pretty simple. FROM tells us we’re basing our settings file on the official version of PHP called php:7-alpine (I took this of course from the official version of PHP on Docker, but I could take any version). The RUN command tells us to run a series of commands that install PHPCS which I took from their official version. And last the command WORKDIR that returns the contents of the container to the app folder. Why? You’ll see in a minute.
Let’s save the file in any old folder and continue on.
After I’ve created the folder, I need to ‘build’ it which is the biggest difference between using an official image and a Docker file. The build pretty much just goes over all the commands in the file and runs it. If everything worked, we’ll be able to make a container from the image just like any other image found on Docker’s site.
The build is done like so:
docker build -t ran-lint-machine .
The first command is docker build which tells us that we’re building. The flag -t and what comes after indicate the name. Take note of this—otherwise you’ll need to use hash of the image which is not so nice. The dot at the end is the path to the Docker file called Dockerfile, which we created and saved. In this case, I run the command right from where the file is located.
Now we’ll see in the console all the stages of the installation. It’s true! If there are any problems along the way, we’ll see them and this way we’ll be able to successfully install the file. If everything is OK, we’ll see the following output:
Successfully built c77653df3672
Successfully tagged ran-lint-machine:latest
Now I have an image that I can run called ran-lint-machine. I can check it using:
docker images --all
I’ll get a list of all of the images that I’ve ever installed, all of the official ones and another wee little one that I made all by myself called ran-lint-machine.
And now? Once I have the name of the image I can use it. It goes like this:
docker run --rm -it -v /c/Users/barzik/test-docker:/app/ ran-lint-machine phpcs PATH/TO/PHP/FILES/
docker run -it -v PATH/TO/PHP/FILES/:/app/ --rm ran-lint-machine phpcs .
We already know docker run -it from the last article. Remember? The most important part here is -v. In our first article on Docker, I wrote about how it helps us to make a connection between our system to the container. In this case it sets what the app folder will be. I’ll make a link between the folder that contains the PHP files to the app, according to how I set the central work folder.
Flag -rm is for deleting the container immediately after running. This is because we’re talking about a one time running.
The name of the image that I set is obviously ran-lint-machine, and it’s set in the build process.
To wrap up this code we have the line that runs the phpcs and the dot, because I’m running phpcs in the apps folder that is connected to the folder that contains the PHP files.
And if everything worked out as necessary, this is what we’ll see:
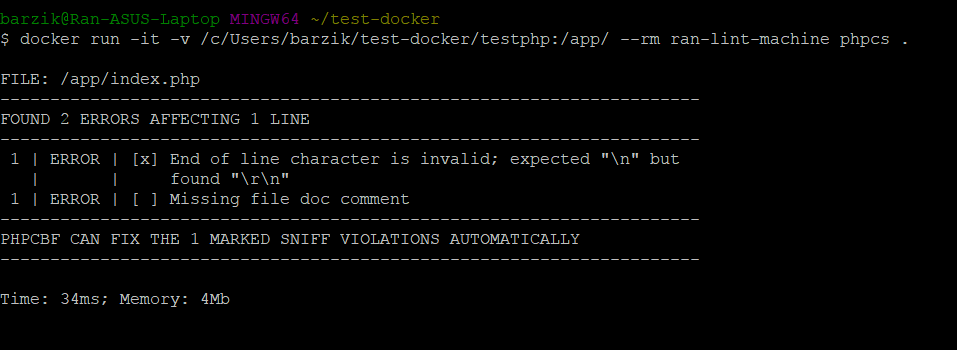
So these three Docker articles should give you the basics. And look how easy it is! Now get out there and start running those containers.
About the author: Ran Bar-Zik is an experienced web developer whose personal blog, Internet Israel, features articles and guides on Node.js, MongoDB, Git, SASS, jQuery, HTML 5, MySQL, and more. Translation of the original article by Aaron Raizen.
Recent Stories


Top DiscoverSDK Experts


Featured Products


Compare Products
Select up to three two products to compare by clicking on the compare icon () of each product.
{{compareToolModel.Error}}
{{CommentsModel.TotalCount}} Comments
Your Comment