Sponsors


Creating different timers including Pomodoro timer in Ionic 2 – Using Observables to count the ticks
We are living in an age that demands a lot of productivity and time management as people have a lot of things to get done and very little time. Not only for the purpose of increasing productivity, many prefer to do concrete work by watching the clock and time, as this enhances their attention and focus. Thus, having some utility to track the time makes the tasks easier to perform.
There are several applications out there, including desktop/mobile applications and web applications that allow you to track the time or the progress of a particular task that you have assigned into it. Think about a stopwatch for different tasks, as systemizing tasks on the basis of their expected time duration in this manner enables you to get things done as quickly as possible, at least this is a majority opinion.
In Ionic 2, there are several ways to implement the timers, for instance, if we declare a variable and try to increase or decrease its value per second, then we can convert it to a timer. But we need a service that performs these operations in real-time behind the application.
Thankfully, Ionic 2 supports Observables which have several helper classes that allow you to change the properties over time in an asynchronous fashion. So, for instance, you will work interactively with your application like you normally do and some properties in your application will keep updating in the background!
But, timers are not enough for enhancing productivity so a better solution is to use the Pomodoro technique. This is basically a time management technique that is done through a timer, wherein the tasks are divided into sub-tasks where each is supposed to be done within 25 minutes. This way you can force yourself to finish the task in the given time.
In this article, I am going to show you how you can create different timers in Ionic 2 through Observables and then I will create a nice Pomodoro timer afterwards. Let’s get started!
Creating different timers including Pomodoro timer in Ionic 2 – Using Observables to count the ticks
It’s not a single kind of timer that is implemented in “timer” apps, but several kinds of timers that have different functionalities. For example, you can have several timers for different tasks running in the background, or you may need to track the total time that has been taken since the start of the application.
Having this complexity in mind, many developers shy away from the implementation of timers or feel that there is no use for such timers in modern applications.
Even though someone can invest their “time” in implementing some more useful and so called “modern” features in their application, understanding how timers work in real-time applications helps in understanding how big websites like Twitter and Facebook are tackling the asynchronous operations of sending and receiving messages and notifications within milliseconds.
There are several ways to create a timer in Ionic 2 and we will look at different approaches. Firstly, we will start with a very basic timer—a simple text that changes with seconds and whos change is reflected on UI/View. Then we will look at the advanced approaches, wherein we will create custom components for starting/pausing the timer.
Before creating our project, let’s talk about Observables. So, what is this funny sounding word? Well, Observables are a mechanism through which a stream of data (think of the collection of data) can be operated on in an asynchronous fashion. This allows for several operations to be performed simultaneously on an Observable object, and the “Observers” can watch and access the data in real-time by “subscribing” to it.
Observables can also be considered as kinds of “asynchronous immutable arrays” as pointed out here (https://medium.com/@andrestaltz/2-minute-introduction-to-rx-24c8ca793877#.ae3ms3gie). This means that every Array operations can be performed on it, including map, filter, reduce, etc. But, the difference between Arrays and Observables is that you are performing parallel operations in Observables, wherein their results are arbitrarily captured by “Observers” and so they don’t affect the other operations in an application.
I won’t go into details on Observables, because there have been several articles, tutorial, and even books written on the subject! You can read more about it here (http://reactivex.io/documentation/observable.html).
Ionic 2 supports Observables out-of-the-box through the RxJS library, so you don’t need to install anything on your own. We will be using the “TimerObservable” module for creating a timer variable and the “Observable” module itself for setting the intervals.
Enough talk, let’s develop our application!
Creating a project
Let’s create a new project:
$ionic start ionic-timer blank –v2Now, we need to create two new pages:
$ionic g page simple-timer
$ionic g page pomodoro-timer
Make sure that these pages are included in “app.component.ts” and “app.module.ts”.
Go into “src/pages/simple-timer” and open the “simple-timer.ts” and copy the following code: (I am pasting the whole code here)
simple-timer.ts
import { Component, OnInit, OnDestroy, ViewChild, Input } from '@angular/core';
import { NavController, NavParams } from 'ionic-angular';

import {TimerObservable} from "rxjs/observable/TimerObservable";
import { Observable } from 'rxjs/Rx';

@Component({
 selector: 'page-simple-timer',
 templateUrl: 'simple-timer.html'
})
export class SimpleTimerPage implements OnInit, OnDestroy {

 subscriptionFirst: any;
 subscriptionSecond: any;
 subscriptionThird: any;
 subscriptionFourth: any;

 tickFirst: any;
 tickSecond: any;
 tickThird: any;
 tickFourth: any;

 remainingSeconds: number;
 runTimer: boolean;
 hasStarted: boolean;
 hasFinished: boolean;
 displayTime: string;

 timeInSeconds: number;

 constructor(public navCtrl: NavController, public navParams: NavParams) {}

 ionViewDidLoad() {
   console.log('ionViewDidLoad SimpleTimerPage');
 }

 ngOnInit() {
    // Start the timer after 2 seconds
   let firstTimer = TimerObservable.create(2000, 1000);
   this.subscriptionFirst = firstTimer.subscribe(t => {
     this.tickFirst = t;
   });

    // Start the timer after 3 seconds
    let secondTimer = TimerObservable.create(3000, 1000);
   this.subscriptionSecond = secondTimer.subscribe(t => {
     this.tickSecond = t;
   });

    // Start the timer after 4 seconds
    let thirdTimer = TimerObservable.create(4000, 1000);
   this.subscriptionThird = thirdTimer.subscribe(t => {
     this.tickThird = t;
   });

    // Set the inital tick to 0
    this.tickFourth = 0;

    this.subscriptionFourth = Observable.interval(1000).subscribe(x => {
        // 1000 implies miliseconds = 1 second
        // Basically run the following code per second
       this.tickFourth++;
    });

    setTimeout(() => {
     this.startTimer();
   }, 1000)


    this.timeInSeconds=60;

    this.initTimer();
 }

 ngOnDestroy() {
   this.subscriptionFirst.unsubscribe();
    this.subscriptionSecond.unsubscribe();
    this.subscriptionThird.unsubscribe();
    this.subscriptionFourth.unsubscribe();
 }

 initTimer() {
    if(!this.timeInSeconds) { this.timeInSeconds = 0; }

    this.runTimer = false;
    this.hasStarted = false;
    this.hasFinished = false;
    this.remainingSeconds = this.timeInSeconds;
    this.displayTime = this.getSecondsAsDigitalClock(this.remainingSeconds);
 }
 startTimer() {
    this.runTimer = true;
    this.hasStarted = true;
    this.timerTick();
 }
 pauseTimer() {
    this.runTimer = false;
 }
 resumeTimer() {
    this.startTimer();
 }
 timerTick() {
    setTimeout(() => {
        if (!this.runTimer) { return; }
        this.remainingSeconds--;
        this.displayTime = this.getSecondsAsDigitalClock(this.remainingSeconds);
        if (this.remainingSeconds > 0) {
            this.timerTick();
        }
        else {
            this.hasFinished = true;
        }
    }, 1000);
 }
 getSecondsAsDigitalClock(inputSeconds: number) {
    var sec_num = parseInt(inputSeconds.toString(), 10);
    var hours   = Math.floor(sec_num / 3600);
    var minutes = Math.floor((sec_num - (hours * 3600)) / 60);
    var seconds = sec_num - (hours * 3600) - (minutes * 60);
    var hoursString = '';
    var minutesString = '';
    var secondsString = '';
    hoursString = (hours < 10) ? "0" + hours : hours.toString();
    minutesString = (minutes < 10) ? "0" + minutes : minutes.toString();
    secondsString = (seconds < 10) ? "0" + seconds : seconds.toString();
    return hoursString + ':' + minutesString + ':' + secondsString;
 }
}
As you can see this is quite a lot of code. So, let’s break it down to understand the specific parts. Firstly, we are importing the required modules; you can see that I have imported “TimerObservable” and “Observable”, both of which are powerful libraries that you will see later.
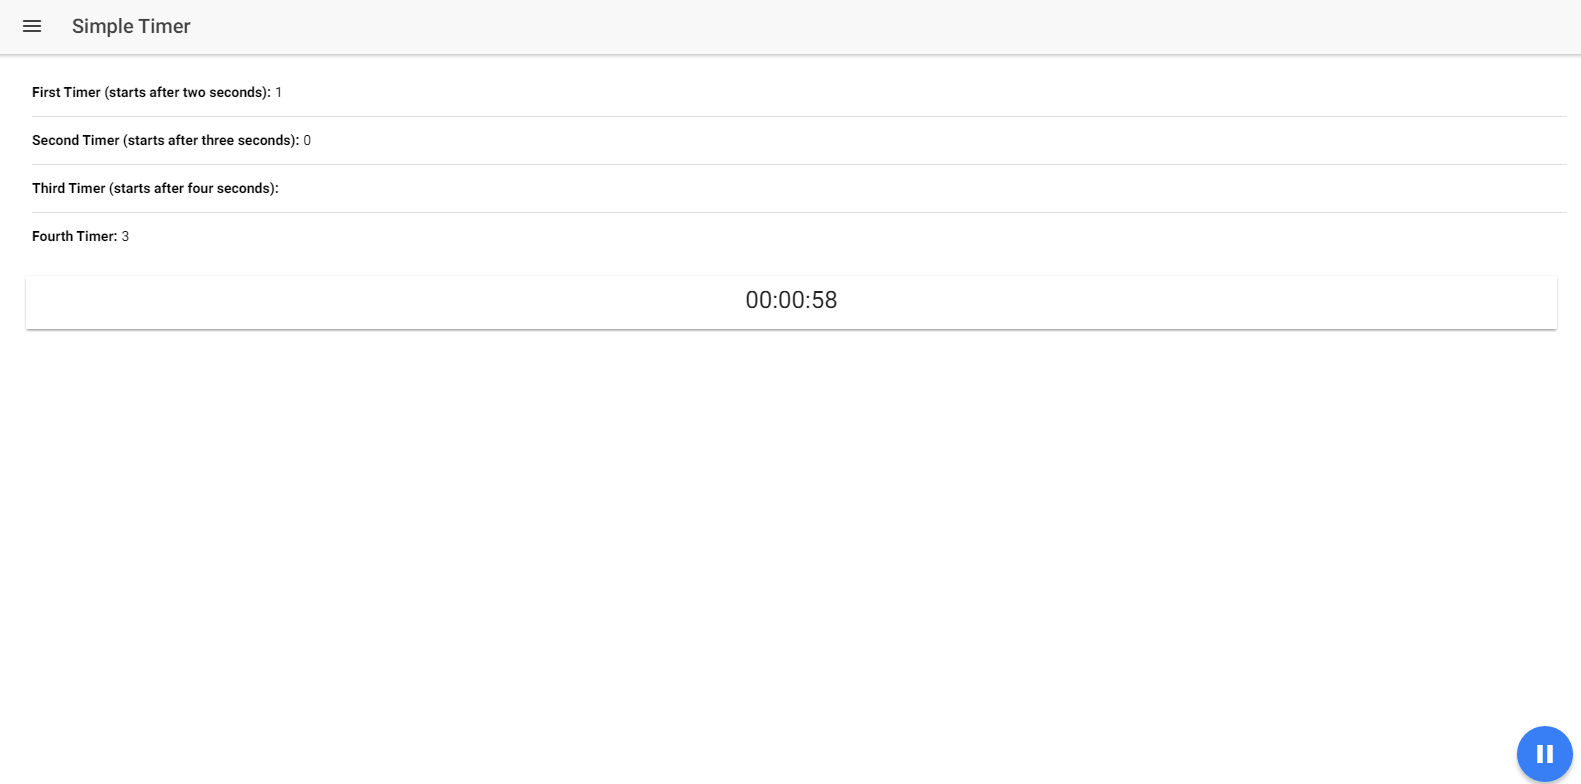
Then I have declared several variables/properties for our “subscribers” and “ticks”. We are creating 5 timers, four of which will start running after second(s), and the final one which is a slightly more sophisticated timer. It allows you to pause the time, reset the time to the initial time and start the time subsequently.
Those initial variables are declared for the four timers—for the final one, “remainingSeconds”, “runTimer”, “hasStarted”, etc. are included.
In the ngOnInit() method, we are initializing our timers. You can see that different timers are initialized with different time intervals on the basis of when a timer should start ticking. The TimerObservable.create() takes the milliseconds as its first parameter which tells when it should trigger the timer, while the second parameter is about at what interval the code should run. You can read more about TimeObservable here (https://github.com/ReactiveX/rxjs/blob/master/src/observable/TimerObservable.ts).
Within this method, we are using Observable.interval() for creating our fourth timer. This is similar to our previous method, except it takes only one parameter which tells at what interval the code in the subscribe() body should run. The “1000” implies 1 second, meaning the “this.tickFourth++;” will be executed every second, giving the illusion of time changing.
The setTimeout() is used to start our fifth timer after 1 second. Later, we set the timeInSeconds to 60 (which you can change later in the UI/View) and then we start our timer with the initTimer() method. This method simply initializes our variables and gets the current displayTime to show in the UI/HTML.
The getSecondsAsDigitalClock() is a very important function as it converts the number into a string format that contains a sophisticated time writing format. The rest should be self-explanatory.
Now, open “simple-timer.html” and copy the following code:
simple-timer.html
<ion-header>
 <ion-navbar>
   <button ion-button menuToggle>
     <ion-icon name="menu"></ion-icon>
   </button>
   <ion-title>Simple Timer</ion-title>
 </ion-navbar>
</ion-header>

<ion-content padding>
    <ion-list>
        <ion-item text-wrap><b>First Timer (starts after two seconds): </b> {{tickFirst}}</ion-item>
        <ion-item text-wrap><b>Second Timer (starts after three seconds): </b> {{tickSecond}}</ion-item>
        <ion-item text-wrap><b>Third Timer (starts after four seconds): </b> {{tickThird}}</ion-item>
        <ion-item text-wrap><b>Fourth Timer: </b> {{tickFourth}}</ion-item>
    </ion-list>

    <ion-label><b>Enter the time in seconds (default is 60): </b></ion-label>
    <ion-input type="text" #time [(ngModel)]="timeInSeconds"></ion-input>
    <button ion-button block (click)="setTime(time.value)">Save Time</button>

    <ion-card>
       <ion-item text-wrap>
           <h1 text-center *ngIf="timeInSeconds && timeInSeconds > 0">{{displayTime}</h1>
       </ion-item>

         <ion-fab bottom right *ngIf="runTimer && hasStarted && !hasFinished">
            <button ion-fab (click)="pauseTimer()">
           <ion-icon name="pause"></ion-icon>
           </button>
         </ion-fab>
         <ion-fab bottom right *ngIf="!runTimer && hasStarted && !hasFinished">
            <button ion-fab (click)="resumeTimer()">
           <ion-icon name="play"></ion-icon>
           </button>
         </ion-fab>
         <ion-fab bottom right *ngIf="!hasStarted">
            <button ion-fab (click)="startTimer()" item-right>
           <ion-icon name="play"></ion-icon>
           </button>
         </ion-fab>
         <ion-fab bottom left *ngIf="!runTimer && (hasStarted || hasFinished) || hasFinished">
            <button ion-fab color="danger" (click)="initTimer()" item-left>
            <ion-icon name="refresh"></ion-icon>
            </button>
         </ion-fab>
    </ion-card>
</ion-content>
Here, we are finally displaying our logic side to the view. We are using <ion-list> for displaying our four timers, for the fifth timer, we are using the <ion-card>. You can see that I am using <ion-fab> to display our buttons, basically this allows you to integrate the floating buttons on the screen that looks as if they are present in front of the view.
You can read more about FabButton here (https://ionicframework.com/docs/v2/api/components/fab/FabButton/).
We are hiding/showing the elements according to the condition set in our logic side. The rest should be easy to understand.
Currently, we can only set our initial time for the fifth timer manually through hard coding. So, let’s add a method for changing the value through UI.
In your “simple-timer.ts”, create a new method:
setTime(time) {
     this.timeInSeconds=time;

     this.pauseTimer();
     this.initTimer();

     // As startTimer() has the this.timerTick(), which we don't want to call here
     // otherwise two seconds will change per tick
     this.runTimer = true;
     this.hasStarted = true;
 }
Now, in your “simple-timer.html” add the following code before the <ion-card>:
<ion-label><b>Enter the time in seconds (default is 60): </b></ion-label>
    <ion-input type="text" #time [(ngModel)]="timeInSeconds"></ion-input>
    <button ion-button block (click)="setTime(time.value)">Save Time</button>
This allows you to enter the custom time in seconds through UI on page.
You can do “ionic serve” to see our awesome timers!
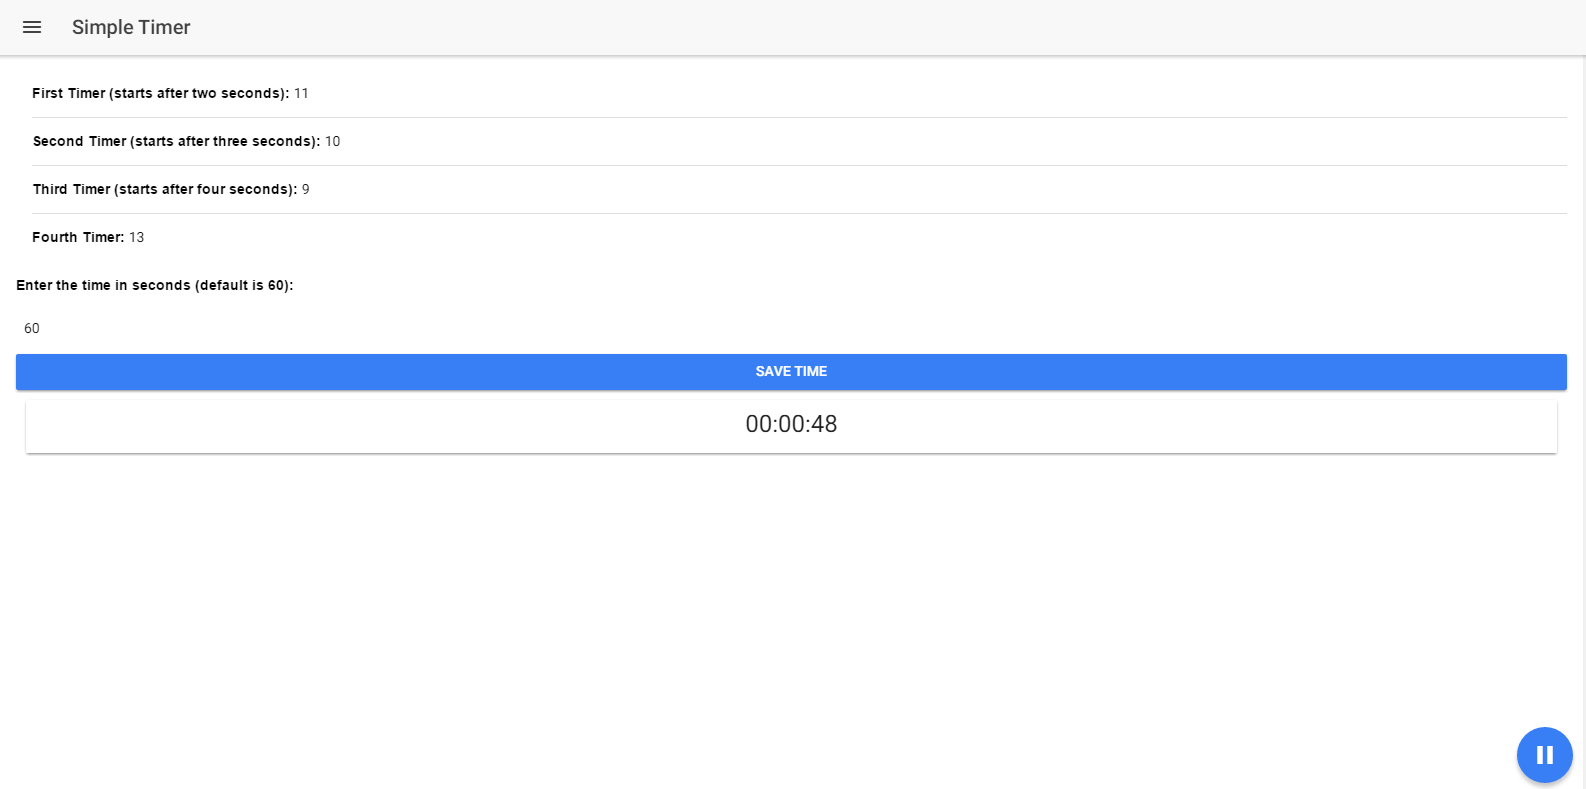
Initially, the seconds are set as 60, but you can change it whatever you want and it will reflect in the UI.
With this method, you can integrate different timers whenever you want. So, let’s create another form of timer: Pomodoro Timer.
Open “pomodoro-timer.ts” and copy the following code:
pomodoro-timer.ts
import { Component } from '@angular/core';
import { NavController, NavParams } from 'ionic-angular';

@Component({
 selector: 'page-pomodoro-timer',
 templateUrl: 'pomodoro-timer.html'
})
export class PomodoroTimerPage {

 constructor(public navCtrl: NavController, public navParams: NavParams) {}

 ionViewDidLoad() {
   console.log('ionViewDidLoad PomodoroTimerPage');
 }

 timeInSeconds: number;

 time: number;
 remainingTime: number;
 runTimer: boolean;
 hasStarted: boolean;
 hasFinished: boolean;
 displayTime: string;

 ngOnInit() {
   this.initTimer();
 }

 initTimer() {
    // Pomodoro is usually for 25 minutes
   if (!this.timeInSeconds) { this.timeInSeconds = 1500; }

   this.time = this.timeInSeconds;
    this.runTimer = false;
    this.hasStarted = false;
    this.hasFinished = false;
    this.remainingTime = this.timeInSeconds;

    this.displayTime = this.getSecondsAsDigitalClock(this.remainingTime);
 }

 startTimer() {
    this.runTimer = true;
   this.hasStarted = true;
   this.timerTick();
 }

 pauseTimer() {
   this.runTimer = false;
 }

 resumeTimer() {
   this.startTimer();
 }

 timerTick() {
   setTimeout(() => {

     if (!this.runTimer) { return; }
     this.remainingTime--;
     this.displayTime = this.getSecondsAsDigitalClock(this.remainingTime);
     if (this.remainingTime > 0) {
       this.timerTick();
     }
     else {
       this.hasFinished = true;
     }
   }, 1000);
 }

 getSecondsAsDigitalClock(inputSeconds: number) {
   var sec_num = parseInt(inputSeconds.toString(), 10); // don't forget the second param
   var hours = Math.floor(sec_num / 3600);
   var minutes = Math.floor((sec_num - (hours * 3600)) / 60);
   var seconds = sec_num - (hours * 3600) - (minutes * 60);
   var hoursString = '';
   var minutesString = '';
   var secondsString = '';
   hoursString = (hours < 10) ? "0" + hours : hours.toString();
   minutesString = (minutes < 10) ? "0" + minutes : minutes.toString();
   secondsString = (seconds < 10) ? "0" + seconds : seconds.toString();
   return hoursString + ':' + minutesString + ':' + secondsString;
 }
}
This code is similar to our previous timer page. The major difference is that we are setting timeInSeconds to 1500 seconds which is equivalent to 25 minutes because the “pomodoros” are usually about 25 minutes.
Now, open “pomodoro.html” and copy the following code:
pomodoro.html
<ion-header>
 <ion-navbar>
   <button ion-button menuToggle>
     <ion-icon name="menu"></ion-icon>
   </button>
   <ion-title>Pomodoro Timer</ion-title>
 </ion-navbar>
</ion-header>

<ion-content padding>

<div>
 <ion-item>
   <h1 text-center>{{displayTime}}</h1>
 </ion-item>
 <ion-fab bottom right *ngIf="runTimer && hasStarted && !hasFinished">
   <button ion-fab (click)="pauseTimer()">
 <ion-icon name="pause"></ion-icon>
 </button>
 </ion-fab>
 <ion-fab bottom right *ngIf="!runTimer && hasStarted && !hasFinished">
   <button ion-fab (click)="resumeTimer()">
    <ion-icon name="play"></ion-icon>
    </button>
 </ion-fab>
 <ion-fab bottom right *ngIf="!hasStarted">
   <button ion-fab (click)="startTimer()" item-right>
    <ion-icon name="play"></ion-icon>
    </button>
 </ion-fab>
 <ion-fab bottom left *ngIf="!runTimer && (hasStarted || hasFinished) || hasFinished">
   <button ion-fab color="danger" (click)="initTimer()" item-left>
    <ion-icon name="refresh"></ion-icon>
   </button>
 </ion-fab>
</div>

</ion-content>
This code should be self-explanatory.
You can do “ionic serve” to see the timer.
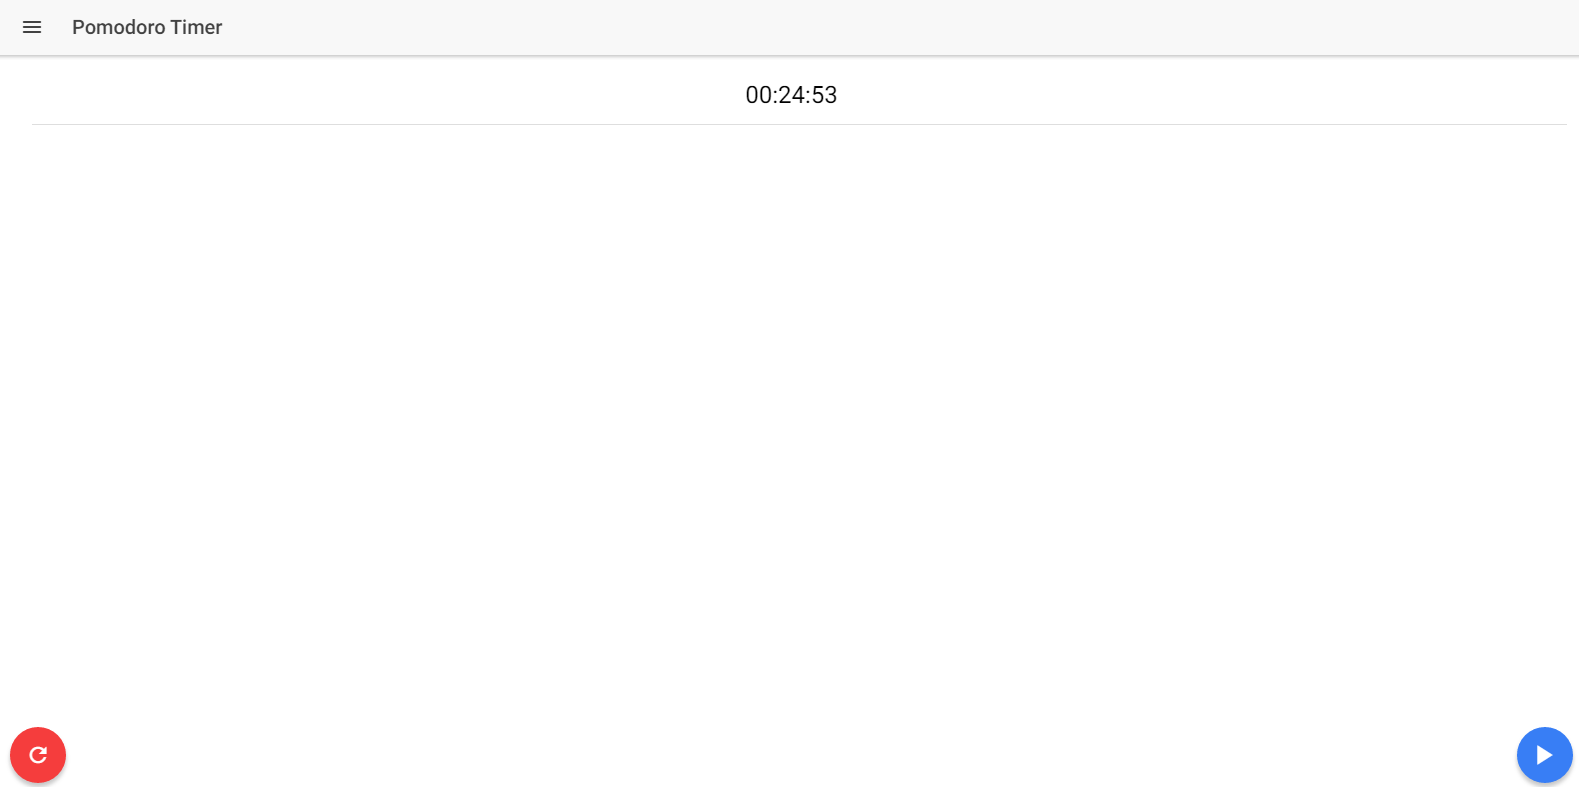
Unlike our previous timer, you need to start the timer with the button.
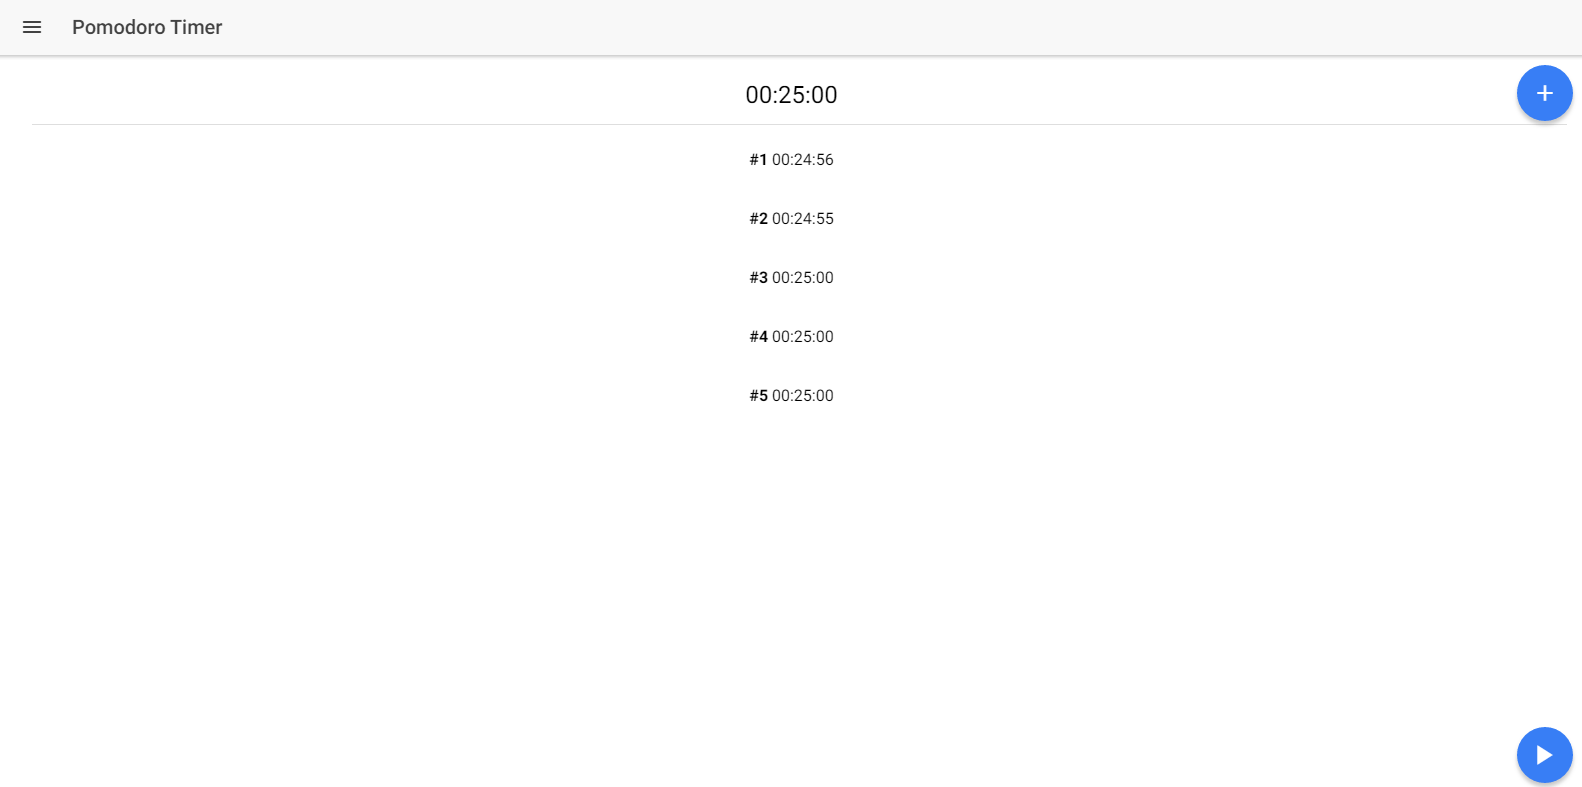
Currently we can’t store the history of our pomodoros, so let’s add something nice!
In “pomodoro-timer.ts”, create an array “timersArray” for storing the total pomodoros:
timersArray: any[];
In ngOnInit(), initialize the array:
ngOnInit() {
    this.timersArray = [{
        stoppedAt: this.displayTime
    }]

   this.initTimer();
 }
Now create a new method:
createNew() {
     this.timersArray.push({stoppedAt: this.displayTime});

     this.initTimer();
     this.pauseTimer();
 }
We need to implement this method in our view side. Open “pomodoro-timer.html” and add the following after <ion-content>:
<ion-fab top right>
   <button ion-fab (click)="createNew()">
 <ion-icon name="add"></ion-icon>
 </button>
 </ion-fab>
This adds the button. For actually displaying the lists, add the following after </ion-item> of displayItem:
<ion-list *ngFor="let array of timersArray; let i = index;">
<ion-item *ngIf="i!=0">
<h2 text-center><b>#{{i}}</b> {{array.stoppedAt}}</h2>
</ion-item>
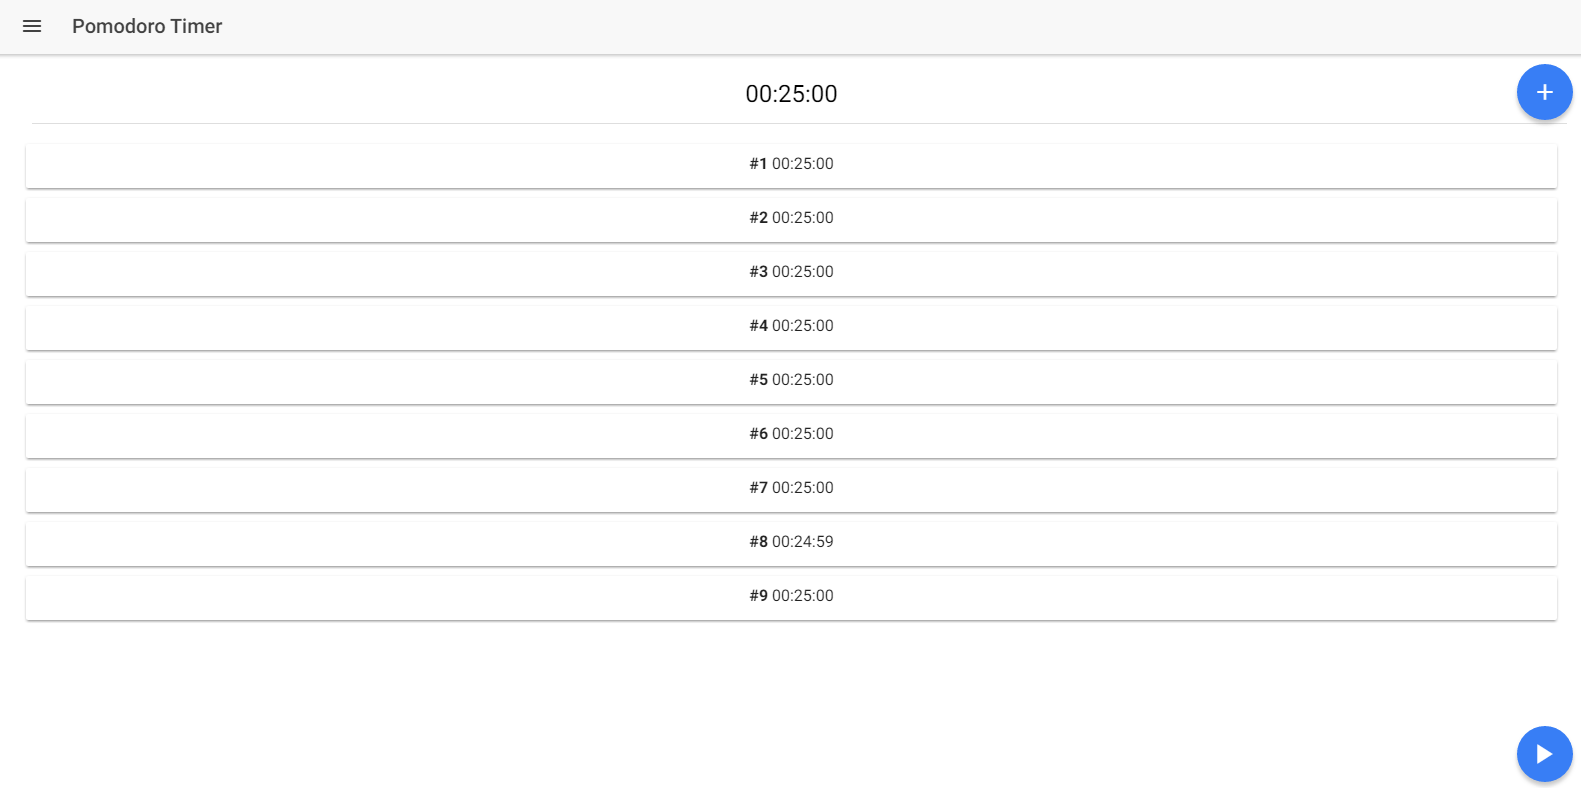
</ion-list>You can now do “ionic serve” to see the awesome result!
EDIT: I have realized that lists/items does not look good for showing the history, so let’s use the <ion-card> instead:
<ion-card *ngFor="let array of timersArray; let i = index;">
   <ion-card-content *ngIf="i!=0">
        <h2 text-center><b>#{{i}}</b> {{array.stoppedAt}}</h2>
   </ion-card-content>
 </ion-card>
If you have trouble following the code, then you can see the uploaded repository here (https://github.com/danyalzia/ionic2-timers-play).
Conclusion
It’s not really difficult to create the timers in Ionic 2 as long as you understand how the architecture works in the framework. Several new things have been introduced in this hybrid development approach, including the TypeScript support and component based programming which makes it entirely new domain for creating applications. Though there is some initial setup time cost, one can start seeing the patterns when translating the outdated code to a new modern code.
If you have any question, then please ask in the comment section below!
Recent Stories


Top DiscoverSDK Experts


Compare Products
Select up to three two products to compare by clicking on the compare icon () of each product.
{{compareToolModel.Error}}
{{CommentsModel.TotalCount}} Comments
Your Comment