Sponsors


Creating a simple audio recorder and music player in Ionic 2 – Synthesizing Cordova Plugins
One cool thing about Ionic 2 is that you can access the hardware features of the platforms. This means the user experience will be similar to a native app, and would be hard to distinguish the hybrid app from the native application (especially if the users don’t know about Ionic/hybrid apps). Thankfully, through the help of Cordova, developers have created several native plugins that allow us to easily use pretty much all the hardware functionalities.
Many applications have audio functionalities in the form of multi-media playback, so for example, there might be a music player, or text-to-speech translator that plays the audio of your text. Such applications at times also need to have something that enables the recording of audio through the help of the microphone, for example, a chat app that allows you to send voice mails.
Thankfully, there is already a native plugin called MediaPlugin that not only allows you to play the audio, but also enables you to record the audio in a file and then subsequently play it on demand. You can even get the current playback position and many more features! Apart from the plugin, the Web Audio API also allows you to use the JavaScript for audio playback and manipulation (we will look at this later).
Not only does Ionic 2 provides plugins for audio playback, but for file management several sophisticated plugins are included in the native library that enable you to load any file on a device or save a new file to a device through a file manager. Thus, it makes sense to make an application that not only allows you record simple audio, but also enables the users to play their custom music on demand.
In this article, I am going to show you how you can create a simple audio recorder and music player in Ionic 2. Let’s get started!
Before creating our application, let’s ask ourselves what an audio recorder usually contains. Well, obviously it requires a function to start the recording that uses the hardware’s microphone to record the audio, it could be voice or music, doesn’t matter. Then we need to have a functionality that stops the recording whenever the user wants. Finally we need functions to play the recording and stop the audio playing subsequently.
We can cover those aspects with <button> (specifically <ion-button>), at least for the UI/HTML side. We can also enable/disable the buttons if we don’t want the users to click all the buttons all the time. For audio recording, we can use MediaPlugin, as it provides a very simple interface for recording and playing the audio, for instance we can initialize our plugin like:
this.mediaPlugin = new MediaPlugin('recording.wav');And then record/play whenever we want like:
this.mediaPlugin.startRecord();
this.mediaPlugin.stopRecord();
this.mediaPlugin.play();
this.mediaPlugin.stop();
Later we will look at how this is done in a real application.
But, you might ask, what about audio/music playing? The MediaPlugin has a lot of limitations because it is not meant to be an API for creating a music player, but only for accessing the hardware’s audio play/stop functionality. So for example we can only initialize the plugin once for the audio that is going to be recorded. This is enough for a simple audio recorder, but usually with music players users are expected to play and load several tracks at once, so we need to make use of some other plugin/service.
Thankfully, there is a new plugin, called ionic-audio(http://arielfaur.github.io/ionic-audio/2.0/index.html) that has several features, including the ability to play multiple tracks, custom components for creating the tracks including the play/pause buttons, a progress bar, and many more! Internally, it uses the MediaPlugin if running on a device and for the browser, it uses the Web Audio API.
We will use this plugin for music playback, wherein we will add some default music tracks. Additionally we will allow the users to add their custom tracks, which they will select either from the file browser or from an external resource (i.e. the internet).
Enough talk, let’s start our project!
Creating a project
First, let’s create a new project:
$ionic start ionic-audio blank –v2We need to create two pages for audio recording and music playing:
$ionic g page audio-recorder
$ionic g page music-playing
Make sure these pages are included in “app.component.ts” and “app.module.ts”. Also, make sure that your “app.html” is set for including the pages and navigation (refer to the previous applications for code).
Your “home.html” should contain the following code:
home.html
$ionic start ionic-audio blank –v2As we need MediaPlugin, let’s install the media plugin:
$ionic plugin add cordova-plugin-media
For audio recording, we will create a file and then record onto it, and then play the file. As I mentioned earlier, the MediaPlugin doesn’t support recording several files simultaneously.
Open the “audio-recorder.ts” and copy the following content:
audio-recorder.ts
import { Component } from '@angular/core';
import { NavController, AlertController, NavParams, Platform } from 'ionic-angular';

import { MediaPlugin } from 'ionic-native';

@Component({
 selector: 'page-audio-recorder',
 templateUrl: 'audio-recorder.html'
})
export class AudioRecorderPage {
 mediaPlugin: MediaPlugin = null;
 recorded: boolean;

 ionViewDidLoad() {
   console.log('ionViewDidLoad AudioRecorderPage');
 }

 constructor(public navCtrl: NavController,
             public alertCtrl: AlertController,
             public platform: Platform) {
                 this.recorded = false;
 }

 get MediaPlugin(): MediaPlugin {
   if (this.mediaPlugin == null) {
     this.mediaPlugin = new MediaPlugin('recording.wav');
   }

   return this.mediaPlugin;
 }

 startRecording() {
   try {
        this.MediaPlugin.startRecord();
   }
   catch (e) {
     this.showAlert('Error: '+ e);
   }
 }

 stopRecording() {
   try {
     this.MediaPlugin.stopRecord();
     this.recorded = true;
   }
   catch (e) {
     this.showAlert('Error: '+ e);
   }
 }

 playRecording() {
   try {
     this.MediaPlugin.play();
   }
   catch (e) {
     this.showAlert('Error: '+ e);
   }
 }

 stopRecordingPlay() {
   try {
     this.MediaPlugin.stop();
   }
   catch (e) {
     this.showAlert('Error: '+ e);
   }
 }

 showAlert(message) {
   let alert = this.alertCtrl.create({
     title: 'Error',
     subTitle: message,
     buttons: ['OK']
   });
   alert.present();
 }
}
Here, I have first imported the required plugin, and then I defined a “recorded” boolean variable which tells if the recording is done or not. We will use this variable to show/hide the play/stop buttons for the playback. Then I defined the simple methods for operations on the file for our audio recording. The rest should be self-explanatory, basically we are giving the errors through “Alert” as we can only test the plugin on the device, so it should give such errors to users when running in the browser.
Now, open “audio-recorder.html” and copy the following code:
audio-recorder.html
<ion-header>
 <ion-navbar>
   <button ion-button menuToggle>
     <ion-icon name="menu"></ion-icon>
   </button>
   <ion-title>Audio Recorder</ion-title>
 </ion-navbar>
</ion-header>

<ion-content padding>
        <div>
            <b>Simple Interface for Audio Recorder</b>
        </div>
        <button ion-button (click)="startRecording()">
         Start recording
        </button>
        <button ion-button (click)="stopRecording()">
         Stop recording
        </button>

        <div *ngIf = "recorded">
            <button ion-button (click)="playRecording()">
             Start playback
            </button>
            <button ion-button (click)="stopRecordingPlay()">
             Stop playback
            </button>
        </div>
</ion-content>
This code should be easy to understand, so let’s skip the explanation.
You can do “ionic serve” to see the results.
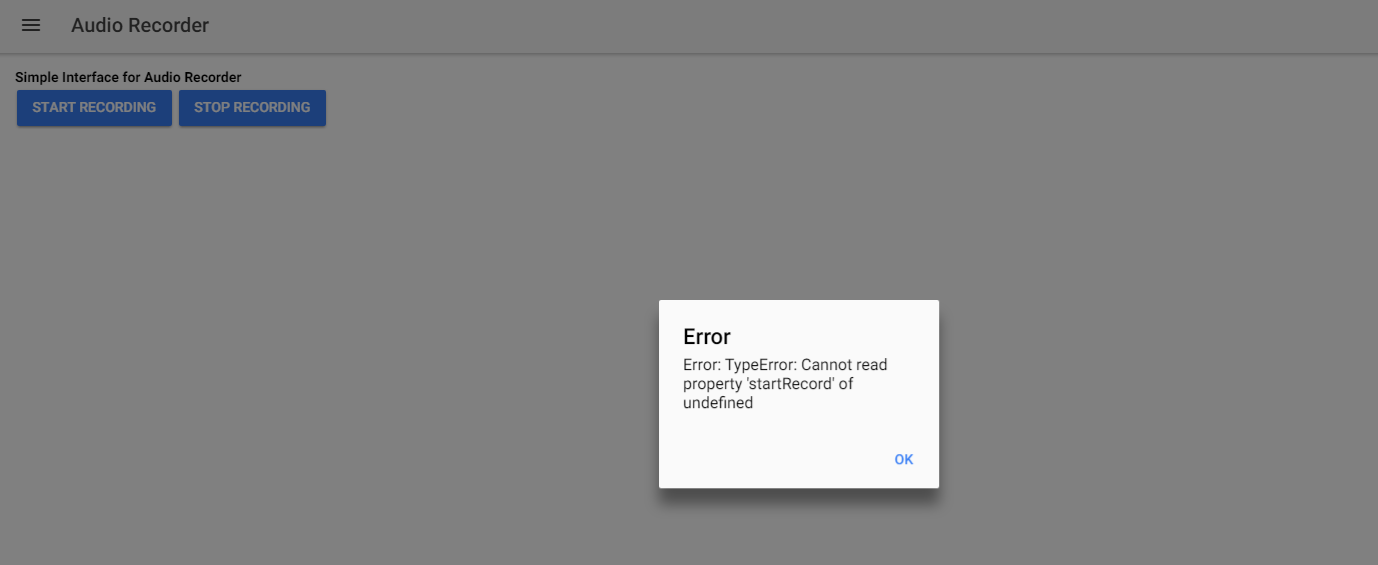
You can see that it is giving errors, so you need to test on a real device.
For the audio playing, we can either load the audio file from the local device or from the external address through HTTP. We will look at both of these approaches.
Open “music-player.ts” and copy the following content:
music-player.ts
import { Component } from '@angular/core';
import { NavController, NavParams, Platform } from 'ionic-angular';

import { AudioProvider } from 'ionic-audio/dist';

import { CustomTrack } from '../../providers/custom-track';

import {FileChooser} from 'ionic-native';

import {FilePath} from 'ionic-native';

@Component({
 selector: 'page-music-player',
 templateUrl: 'music-player.html'
})
export class MusicPlayerPage {
 myTracks: any[];
 singleTrack: any;
 allTracks: any[];
 selectedTrack: number;

 loaded: boolean;

 filePath: any;

 File: any;

 ionViewDidLoad() {
   console.log('ionViewDidLoad MusicPlayerPage');

    if (this.customTrack.customSource == null) {
         this.loaded = false;
    }

    else {
        this.loaded = true;
    }
 }

 // http://stackoverflow.com/questions/35352284/replacing-characters-within-a-string-in-angularjs
 tools_replaceAll(str, find, replace) {
     return str.replace(new RegExp(find, 'g'), replace);
 }

 openFile() {
     this.platform.ready().then(() => {
         let file: any;
         FileChooser.open()
         .then((uri) => {
             console.log(uri);
             file = uri;
             this.File = file;
             console.log("OpenFile path: " + this.File);

             FilePath.resolveNativePath(uri)
             .then((filePath) => {
                 console.log("Second Path: "+ filePath);
                 this.filePath = filePath;

                 //this.filePath = this.tools_replaceAll(this.filePath, "%3A416" , ".mp3" ) ;

                 this.saveTrackSource(this.filePath);
             })
             .catch((err) => {
                 console.log(err);
                });

         }).catch((e) => console.log(e));
     });
 }

 constructor(public customTrack: CustomTrack, public navCtrl: NavController, public navParams: NavParams, private audioProvider: AudioProvider, public platform: Platform) {


    this.filePath = "";
    this.File = this.filePath;

   this.myTracks = [{
     src: 'http://mp3zoop.com/download/775932db906b446e8f3177af4c71f4e0/4/katatonia-soil039s-song.mp3',
     artist: 'Katatonia',
     title: "Soil's Song",
     art: 'https://images-na.ssl-images-amazon.com/images/I/51%2BVlDDzumL.jpg',
     preload: 'metadata'
   },
   {
     src: 'http://www.noiseaddicts.com/samples_1w72b820/4201.mp3',
     title: 'India National Anthem',
     art: 'http://www.flagsinformation.com/indian-flag.png',
     preload: 'metadata'
   }];

   this.singleTrack = {
     src: 'http://www.noiseaddicts.com/samples_1w72b820/4207.mp3',
     title: 'Israel National Anthem',
     art: 'http://www.crwflags.com/fotw/images/i/il.gif',
     preload: 'metadata'
   };

    this.customTrack.customTrack = {
        src: this.customTrack.customSource,
        artist: 'Unknown',
        title: 'Custom Song',
        preload: 'none'
    };
 }

 saveTrackSource(source) {
     this.customTrack.customSource = source;
     console.log(this.customTrack.customSource);

     this.loaded = true;

     if (this.customTrack.customSource == null) {
         this.loaded = false;
     }

     this.customTrack.customTrack.src = this.customTrack.customSource;
     this.pauseSelectedTrack();

     // Let's reload the view
     this.navCtrl.setRoot(this.navCtrl.getActive().component);
 }

 ngAfterContentInit() {
   this.allTracks = this.audioProvider.tracks;
 }

 playSelectedTrack() {
   this.audioProvider.play(this.selectedTrack);
 }

 pauseSelectedTrack() {
    this.audioProvider.pause(this.selectedTrack);
 }

 onTrackFinished(track: any) {
   console.log('Track finished', track)
 }
}
There is a lot of content here, so let’s break it down. Firstly, we are importing the required modules (ignore the ‘CustomTrack’ for now). And then we are declaring some properties, including the arrays to store our track data, file path, selected Track index, and “loaded” boolean to check if the custom song is loaded properly or not.
In the constructor, you can see that I have added several tracks in the “myTracks” array. You can add as many tracks you want. You need to supply the parameters when adding the tracks, where “src” is necessary while the other parameters are optional. You can see that here I have added the external links for both the “src” and “art”. The “preload” tag is for specifying whether to load the metadata present in the file itself.
Then there is the “singleTrack” array that stores a single track. This is done to demonstrate that you can either add several tracks within an array or you only one track.
We are using the provider for our custom track that simply stores the path and source. The saveTrackSource() method assigns the path and source to our service class, and then we are updating the UI/View with navCtrl.setRoot() method.
The openFile() method is where the magic takes place. The FileChooser.open() gives us the file browser in our device which when we select a particular file gives the URI. But this URI can’t be loaded directly in our music player, so we need to get the proper path for our track. We’ll use FilePath.resolveNativePath() for converting the URI to our native path which we are then passing to our saveTrackSource() method.
I have included the method tools_replaceAll() in case you need to replace some string, let’s say an invalid/corrupted path. I required this method when working with URI as the file opener was giving me the wrong file extension when loading the audio files.
As we are using the “FilePath” and “FileChooser” plugin, we need to install the plugins as well:
$ionic plugin add cordova-plugin-filepath
$ionic plugin add http://github.com/don/cordova-filechooser.git
As I mentioned earlier, we used the provider for storing the custom track, so let’s create this provider:
$ionic g provider custom-track
Open “src/providers/custom-track.ts” and copy the following content:
custom-track.ts
import { Injectable } from '@angular/core';
import { Http } from '@angular/http';
import 'rxjs/add/operator/map';

@Injectable()export class CustomTrack {
 customTrack: any;
 customSource: any;

 constructor(public http: Http) {
   console.log('Hello CustomTrack Provider');

 }

}
This should be self-explanatory.
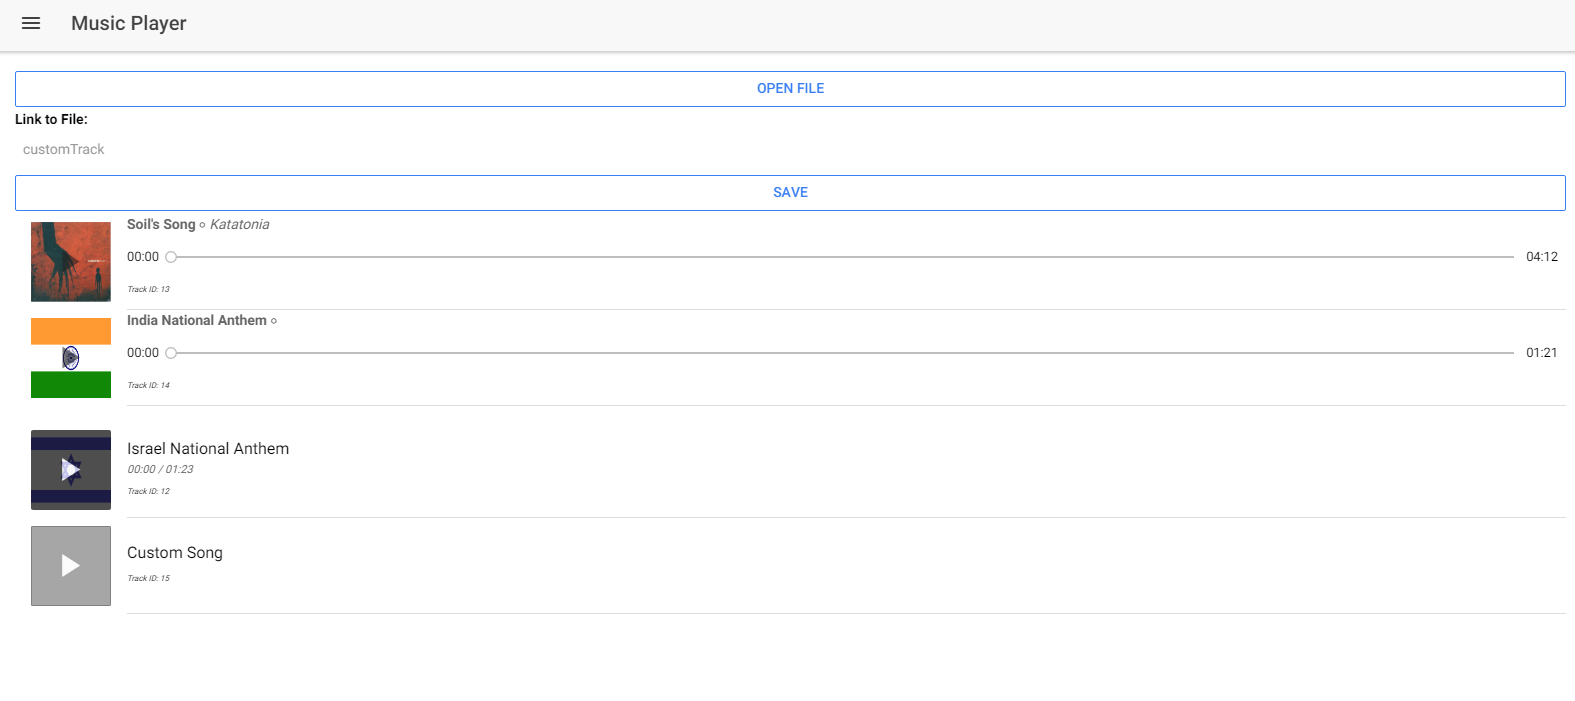
Now, open “music-player.html” and copy the following code:
music-player.html
<ion-header>
<ion-navbar>
<button ion-button menuToggle>
<ion-icon name="menu"></ion-icon>
</button>
<ion-title>Music Player</ion-title>
</ion-navbar>
</ion-header>
<ion-content padding>
<button ion-button block outline (click)="openFile()">Open File</button>
<b>Link to File:</b>
<ion-input placeholder="customTrack" #customId [(ngModel)]="customTrack.customSource"> </ion-input>
<button ion-button block outline (click)="saveTrackSource(customId.value)">Save</button>
<ion-list>
<audio-track #audio *ngFor="let track of myTracks" [track]="track" (onFinish)="onTrackFinished($event)">
<ion-item>
<ion-thumbnail item-left>
<img src="{{audio.art}}">
<audio-track-play dark [audioTrack]="audio">
<ion-spinner></ion-spinner>
</audio-track-play>
</ion-thumbnail>
<div item-content style="width:100%">
<p><strong>{{audio.title}}</strong> ⚬ <em>{{audio.artist}}</em></p>
<audio-track-progress-bar duration progress [audioTrack]="audio"></audio-track-progress-bar>
<em style="font-size:.5em">Track ID: {{audio.id}}</em>
</div>
</ion-item>
</audio-track>
</ion-list>
<audio-track #track [track]="singleTrack">
<ion-item [audioTrack]="track">
<ion-thumbnail item-left>
<img src="{{track.art}}">
<audio-track-play light [audioTrack]="track">
<ion-spinner></ion-spinner>
</audio-track-play>
</ion-thumbnail>
<h2>{{track.title}}</h2>
<p>
<audio-track-progress [audioTrack]="track"></audio-track-progress>
</p>
<em style="font-size:.5em">Track ID: {{track.id}}</em>
</ion-item>
</audio-track>
<div *ngIf="loaded">
<audio-track #custom [track]="customTrack.customTrack">
<ion-item [audioTrack]="custom">
<ion-thumbnail item-left>
<img src="{{custom.art}}">
<audio-track-play light [audioTrack]="custom">
<ion-spinner></ion-spinner>
</audio-track-play>
</ion-thumbnail>
<h2>{{custom.title}}</h2>
<p>
<audio-track-progress [audioTrack]="custom"></audio-track-progress>
</p>
<em style="font-size:.5em">Track ID: {{custom.id}}</em>
</ion-item>
</audio-track>
</div>
</ion-content>Here, we are using several custom components provided by “ionic-audio” plugin. This includes the play/stop button, progress bar, track setting, etc. You can see that I am using the *ngIf directive to hide/show the elements when a certain condition is fulfilled—that is, when the custom song is loaded properly from the source/path. The rest shouldn’t be hard to understand.
Now, in your “app.module.ts”, you need to first import the module:
import { IonicAudioModule } from 'ionic-audio/dist';And then, you need to add it in “imports” array like following:
imports: [
   IonicModule.forRoot(MyApp),
    IonicAudioModule.forRoot()
 ],
As we are using custom components, we need to add “CUSTOM_ELEMENTS_SCHEMA” to the “schemas” array otherwise your console will give errors. First import the “CUSTOM_ELEMENTS_SCHEMA”:
import { CUSTOM_ELEMENTS_SCHEMA } from '@angular/core';

and then add it in an array “schemas” (we need to create it):

…

providers: [CustomTrack, {provide: ErrorHandler, useClass: IonicErrorHandler}],

schemas: [ CUSTOM_ELEMENTS_SCHEMA ]
You can do “ionic serve” to see the results.
If you have trouble following the code, then you can read the source code here (https://github.com/danyalzia/ionic2-audio-play).
Web Audio API
You can also use the Web Audio API, but we want to make the experience as native like as possible so we used the plugins for accessing the hardware’s audio functionality. Unlike HTML5 Audio, this API allows you choose different audio sources, add effects to the audi, create visualizations, apply spatial effects, and much more. Basically, it’s a very advanced audio library with many audio manipulation features.
I am not going to cover this API here, as that would require a whole new article plus there is no TypeScript support for the API as far as I know. Just know that it’s an alternative to the libraries we used earlier if you want to implement the media functionality through JavaScript code. You can read more about it here (https://developer.mozilla.org/en-US/docs/Web/API/Web_Audio_API).
Actually, there is a very mature Ionic 2 project that uses the Web Audio API, you should check it out here (https://github.com/tracktunes/ionic-recorder).
Conclusion
There is no doubt that the support for native plugins has been on the rise since the recent hype of Ionic 2 that is still increasing. The easier it is to access the native functionality for a beginning developer, the better it is for them to quickly cope with new changes in Ionic 2. This results in them being likely to choose Ionic 2 for trying to create their next big commercial application.
If you have any question, then please ask in the comment section below!
Recent Stories


Top DiscoverSDK Experts


Featured Products


Compare Products
Select up to three two products to compare by clicking on the compare icon () of each product.
{{compareToolModel.Error}}
{{CommentsModel.TotalCount}} Comments
Your Comment