Sponsors


10 Interesting Python Modules to Learn in 2016
In this article I will give you an introduction into some Python modules I think of as useful. Naturally this can vary in your case but anyway it is a good idea to look at them, maybe you will use them in the future.
I won't give a thorough introduction for each module because it would blow-up the boundaries of this article. However I will try to give you a fair summary on the module: what id does and how you can use it in the future if you are interested. For a detailed introduction you have to wait for either future articles which explain these libraries in more depth or you have to search the web to find resources. And there are plenty of good resources out there.

In some languages static typing is the only way to go. In Python there is dynamic typing which means once a variable has assigned a value of a given type (int for example) it can later become a value which is from another type (string). However in some applications this leads to errors because code blocks expect values from a given type and you pass in something else instead.
Python 3.5 introduced the standard for type annotations where you can annotate your code to display what type the function parameters should have and what type the function returns for example. However type checking is only an annotation which you see in the code but is removed when this code gets executed.
>>> def add(a: int, b: int) -> int:
...     return a+b
...
The example function above adds two variables. The type hint shows that the expected numbers are from type int and the result is an int too.
To demonstrate that the type hints are only for the developers let's call this function:
>>> add(1, 5)
6
>>> add('a', '3')
'a3'
There is no problem if you provide other types to the function as long as Python can use the + operator on both variables.
Now mypy is a library which looks for such type hints and gives you warnings if you try to call a function with the wrong type. Even if your static type checking with mypy fails you can run your application with your interpreter of choice.
Let's convert the example above to a Python module and call it typing_test.py:
__author__ = 'GHajba'

def add(a: int, b: int) -> int:
    return a + b

if __name__ == '__main__':
    print(add(1, 5))
    print(add('a', '3'))
As you can see, I call the function with the same parameters as previously and I expect that I get some type warnings:
mypy typing_test.py
typing_test.py:6: error: Argument 1 to "add" has incompatible type "str"; expected "int"
typing_test.py:6: error: Argument 2 to "add" has incompatible type "str"; expected "int"
And yes, there it is. If I run the script (as mentioned above) it executes:
python3 typing_test.py
6
a3
An interesting (and in my eyes not a very good) result comes when you execute type checking on a file which has no type errors: you get no output. I would expect at least one line telling me that 0 errors were found. To satisfy my needs I have to run mypy with the -v flag for verbose mode however this gives too much information and if you get some errors the screen is full with data you are not interested in. I hope this will change in a future version, I am currently using 0.4.3.
You can find a quick documentation about mypy at https://github.com/python/mypy (including how to install this library).
Nose (https://readthedocs.org/) is a testing library. As their homepage states: "nose is nicer testing for python". And their tagline is: "nose extends unit test to make testing easier."
And I know you do not want to write unit tests. You are a Python developer who is a rebel and does not want to compile with Java-like developers who have to write tests to get their code accepted.
Anyway I do not want to go into detail that you must or don't have to write tests (sometimes I even don't test my Java code) but sometimes it is a good approach to write tests -- the best use case for this is when you write a complex block of code. So let's install nose:
pip install noseFor an example let's create a module to test and call it overcomplicated.py:
author__ = 'GHajba'

def multiply(a, b):
    if a == 0:
        return 0
    return a + multiply(a-1, b)
As the name mentions this module contains overcomplicated things and, well, the contents are really over-complicated. Now we want to test this module. For this let's create a simple test file and call it overcomplicated_test.py (and I know there are errors in the assertion but they are there for good):
from overcomplicated import multiply
__author__ = 'GHajba'

def test_simple():
    assert multiply(3, 4) == 12

def test_with_0():
    assert multiply(0, 0) == 1
    assert multiply(0, 12) == 0
    assert multiply(45, 0) == 0
    assert multiply(-3, 0) == 0

def test_negative():
    assert multiply(-1, 3) == -3
    assert multiply(-9, -2) == 18
    assert multiply(42, -3) == -125
Well, the test itself is not as complicated as the module to test but this is good for a simple introduction. We test here some corner cases like multiplying with 0, multiplying 0 and multiplication with negative numbers.
Now let's see how we can utilize nose and why it is useful for testing:
nosetest overcomplicated_test.pyIf you run the test above you will get an error and one failed test. And these tests test negative numbers. Why is this?
File "/Users/GHajba/dev/python/overcomplicated.py", line 4, in multiply
  return b + multiply(a-1, b)
File "/Users/GHajba/dev/python/overcomplicated.py", line 4, in multiply
  return b + multiply(a-1, b)
File "/Users/GHajba/dev/python/overcomplicated.py", line 2, in multiply
if a == 0:
RecursionError: maximum recursion depth exceeded in comparison

----------------------------------------------------------------------
Ran 3 tests in 0.018s

FAILED (errors=2)
That's because of the stop-condition in the multiply function: the recursion stops if a has the value of 0. However with negative multiplier there is a problem.
Now let's correct the script and re-run the tests:
.FF
======================================================================
FAIL: overcomplicated_test.test_with_0
----------------------------------------------------------------------
Traceback (most recent call last):
  File "/Library/Frameworks/Python.framework/Versions/3.5/lib/python3.5/site-packages/nose/case.py", line 198, in runTest
    self.test(*self.arg)
  File "/User/GHajba/dev/python/overcomplicated_test.py", line 7, in test_with_0
    assert multiply(0,0) == 1
AssertionError

======================================================================
FAIL: overcomplicated_test.test_negative
----------------------------------------------------------------------
Traceback (most recent call last):
  File "/Library/Frameworks/Python.framework/Versions/3.5/lib/python3.5/site-packages/nose/case.py", line 198, in runTest
    self.test(*self.arg)
  File "/Users/GHajba/dev/python/overcomplicated_test.py", line 15, in test_negative
    assert multiply(42, -3) == -125
AssertionError

----------------------------------------------------------------------
Ran 3 tests in 0.001s

FAILED (failures=2)
The 2 failures are there however now it is not a problem with recursion. As you can see, the test is failing but it shows you the spots where the errors happened. Now let's fix all the errors in the tests and run the script again:
nosetests -v overcomplicated_test.py
overcomplicated_test.test_simple ... ok
overcomplicated_test.test_with_0 ... ok
overcomplicated_test.test_negative ... ok

----------------------------------------------------------------------
Ran 3 tests in 0.001s
OK
Now we are done and all tests are finished without errors. The -v flag tells nose to display a verbose result on the tests which were executed.
This is a module which comes with your Python installation. This library arrived in this article because it is useful if you just want to start a simple HTTP server where you can try your homepage and see if the internal links are working.
To start a server just execute the following command from your command line:
python -m http.serverNote that this module is only available in Python 3. Well, this sentence is not fully true, the server is available for Python 2 too but it has to be used in a bit different way:
python -m SimpleHTTPServerThe default port both versions listen to is 8000. If you want to use a different port (like 8080) you can put the port number at the end of the starting command.
For Python 3 it looks like this:
python -m http.server 8080And for Python 2 like this:
python -m SimpleHTTPServer 8080If the server is running, you can see all the requests logged to the console (if you do not redirect the output into a file of course). This gives you an opportunity to see if the template you downloaded for free does not contain a malicious part where you are redirected or getting unwanted content.

Sometimes you have data that you want to display to your users in an application or just want to create nice graphics from it and showcase it in a document.
For this I suggest using the matplotlib Python library. The best way to demonstrate this is with a simple example where we display functions because functions may be easily calculated and they have a lot of data.
We will display the x^2 function between -3 and 3. One way would be to utilize NumPy (another Python library which helps with large mathematical calculations in an easy way) however in that case I would have to introduce that module too. Therefore I use a simple "hack" and create my data as a range:
import matplotlib.pyplot as pltauthor__ = 'GHajba'
x_axis = [x for x in range(-3,4)]
y_axis = [x * x for x in x_axis]
plt.plot(x_axis, y_axis)
plt.show()
If you know mathematical functions and the range Python function you will know that the mathematical function works on every rational number but the range function creates only integers. And yes, the displayed image is not what we imagine:
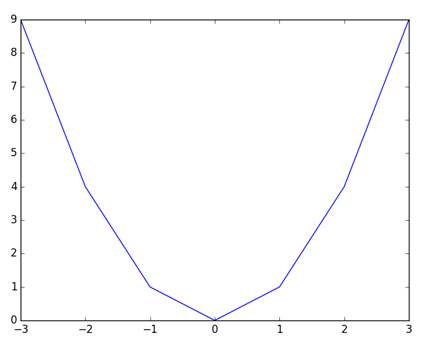
To fix this we could create a range of rational numbers -- or we can display only the distinct integers. Let's do this second version because in this case we move out from the defaults of matplotlib.
The only thing to change here is the plt.plot function to the following line:
plt.scatter(x_axis, y_axis)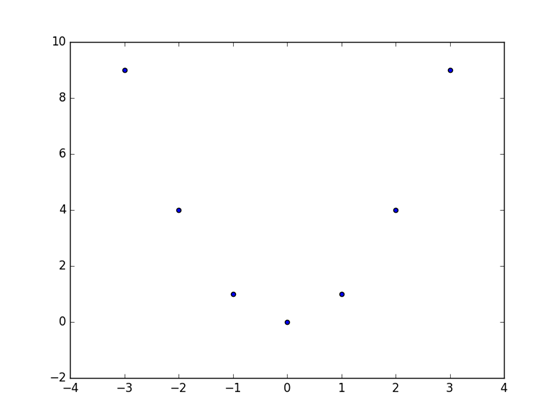
Now it is time to explain a bit what we have done: generating the axis' data is easy to understand: we have the numbers of the x axis and apply our function on each of these numbers to have the data of the y axis.
The interesting parts are the plt.plot or plt.scatter functions. The first function displays a simple plot where each data point is connected with a line and the second displays a scatter-plot where only the distinct data-points are displayed.
The plt.show() function is needed to display the generated plot.
Naturally you can create some more plot types with matplotlib like bar plots, pie charts, quiver plots and so on.
The documentation of the library is very good and you can find a lot of resources on the internet if you want to dig deeper into displaying data with Python in a better understandable way.
The documentation of matplotlib can be found here: http://matplotlib.org/

It can happen that you get a job inquiry where you need to interact with the Internet in order to get some website information, and send out
specific requests based on it. In such a situation you can use some default Python library like urllib but it has its limitations in readability and in the end your code will become too complex.
A very good alternative to leverage complexity and maintain readability is to use the Requests(http://www.discoversdk.com/products/requests) module. As their statement on their homepage tells us: "Requests: HTTP for Humans". And this well describes what the developers of this module try to achieve.
In this section I will only showcase what requests can do and will not compare it to different solutions with default Python tools.
A nice introductory example is always to gather some JSON data from various APIs because it returns structured data which is easy to read.
r = requests.get('http://httpbin.org/get')
print(r.status_code)
print(r.headers['content-type'])
print(r.encoding)
print(r.json())
This basic example goes up to HTTPBin and requests user information. As a result you get back a JSON string which you can parse or just simply print to the console as I do in the example. HTTPBin is a nice site because it implements endpoints for the various HTTP requests. It is a good place to go to if you just want to try out your request-response handling.
You can naturally do other requests not just GET but POST, PUT, DELETE, HEAD and OPTIONS with the requests library.
And beside such basic requests you can provide additional information to a request like custom headers to send, cookies to add to the request or data for POST requests.
Why would someone send custom headers or even cookies? Well, that's because some websites filter for scraping bots. Those bots either do not use allowed user agents (which is sent in the request's header) or they do not send any information regarding this. In this case you can get your own header information and give it to the request.
Cookies are used if you communicate with a given website in a logged-in session where you have to send your authentication token every time you file a request. Here is one option to extract this token after authentication from the response's cookie jar or use session which is a sub-module of requests and handles such sessions for you where the cookies are sent to the server automatically.
The documentation of the Requests module can be found here: http://docs.python-requests.org/en/master/
PeeWee
![]()
PeeWee (https://github.com/coleifer/peewee) is an ORM (Object-Relational Mapping) framework which comes in handy if you have an application where you have to fill data from objects (from class representations) to a relational database and vice versa.
Because it is easy to learn and use it can be a good alternative to SQLAlchemy if you just want to create a proof-of-concept in a short time.
import peewee

__author__ = 'GHajba'

db = peewee.SqliteDatabase('my_app.db')

class Book(peewee.Model):
    author = peewee.CharField()
    title = peewee.TextField()

    class Meta:
        database = db


if __name__ == '__main__':
    db.connect()
    Book.create_table(True)
    book = Book(author='Gabor Laszlo Hajba', title='Python 3 in Anger')
    book.save()
    for book in Book.filter(author="Gabor Laszlo Hajba"):
        print(book.title)
    db.close()
In the basic example above I create a database table, fill it with data and extract the contents of the table. Let's see how it is done in detail.
The
db = peewee.SqliteDatabase('my_app.db') line initializes an object with a database connection. It is an SQLite database in the same folder where you run the script (if it is not present it will be created).
The class Book describes the model which we want to map into the database. It extends peewee.Model which makes it available for ORM. This model has two fields which are both text representations. Naturally in a real-life example authors would be another model and the reference would be done through foreign keys.
The Meta class inside our model class tells peewee which database configuration to use.
In the main part of the script I create a table through the model definition. The parameter provided tell peewee to ignore if the table already exists.
Creating a book happens through the constructor of the model class. It accepts keyword arguments where the keys correspond to the model's fields.
Calling the save() method on the newly created object will persist the information into the database.
In the for loop I display all books' titles where the author field matches the provided string.
If you run this sample application it will display Python 3 in Anger as many times as you have started this example script.
Naturally this is only the beginning where PeeWee can take you. My intention in adding this library to this article was to expand your library-set for ORM because SQLAlchemy is not the only way to map objects into relational databases.
PyGame
![]()
PyGame (http://www.pygame.org/download.shtml) is a library for creating games. I won't introduce the whole library in this article because I could write a book because there are so many options (and actually there are some books already out there which introduce you to PyGame). However I will give you a brief introduction how to install and run it with a simple example.
And by brief I mean really brief.
Installing the library is easy: pip install pygame. Here I have to mention that the last final stable release came out in 2009. Now it is in development again and the current (5th August 2016) available version is 1.9.2b8. I hope it will be released soon. From version 1.9.2 PyGame supports Python 3.2 and up therefore my examples are written in Python 3.5.
import pygame
from pygame.locals import *

__author__ = 'GHajba'

clock = pygame.time.Clock()

screen = pygame.display.set_mode((screen_width, screen_height))
pokemon = pygame.image.load('drowzee.png')

position = (start_x, start_y)
while True:
clock.tick(40)
    screen.fill(BLACK)

    for event in pygame.event.get():
        if not hasattr(event, 'key'):
            continue
        if event.key == K_ESCAPE:
            exit(0)

    position = (position[0] + speed, position[1])
    screen.blit(pokemon, position)
    pygame.display.flip()
    if position[0] > screen_width or position[0] < start_x:
        pokemon = pygame.transform.flip(pokemon, True, False)
        speed = -1 * speed
This is a basic example where we take an image and move it around the screen. Because Pokémon Go is currently all the hype, I have taken a Pokémon to showcase it here. Note that some of the code have been removed to show only the interesting parts.
I think this example is pretty straightforward. Where it needs some explaining is inside the endless loop. The clock.tick tells PyGame how much frames per second the application has (technically it tells the library to pause until 1/40th of a second has passed and with this it limits the number of ticks to 40 per second).
Filling the screen in black is to remove previous renderings from the screen. If you do not include this line you may end-up with something like this when running your code:

Bad for the app, isn't it?
Anyway, the most important part of this code above is inside the for loop. That's because it controls event handling from outside. It looks only for key events and if it is the Esc key (top left on your keyboard) it exits. Naturally you can handle here other keys or mouse clicks which could influence the displayed information (moving the Pokémon only when the user presses a key or clicks with the mouse).
The code-part after the event handling takes care of moving the image around the screen from left-to-right. If it reaches the right edge it flips the image and makes it move from right-to-left. And it goes on and on and on and... Until the user press the Esc key.
You can read more about PyGame at their website: http://www.pygame.org/docs/

As the name already suggests, prettytable (https://pypi.python.org/pypi/PrettyTable) is a table printing library which displays the contents of the table as a pretty formatted table on the console. Let's see an example:
>>> from prettytable import PrettyTable
>>>
>>> table = PrettyTable(['food','price'])
>>> table.add_row(['ham','$2'])
>>> table.add_row(['eggs','$1'])
>>> table.add_row(['spam','$4'])
>>> print(table)
+------+-------+
| food | price |
+------+-------+
| ham  |   $2  |
| eggs |   $1  |
| spam |   $4  |
+------+-------+
Beside this basic usage you can sort by the columns of the tables. Let's sort by the price column:
>>> table.sortby = 'price'
>>> print(table)
+------+-------+
| food | price |
+------+-------+
| eggs |   $1  |
| ham  |   $2  |
| spam |   $4  |
+------+-------+
And here it goes: a pretty table sorted by the second column. Note that the sort in the price column is alphabetical sorting. That's because the column contains strings.
Another option where you can use this library is to display dictionary contents pretty:
>>> from prettytable import PrettyTable
>>>
>>> d = {'ham':2, 'eggs':1, 'spam':4}
>>> table = PrettyTable(['food', 'price'])
>>> for key, value in d.items():
...     table.add_row([key, value])
...
>>> print(table)
+------+-------+
| food | price |
+------+-------+
| ham  |   2   |
| eggs |   1   |
| spam |   4   |
+------+-------+
>>> table.sortby = 'price'
>>> print(table)
+------+-------+
| food | price |
+------+-------+
| eggs |   1   |
| ham  |   2   |
| spam |   4   |
+------+-------+
Naturally this introduction scratches the features of this library, you can find more information in the documentation, like how to change the alignment of the columns or how to display your table as HTML markup. The documentation can be found here: https://ptable.readthedocs.org/

Progressbar (https://pypi.python.org/pypi/progressbar) is a little tool where you can display a progress of your console application. I think there is not much more I can tell you because I think you get the idea. However there are many use cases where you can use this library, let's see some.
The easiest example is to wrap a list inside the progress bar and let it do it's magic:
>>> from time import sleep
>>> from progressbar import ProgressBar
>>>
>>> bar = ProgressBar()
>>> for i in bar(range(50)):
...     sleep(0.5)
...
 32% (16 of 50) |###################                                          | Elapsed Time: 0:00:08 ETA: 0:00:17
As you can see (with this long sleep) it takes quite some time to get the bar filled up. And what you won't see so clearly is that the library supports screen resizing. This means that the output is always displayed on one line. If you have a smaller screen then it will be displayed in that small line, if you have a wider screen then the result will be broader using the whole screen width.
Note that in the example above you cannot re-use the bar variable because it iterated over the complete list. If you try to do that you will get an exception:
100% (50 of 50) |############################################################| Elapsed Time: 0:00:25 Time: 0:00:25
>>> for i in bar(range(50)):
...     sleep(0.5)
...
Traceback (most recent call last):
  File "<stdin>", line 1, in <module>
  File "/Library/Frameworks/Python.framework/Versions/3.5/lib/python3.5/site-packages/progressbar/bar.py", line 387, in __next__
    self.update(self.value + 1)
  File "/Library/Frameworks/Python.framework/Versions/3.5/lib/python3.5/site-packages/progressbar/bar.py", line 496, in update
    % (self.min_value, self.max_value))
ValueError: Value out of range, should be between 0 and 50
To solve this, you have to create a new instance of the ProgressBar class.
Progressbar comes in two different flavors: the original version does not support Python 3 therefore you have to install the library called progressbar2 with pip if you use Python 3. For Python 2 pip install progressbar is fine.
The Python 2 version is a bit different: it does not display the elapsed time nor an ETA.

At some point in your development career you will reach the conclusion that you need universally unique identifiers. For example you want to send out promotion codes and want to ensure that everyone gets a unique code -- and do not want that some users could re-use the codes of others by guessing it.
For this comes the uuid module which ships with Python. It implements the versions 1, 3, 4 and 5 of the UUID (https://docs.python.org/3/library/uuid.html) standards. This means you have quite some options to get things rolling.
I am not going into the details of the four implemented standards but I suggest you use uuid.uuid4() if you require some unique and random UUID. The uuid.uuid1() function contains the computer's network address that is quite problematic privacy-wise. I hope you won't be angry if I do not provide example results where you can see that it really contains the address (thus the UUIDs generated have very much in common). Just execute the following in your interactive interpreter:
>>> from uuid import uuid1
>>> for i in range(5):
...     print(uuid1())
...
For comparison, let's take a look at uuid4:
>>> from uuid import uuid4
>>> for i in range(5):
...     print(uuid4())
...
3d6031d8-e52f-42d9-9946-e4097b76afda
531d2050-b7cf-4529-aa49-ec21c02c1463
6e3169eb-877e-436f-b92e-9e5ada080e19
29b58d6b-b94d-4a31-bd9d-3130558a931c
10df135f-771d-44dc-b110-896646869fdc
As you can see, here the UUIDs are really different and do not contain matching parts.
Conclusion
There are many more interesting Python modules out there. I have chosen these to give you some introduction to some modules you may have never encountered or you thought it would be too hard to get acquainted with.
Recent Stories


Top DiscoverSDK Experts


Compare Products
Select up to three two products to compare by clicking on the compare icon () of each product.
{{compareToolModel.Error}}
{{CommentsModel.TotalCount}} Comments
Your Comment